Project setup
Let's install rustup, this will install Rust and the Rust compiler for us. Now let's check everything is installed correctly using these two commands; the versions shouldn't matter too much so if yours are different don't worry about it.
$ rustc --version
rustc 1.40.0
$ cargo --version
cargo 1.40.0
Creating a project
Cargo is Rust's package manager, and we will use it to create our game project. Change into a directory where you'd like the game to live and run the following command, with this we will be creating a new project called rust-sokoban using cargo.
cargo init rust-sokoban
After the command has run you should see the following folder structure.
├── src
│   └── main.rs
└── Cargo.toml
We can now run cargo run in this directory and we should see something like this.
$ cargo run
   Compiling rust-sokoban v0.1.0
    Finished dev [unoptimized + debuginfo] target(s) in 1.30s
     Running `../rust-sokoban/target/debug/rust-sokoban`
Hello, world!
Making it a game
It's time to make this basic hello world project into a game! We are going to use ggez which is one of the popular 2D game engines out there.
Remember that Cargo.toml file we saw in our directory? That file is used for dependency management, so if we want to use any Rust crates we'll have to add them there. Let's add ggez as one of our dependencies.
MORE: Read more about Cargo and toml files here.
[dependencies]
ggez = "0.9.3"
Now let's run cargo run again and you should see something like this. It should take slightly longer this time as it will be fetching these new dependencies from crates.io, then compiling them and finally linking them into our lib.
cargo run
    Updating crates.io index
    Downloaded ....
    ....
    Compiling ....
    ....
    Finished dev [unoptimized + debuginfo] target(s) in 2m 15s
    Running `.../rust-sokoban/target/debug/rust-sokoban`
    Hello, world!
NOTE: If you're following this guide on Ubuntu, you might need to install a few more dependencies. If this step fails and you see errors related to
alsaandlibudev, install them by runningsudo apt-get install libudev-dev libasound2-dev.
Now let's actually use ggez in the main file and set up our window. This is just the simplest example of a ggez program that will give us a window with nothing else. Copy and paste this into the main.rs file and run again.
use ggez::{conf, event, Context, GameResult};
use std::path;

// This struct will hold all our game state
// For now there is nothing to be held, but we'll add
// things shortly.
struct Game {}

// This is the main event loop. ggez tells us to implement
// two things:
// - updating
// - rendering
impl event::EventHandler<ggez::GameError> for Game {
    fn update(&mut self, _context: &mut Context) -> GameResult {
        // TODO: update game logic here
        Ok(())
    }

    fn draw(&mut self, _context: &mut Context) -> GameResult {
        // TODO: update draw here
        Ok(())
    }
}

pub fn main() -> GameResult {
    // Create a game context and event loop
    let context_builder = ggez::ContextBuilder::new("rust_sokoban", "sokoban")
        .window_setup(conf::WindowSetup::default().title("Rust Sokoban!"))
        .window_mode(conf::WindowMode::default().dimensions(800.0, 600.0))
        .add_resource_path(path::PathBuf::from("./resources"));

    let (context, event_loop) = context_builder.build()?;
    // Create the game state
    let game = Game {};
    // Run the main event loop
    event::run(context, event_loop, game)
}
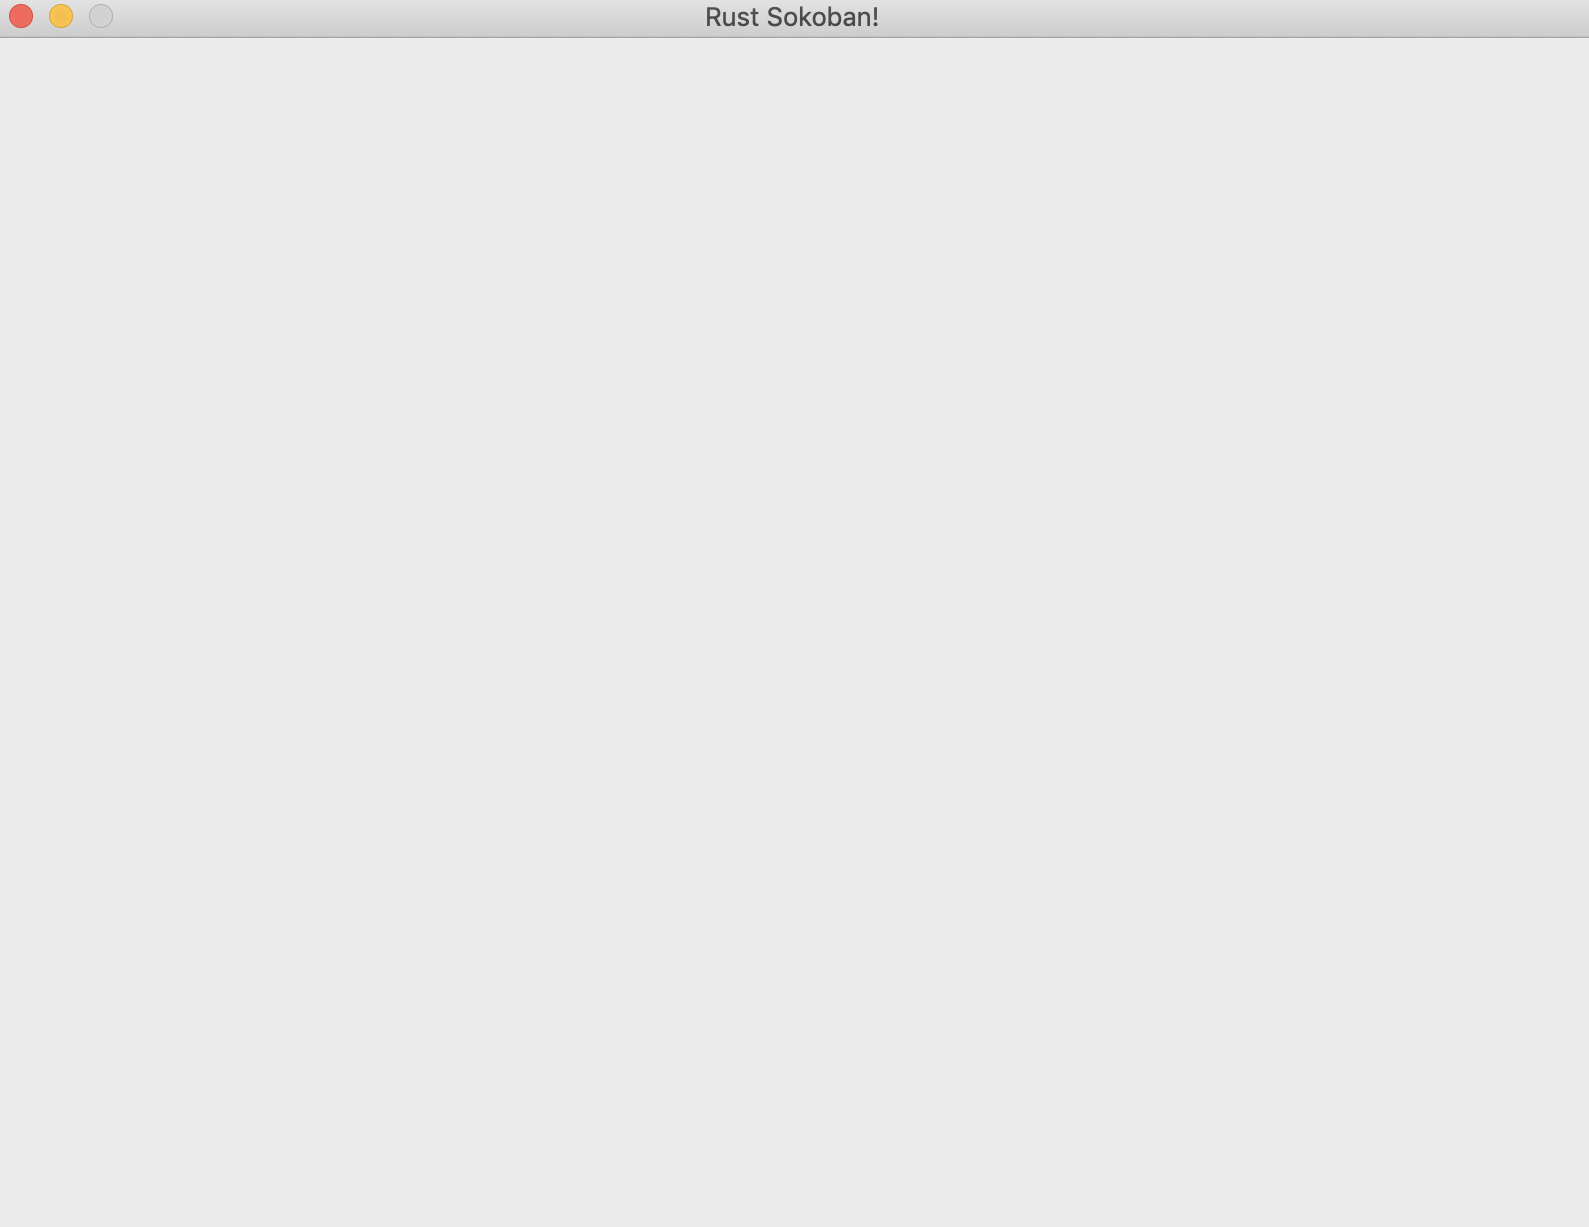
You should see something like this.
Basic concepts and syntax
Now that we have our basic window, let's delve into the code we have in main and understand the underlying Rust concepts and syntax.
Importing
Hopefully this should be a familiar concept from other languages you might know, but to bring types and namespaces into the scope from our dependent packages (or crates) we simply use them.
Declaring a struct
MORE: Read more about structs here.
Implementing a trait
A trait is much like an interface in other languages, it allows us to associate some behaviour with a particular type. In this case we want to implement the EventHandler trait and add that behaviour to our Game struct.
MORE: Read more about traits here.
Functions
We are also learning how to declare functions in Rust.
You might be wondering what the self is, in this case self means that the update function is a member function, it belongs to an instance of the game struct and it cannot be called in a static context.
MORE: Read more about functions here.
Mut syntax
You might also be wondering what the &mut is in the &mut self in the update function. Mutability of an object simply says whether or not that object can be modified or not. Check out the example below when declaring variables.
Now going back to the update function, when mut is used with self, it refers to the instance of the class that the function belongs to. Taking another example:
MORE: Read more about mutability here (this lecture uses Java but the concepts should apply to any language), and read more about Rust mutability and variables here.
After that gentle intro to Rust syntax and code, we are now ready to move on! See you in the next section!
CODELINK: You can see the full code in this example here.