Chapter 1: Base game
Welcome to Rust Sokoban!
What is Rust Sokoban?
Rust Sokoban is an extended tutorial on making a Sokoban copy in Rust. We'll use an existing 2D game engine, pre-made assets and by the end we'll have a fully working game.
Who made this book?
This book was written by @oliviff with the help of awesome contributors: Blaine, Ivan, cobans, Hector, Matt, Guilhermo and Christian.
Why Rust?
I started learning Rust in March 2019 and I've been making a game in Rust since. I've learnt a lot in the process about Rust, about making games, written a few blog posts and learnt a lot about the Rust gamedev ecosystem. This book is me writing it all up and hopefully helping more people get involved in Rust gamedev.
Do I need to know Rust to follow?
No, you don't need to know Rust! This book should be a good hands-on intro to making games in Rust, it will explain some of the syntax and basic Rust concepts, and it's meant to give you enough info that you can go read up more on your own about each topic and concept. I recommend you take everything in this book step by step and if there is anything you'd like to understand better there will usually be a link around to a resource that explains it in more detail. This book is not meant to be an in depth walkthrough of all of Rust's features, just a gentle introduction to the language doing a fun little task.
Book formatting
You'll see links like this which will point you to resources where you can learn more about the concepts introduced, either Rust or gamedev related.
MORE: Read more here.
You will also see links like this which will point to the full code in that chapter. Sometimes not all code will be included in the section, so check these out for details like imports, code order, etc.
CODELINK: You can see the full code in this example here.
Resources
If you find yourself in need of help or just want to ask a question, here are some good places:
- The Rust programming language book
- Rust learning by example
- Rust in motion course
- r/rust
- r/rustgamedev
- #rustlang
- @rustlang
- @rust_gamedev
One of the best things about Rust are the people behind it. There is an amazing community out there so please feel encouraged to reach out to any of us.
Now that we got the intro out of the way, let's get started making our first game in Rust (well, technically it will be my second, but hopefully your first).
Made with 🦀 and 🧡 by @oliviff
Project setup
Let's install rustup, this will install Rust and the Rust compiler for us. Now let's check everything is installed correctly using these two commands; the versions shouldn't matter too much so if yours are different don't worry about it.
$ rustc --version
rustc 1.40.0
$ cargo --version
cargo 1.40.0
Creating a project
Cargo is Rust's package manager, and we will use it to create our game project. Change into a directory where you'd like the game to live and run the following command, with this we will be creating a new project called rust-sokoban using cargo.
cargo init rust-sokoban
After the command has run you should see the following folder structure.
├── src
│   └── main.rs
└── Cargo.toml
We can now run cargo run in this directory and we should see something like this.
$ cargo run
   Compiling rust-sokoban v0.1.0
    Finished dev [unoptimized + debuginfo] target(s) in 1.30s
     Running `../rust-sokoban/target/debug/rust-sokoban`
Hello, world!
Making it a game
It's time to make this basic hello world project into a game! We are going to use ggez which is one of the popular 2D game engines out there.
Remember that Cargo.toml file we saw in our directory? That file is used for dependency management, so if we want to use any Rust crates we'll have to add them there. Let's add ggez as one of our dependencies.
MORE: Read more about Cargo and toml files here.
[dependencies]
ggez = "0.9.3"
Now let's run cargo run again and you should see something like this. It should take slightly longer this time as it will be fetching these new dependencies from crates.io, then compiling them and finally linking them into our lib.
cargo run
    Updating crates.io index
    Downloaded ....
    ....
    Compiling ....
    ....
    Finished dev [unoptimized + debuginfo] target(s) in 2m 15s
    Running `.../rust-sokoban/target/debug/rust-sokoban`
    Hello, world!
NOTE: If you're following this guide on Ubuntu, you might need to install a few more dependencies. If this step fails and you see errors related to
alsaandlibudev, install them by runningsudo apt-get install libudev-dev libasound2-dev.
Now let's actually use ggez in the main file and set up our window. This is just the simplest example of a ggez program that will give us a window with nothing else. Copy and paste this into the main.rs file and run again.
use ggez::{conf, event, Context, GameResult};
use std::path;

// This struct will hold all our game state
// For now there is nothing to be held, but we'll add
// things shortly.
struct Game {}

// This is the main event loop. ggez tells us to implement
// two things:
// - updating
// - rendering
impl event::EventHandler<ggez::GameError> for Game {
    fn update(&mut self, _context: &mut Context) -> GameResult {
        // TODO: update game logic here
        Ok(())
    }

    fn draw(&mut self, _context: &mut Context) -> GameResult {
        // TODO: update draw here
        Ok(())
    }
}

pub fn main() -> GameResult {
    // Create a game context and event loop
    let context_builder = ggez::ContextBuilder::new("rust_sokoban", "sokoban")
        .window_setup(conf::WindowSetup::default().title("Rust Sokoban!"))
        .window_mode(conf::WindowMode::default().dimensions(800.0, 600.0))
        .add_resource_path(path::PathBuf::from("./resources"));

    let (context, event_loop) = context_builder.build()?;
    // Create the game state
    let game = Game {};
    // Run the main event loop
    event::run(context, event_loop, game)
}
You should see something like this.
Basic concepts and syntax
Now that we have our basic window, let's delve into the code we have in main and understand the underlying Rust concepts and syntax.
Importing
Hopefully this should be a familiar concept from other languages you might know, but to bring types and namespaces into the scope from our dependent packages (or crates) we simply use them.
#![allow(unused)]
fn main() {
// this will import conf, event, Context and GameResult from the ggez namespace
use ggez::{conf, event, Context, GameResult};
}
Declaring a struct
#![allow(unused)]
fn main() {
// This struct will hold all our game state
// For now there is nothing to be held, but we'll add
// things shortly.
struct Game {}
}
MORE: Read more about structs here.
Implementing a trait
A trait is much like an interface in other languages, it allows us to associate some behaviour with a particular type. In this case we want to implement the EventHandler trait and add that behaviour to our Game struct.
#![allow(unused)]
fn main() {
// This is the main event loop. ggez tells us to implement
// two things:
// - updating
// - rendering
impl event::EventHandler<ggez::GameError> for Game {
    fn update(&mut self, _context: &mut Context) -> GameResult {
        // TODO: update game logic here
        Ok(())
    }

    fn draw(&mut self, _context: &mut Context) -> GameResult {
        // TODO: update draw here
        Ok(())
    }
}
}
MORE: Read more about traits here.
Functions
We are also learning how to declare functions in Rust.
#![allow(unused)]
fn main() {
    fn update(&mut self, _context: &mut Context) -> GameResult {
        // TODO: update game logic here
        Ok(())
    }
}
You might be wondering what the self is, in this case self means that the update function is a member function, it belongs to an instance of the game struct and it cannot be called in a static context.
MORE: Read more about functions here.
Mut syntax
You might also be wondering what the &mut is in the &mut self in the update function. Mutability of an object simply says whether or not that object can be modified or not. Check out the example below when declaring variables.
#![allow(unused)]
fn main() {
let a = 10; // a cannot be changed because it's not declared as mutable
let mut b = 20; // b can be changed because it's declared as mutable
}
Now going back to the update function, when mut is used with self, it refers to the instance of the class that the function belongs to. Taking another example:
#![allow(unused)]
fn main() {
// Simple struct X with a num variable inside
struct X {
    num: u32
}

// Implementation block for X
impl X {
    fn a(&self) { self.num = 5 }
    // a cannot modify the instance of x here because
    // of the &self, this will not compile

    fn b(&mut self) { self.num = 5 }
    // b can modify the instance of x here because
    // of the &mut self, this part will compile
}
}
MORE: Read more about mutability here (this lecture uses Java but the concepts should apply to any language), and read more about Rust mutability and variables here.
After that gentle intro to Rust syntax and code, we are now ready to move on! See you in the next section!
CODELINK: You can see the full code in this example here.
Entity Component System
In this section we will discuss Sokoban in more detail and how we will architect our game.
Sokoban
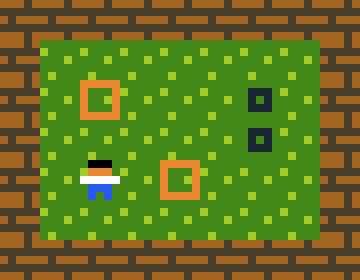
Here is how a Sokoban game looks like, if you are not familiar with the gameplay already. We have walls and boxes, and the goal is for the player to move the boxes onto their spots by pushing them around.
ECS
ECS (Entity Component System) is an architectural pattern for writing games which follows the composition over inheritance principle. We will be using ECS heavily in this project, much like most Rust games, so let's spend a bit of time familiarizing ourselves with the key concepts:
- Components - data-only structs which hold different characteristics of entities: some examples of components: Position, Renderable, Movement, etc. The key part here is that this is pure data, no behaviour.
- Entities - entities are made up of multiple components, for example a player might be made up by Position, Renderable & Movement, while the floor might just be Position & Renderable since it doesn't move. Entities are pretty much just dummy containers of one or more components with a unique identifier.
- Systems - systems use entities and components and contain behaviour and logic based on that data. For example, you could have a rendering system which just iterates through all entities which contain renderable components and draws all of them. The key here is that the components themselves don't contain any behaviour, instead they use a system to interpret the data and act.
If that doesn't make sense yet don't worry, we will discuss some practical examples in the next section applied to our Sokoban game.
Sokoban architecture
Based on what we know now about how a Sokoban game should work, we will need a few different types of "things": walls, a player, floors, boxes and box spots. These will be our entities.
Now we have to identify what these entities will be made of, or what components we need. Well first of all we will need to keep track of where everything is on the map, so we need some sort of position component. Secondly, some (but not all) entities can move. The player can move around, but boxes can also move if they get pushed by the player. Finally, we need a way to render each entity, so we need some renderable component.
Here is how our first idea of entities and components looks like:
- Player entity: Position, Renderable, Movable
- Wall entity: Position, Renderable
- Floor entity: Position, Renderable
- Box entity: Position, Renderable, Movable
- Box spot entity: Position, Renderable
At first thinking in ECS might be difficult, so don't worry if you don't understand everything yet or if this doesn't seem familiar with the way you've done things in other languages.
Hecs
Finally, let's bring in an ECS crate. There are a ton of them out there, but we will use hecs for this book.
[dependencies]
ggez = "0.9.3"
hecs = "0.10.5"
Next up, we'll start implementing entities and components!
CODELINK: You can see the full code in this example here.
Components and entities
In this section we will create our components which we will then use in the hecs world.
Defining components
Let's start by defining components. We previously discussed Position, Renderable and Movement - we'll skip movement for now. We will also need some components to identify each entity - for example we will need a Wall component so we can identify an entity as a wall by the fact that it has a wall component.
This should hopefully be straight-forward, the position components stores the x, y and z coordinates which will tell us where something is on the map, and the renderable component will receive a string path pointing to an image which we can render. All other components are marker components. The name marker component sounds pretty intimidating but it's essentially just a tag which has no other data fields.
#![allow(unused)]
fn main() {
#[allow(dead_code)]
pub struct Position {
    x: u8,
    y: u8,
    z: u8,
}

#[allow(dead_code)]
pub struct Renderable {
    path: String,
}

pub struct Wall {}

pub struct Player {}

pub struct Box {}

pub struct BoxSpot {}

}
Creating entities
An entity is simply a numeric identifier tied to a set of components. So the way we'll create entities is by simply specifying which components they contain.
This is how entity creation looks now.
#![allow(unused)]
fn main() {
pub fn create_wall(world: &mut World, position: Position) -> Entity {
    world.spawn((
        Position { z: 10, ..position },
        Renderable {
            path: "/images/wall.png".to_string(),
        },
        Wall {},
    ))
}
pub fn create_floor(world: &mut World, position: Position) -> Entity {
    world.spawn((
        Position { z: 5, ..position },
        Renderable {
            path: "/images/floor.png".to_string(),
        },
    ))
}

pub fn create_box(world: &mut World, position: Position) -> Entity {
    world.spawn((
        Position { z: 10, ..position },
        Renderable {
            path: "/images/box.png".to_string(),
        },
        Box {},
    ))
}

pub fn create_box_spot(world: &mut World, position: Position) -> Entity {
    world.spawn((
        Position { z: 9, ..position },
        Renderable {
            path: "/images/box_spot.png".to_string(),
        },
        BoxSpot {},
    ))
}

pub fn create_player(world: &mut World, position: Position) -> Entity {
    world.spawn((
        Position { z: 10, ..position },
        Renderable {
            path: "/images/player.png".to_string(),
        },
        Player {},
    ))
}
}
Assets
You might have noticed we are referencing the assets we will be using above in the entity creation. You are free to create your own assets or download the ones I am using which you can find right below (simply right click and save as image).


Let's add the images to our project. We'll add a resources folder which will hold all our resources, for now this will only be images but in the future we will have other types of resources, like configuration files and/or audio files (keep going and you'll learn all about playing sounds in Chapter 3.3 - Sounds and events). We'll also add an images folder and place our pngs there, it should look like something like this. You can also use a different folder structure if you wish so, just make sure to use the right paths further down in this section when we'll be using the images.
├── resources
│   └── images
│       ├── box.png
│       ├── box_spot.png
│       ├── floor.png
│       ├── player.png
│       └── wall.png
├── src
│   └── main.rs
└── Cargo.toml
World creation
Finally, let's tie everything together. We'll need to create a hecs::World object, we'll add that to our Game struct and we will initialize it first thing in our main. Here is the full code, running now should render the same blank window, but we've made tremendous progress in actually setting up our game components and entities! Next up, we'll get to rendering so we'll finally see something on screen!
pub fn main() -> GameResult {
    let world = World::new();

    // Create a game context and event loop
    let context_builder = ggez::ContextBuilder::new("rust_sokoban", "sokoban")
        .window_setup(conf::WindowSetup::default().title("Rust Sokoban!"))
        .window_mode(conf::WindowMode::default().dimensions(800.0, 600.0))
        .add_resource_path(path::PathBuf::from("./resources"));

    let (context, event_loop) = context_builder.build()?;

    // Create the game state
    let game = Game { world };
    // Run the main event loop
    event::run(context, event_loop, game)
}
Note that running now will report some warnings in the console about unused import(s) and/or fields, don't worry about these just yet as we'll fix them in the coming chapters.
CODELINK: You can see the full code in this example here.
Rendering system
It's time for our first system, the rendering system. This system will be responsible for drawing all our entities on the screen.
Rendering system setup
First we'll start with a blank implementation, something like this:
#![allow(unused)]
fn main() {
pub fn run_rendering(world: &World, context: &mut Context) {
        // TODO add implementation
}
}
Finally let's run the rendering system in our draw loop. This means that every time the game updates we will render the latest state of all our entities.
#![allow(unused)]
fn main() {
impl event::EventHandler<ggez::GameError> for Game {
    fn update(&mut self, _context: &mut Context) -> GameResult {
        Ok(())
    }

    fn draw(&mut self, context: &mut Context) -> GameResult {
        // Render game entities
        {
            run_rendering(&self.world, context);
        }

        Ok(())
    }
}
}
Running the game now should compile, but it will probably not do anything yet, since we haven't filled in any of the implementation of the rendering system and also we haven't created any entities.
Rendering system implementation
Note: We're going to add glam as a dependency here that is a simple and fast 3D library that offers some performance improvements.
[dependencies]
ggez = "0.9.3"
glam = { version = "0.24", features = ["mint"] }
Here is the implementation of the rendering system. It does a few things:
- clear the screen (ensuring we don't keep any of the state rendered on the previous frame)
- get all entities with a renderable component and sort them by z (we do this in order to ensure we can render things on top of each other, for example the player should be above the floor, otherwise we wouldn't be able to see them)
- iterate through sorted entities and render each of them as an image
- finally, present to the screen
#![allow(unused)]
fn main() {
fn run_rendering(world: &World, context: &mut Context) {
    // Clearing the screen (this gives us the background colour)
        let mut canvas =
        graphics::Canvas::from_frame(context, graphics::Color::from([0.95, 0.95, 0.95, 1.0]));

    // Get all the renderables with their positions and sort by the position z
    // This will allow us to have entities layered visually.
    let mut query = world.query::<(&Position, &Renderable)>();
    let mut rendering_data: Vec<(Entity, (&Position, &Renderable))> = query.into_iter().collect();
    rendering_data.sort_by_key(|&k| k.1 .0.z);

    // Iterate through all pairs of positions & renderables, load the image
    // and draw it at the specified position.
    for (_, (position, renderable)) in rendering_data.iter() {
        // Load the image
        let image = Image::from_path(context, renderable.path.clone()).unwrap();
        let x = position.x as f32 * TILE_WIDTH;
        let y = position.y as f32 * TILE_WIDTH;

        // draw
        let draw_params = DrawParam::new().dest(Vec2::new(x, y));
        canvas.draw(&image, draw_params);
    }

    // Finally, present the canvas, this will actually display everything
    // on the screen.
    canvas.finish(context).expect("expected to present");
}
}
Add some test entities
Let's create some test entities to make sure things are working correctly.
#![allow(unused)]
fn main() {
// Initialize the level
pub fn initialize_level(world: &mut World) {
    create_player(
        world,
        Position {
            x: 0,
            y: 0,
            z: 0, // we will get the z from the factory functions
        },
    );
    create_wall(
        world,
        Position {
            x: 1,
            y: 0,
            z: 0, // we will get the z from the factory functions
        },
    );
    create_box(
        world,
        Position {
            x: 2,
            y: 0,
            z: 0, // we will get the z from the factory functions
        },
    );
}
}
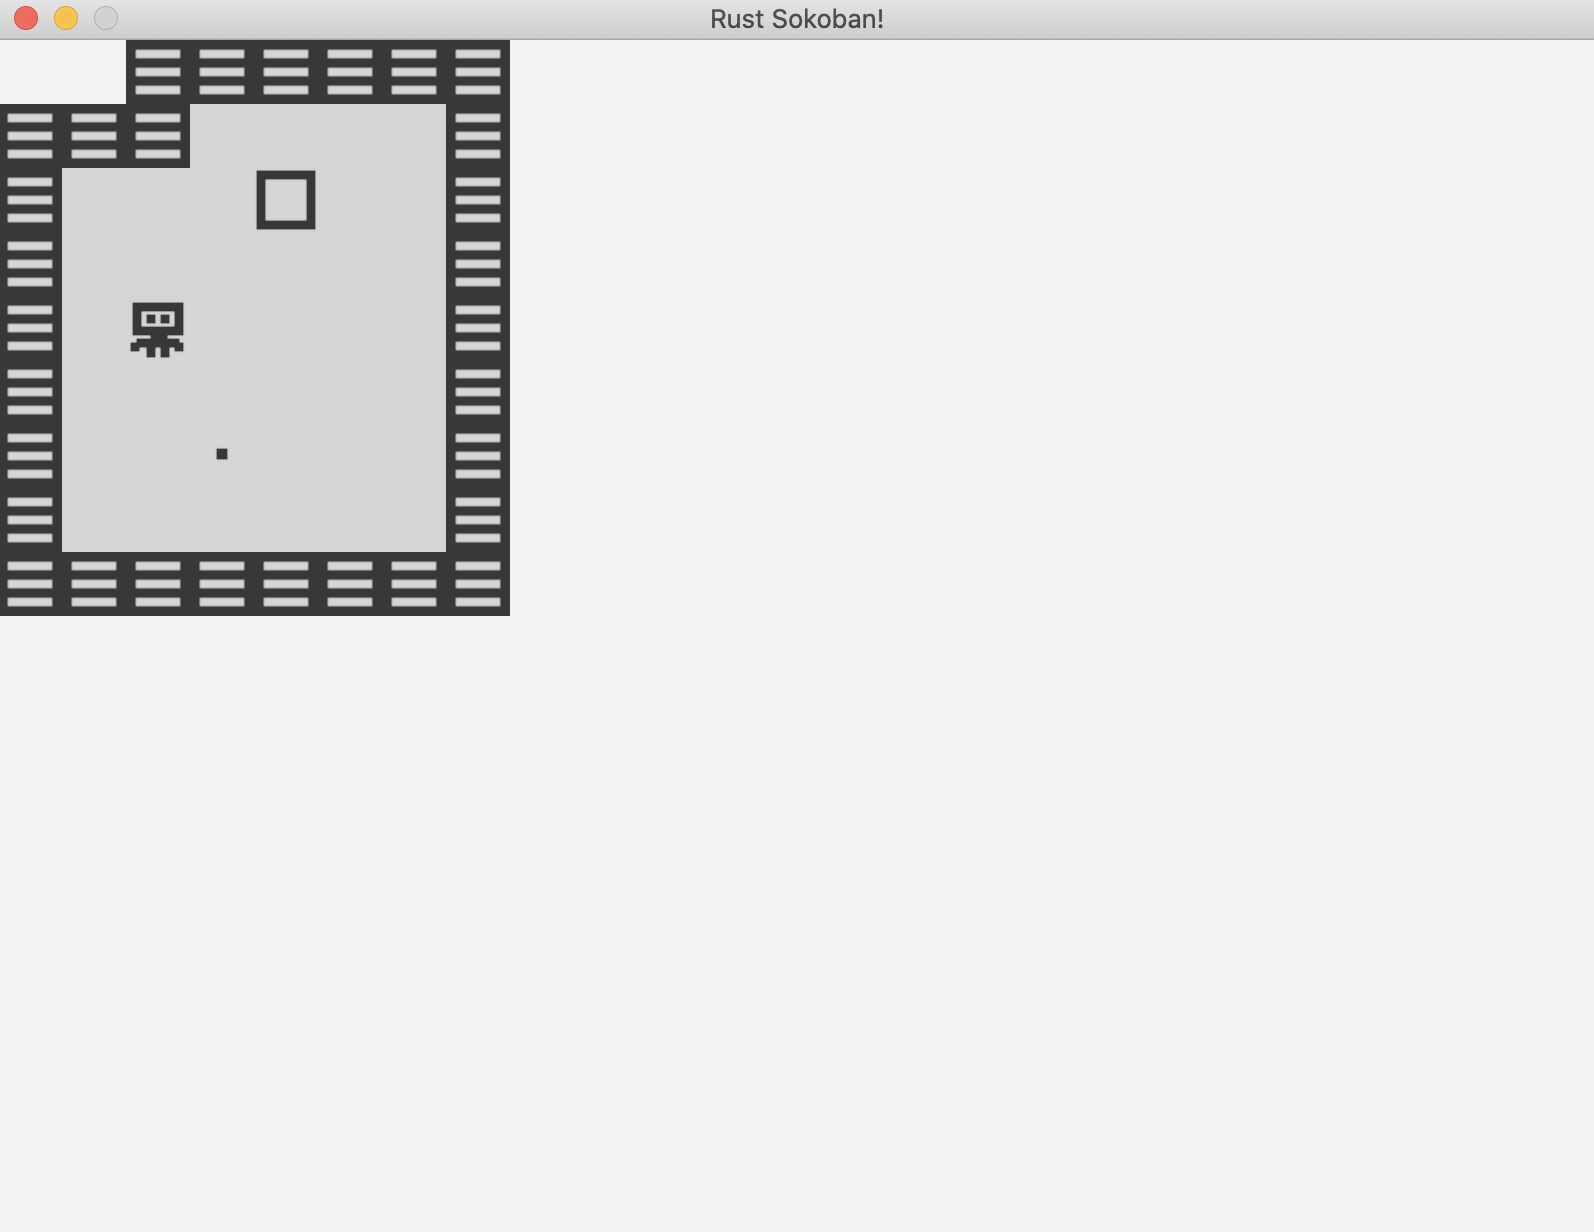
Finally, let's put everything together and run. You should see something like this! This is super exciting, now we have a proper rendering system and we can actually see something on the screen for the first time. Next up, we're going to work on the gameplay so it can actually feel like a game!

Final code below.
NOTE: Note that this is a very basic implementation of rendering and as the number of entities grow the performance will not be good enough. A more advanced implementation of rendering which uses batch rendering can be found in Chapter 3 - Batch Rendering.
/* ANCHOR: all */
// Rust sokoban
// main.rs

use ggez::{
    conf, event,
    graphics::{self, DrawParam, Image},
    Context, GameResult,
};
use glam::Vec2;
use hecs::{Entity, World};

use std::path;

const TILE_WIDTH: f32 = 32.0;

// ANCHOR: components
pub struct Position {
    x: u8,
    y: u8,
    z: u8,
}

pub struct Renderable {
    path: String,
}

pub struct Wall {}

pub struct Player {}

pub struct Box {}

pub struct BoxSpot {}

// ANCHOR_END: components

// ANCHOR: game
// This struct will hold all our game state
// For now there is nothing to be held, but we'll add
// things shortly.
struct Game {
    world: World,
}
// ANCHOR_END: game

// ANCHOR: init
// Initialize the level
pub fn initialize_level(world: &mut World) {
    create_player(
        world,
        Position {
            x: 0,
            y: 0,
            z: 0, // we will get the z from the factory functions
        },
    );
    create_wall(
        world,
        Position {
            x: 1,
            y: 0,
            z: 0, // we will get the z from the factory functions
        },
    );
    create_box(
        world,
        Position {
            x: 2,
            y: 0,
            z: 0, // we will get the z from the factory functions
        },
    );
}
// ANCHOR_END: init

// ANCHOR: handler
impl event::EventHandler<ggez::GameError> for Game {
    fn update(&mut self, _context: &mut Context) -> GameResult {
        Ok(())
    }

    fn draw(&mut self, context: &mut Context) -> GameResult {
        // Render game entities
        {
            run_rendering(&self.world, context);
        }

        Ok(())
    }
}
// ANCHOR_END: handler

// ANCHOR: entities
pub fn create_wall(world: &mut World, position: Position) -> Entity {
    world.spawn((
        Position { z: 10, ..position },
        Renderable {
            path: "/images/wall.png".to_string(),
        },
        Wall {},
    ))
}
pub fn create_floor(world: &mut World, position: Position) -> Entity {
    world.spawn((
        Position { z: 5, ..position },
        Renderable {
            path: "/images/floor.png".to_string(),
        },
    ))
}

pub fn create_box(world: &mut World, position: Position) -> Entity {
    world.spawn((
        Position { z: 10, ..position },
        Renderable {
            path: "/images/box.png".to_string(),
        },
        Box {},
    ))
}

pub fn create_box_spot(world: &mut World, position: Position) -> Entity {
    world.spawn((
        Position { z: 9, ..position },
        Renderable {
            path: "/images/box_spot.png".to_string(),
        },
        BoxSpot {},
    ))
}

pub fn create_player(world: &mut World, position: Position) -> Entity {
    world.spawn((
        Position { z: 10, ..position },
        Renderable {
            path: "/images/player.png".to_string(),
        },
        Player {},
    ))
}
// ANCHOR_END: entities

// ANCHOR: rendering_system
fn run_rendering(world: &World, context: &mut Context) {
    // Clearing the screen (this gives us the background colour)
        let mut canvas =
        graphics::Canvas::from_frame(context, graphics::Color::from([0.95, 0.95, 0.95, 1.0]));

    // Get all the renderables with their positions and sort by the position z
    // This will allow us to have entities layered visually.
    let mut query = world.query::<(&Position, &Renderable)>();
    let mut rendering_data: Vec<(Entity, (&Position, &Renderable))> = query.into_iter().collect();
    rendering_data.sort_by_key(|&k| k.1 .0.z);

    // Iterate through all pairs of positions & renderables, load the image
    // and draw it at the specified position.
    for (_, (position, renderable)) in rendering_data.iter() {
        // Load the image
        let image = Image::from_path(context, renderable.path.clone()).unwrap();
        let x = position.x as f32 * TILE_WIDTH;
        let y = position.y as f32 * TILE_WIDTH;

        // draw
        let draw_params = DrawParam::new().dest(Vec2::new(x, y));
        canvas.draw(&image, draw_params);
    }

    // Finally, present the canvas, this will actually display everything
    // on the screen.
    canvas.finish(context).expect("expected to present");
}
// ANCHOR_END: rendering_system

// ANCHOR: main
pub fn main() -> GameResult {
    let world = World::new();

    // Create a game context and event loop
    let context_builder = ggez::ContextBuilder::new("rust_sokoban", "sokoban")
        .window_setup(conf::WindowSetup::default().title("Rust Sokoban!"))
        .window_mode(conf::WindowMode::default().dimensions(800.0, 600.0))
        .add_resource_path(path::PathBuf::from("./resources"));

    let (context, event_loop) = context_builder.build()?;

    // Create the game state
    let game = Game { world };
    // Run the main event loop
    event::run(context, event_loop, game)
}
// ANCHOR_END: main

/* ANCHOR_END: all */
CODELINK: You can see the full code in this example here.
Chapter 2: Gameplay
Welcome to Chapter 2 and congratulations of making it so far! In this chapter we are going to work on gameplay and make things happen!
Map loading
Last chapter we left off at creating some entities to test our rendering system, but now it's time to render a proper map. In this section we will create a text based map configuration which we will load.
Map config
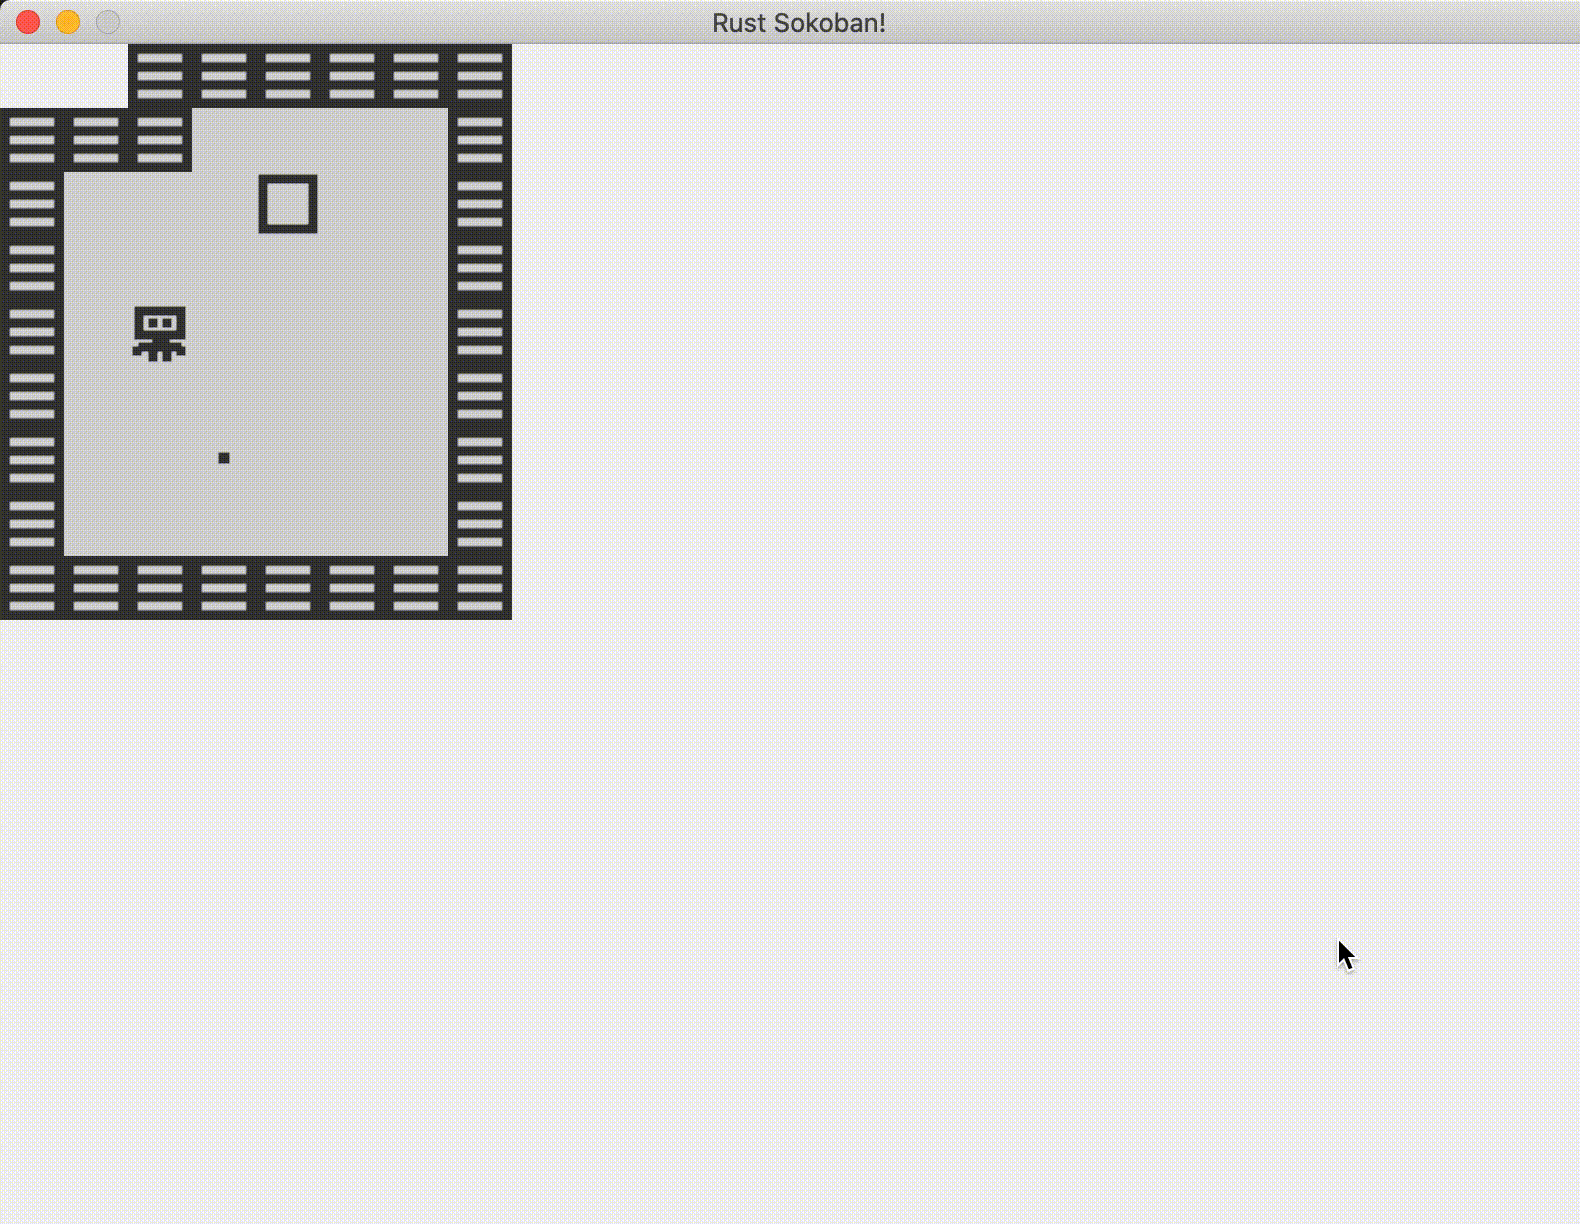
First step, let's try to load a level based on a 2d map that looks like this.
#![allow(unused)]
fn main() {
    const MAP: &str = "
    N N W W W W W W
    W W W . . . . W
    W . . . B . . W
    W . . . . . . W
    W . P . . . . W
    W . . . . . . W
    W . . S . . . W
    W . . . . . . W
    W W W W W W W W
    ";

where:
. is an empty spot
W is a wall
P is the player
B is a box
S is a box spot
N is nothing: used for the outer edges of the map
}
Eventually we can load from a file but for simplicity let's go with a constant in the code for now.
And here is the implementation of load map.
#![allow(unused)]
fn main() {
// Initialize the level// Initialize the level
pub fn initialize_level(world: &mut World) {
    const MAP: &str = "
    N N W W W W W W
    W W W . . . . W
    W . . . B . . W
    W . . . . . . W
    W . P . . . . W
    W . . . . . . W
    W . . S . . . W
    W . . . . . . W
    W W W W W W W W
    ";

    load_map(world, MAP.to_string());
}

pub fn load_map(world: &mut World, map_string: String) {
    // read all lines
    let rows: Vec<&str> = map_string.trim().split('\n').map(|x| x.trim()).collect();

    for (y, row) in rows.iter().enumerate() {
        let columns: Vec<&str> = row.split(' ').collect();

        for (x, column) in columns.iter().enumerate() {
            // Create the position at which to create something on the map
            let position = Position {
                x: x as u8,
                y: y as u8,
                z: 0, // we will get the z from the factory functions
            };

            // Figure out what object we should create
            match *column {
                "." => {
                    create_floor(world, position);
                }
                "W" => {
                    create_floor(world, position);
                    create_wall(world, position);
                }
                "P" => {
                    create_floor(world, position);
                    create_player(world, position);
                }
                "B" => {
                    create_floor(world, position);
                    create_box(world, position);
                }
                "S" => {
                    create_floor(world, position);
                    create_box_spot(world, position);
                }
                "N" => (),
                c => panic!("unrecognized map item {}", c),
            }
        }
    }
}
}
The most interesting Rust concept here is probably the match. We are using the basic feature of pattern matching here, we are simply matching on the values of each token found in the map config, but we could do a lot of more advanced conditions or types of patterns.
MORE: Read more about pattern matching here.
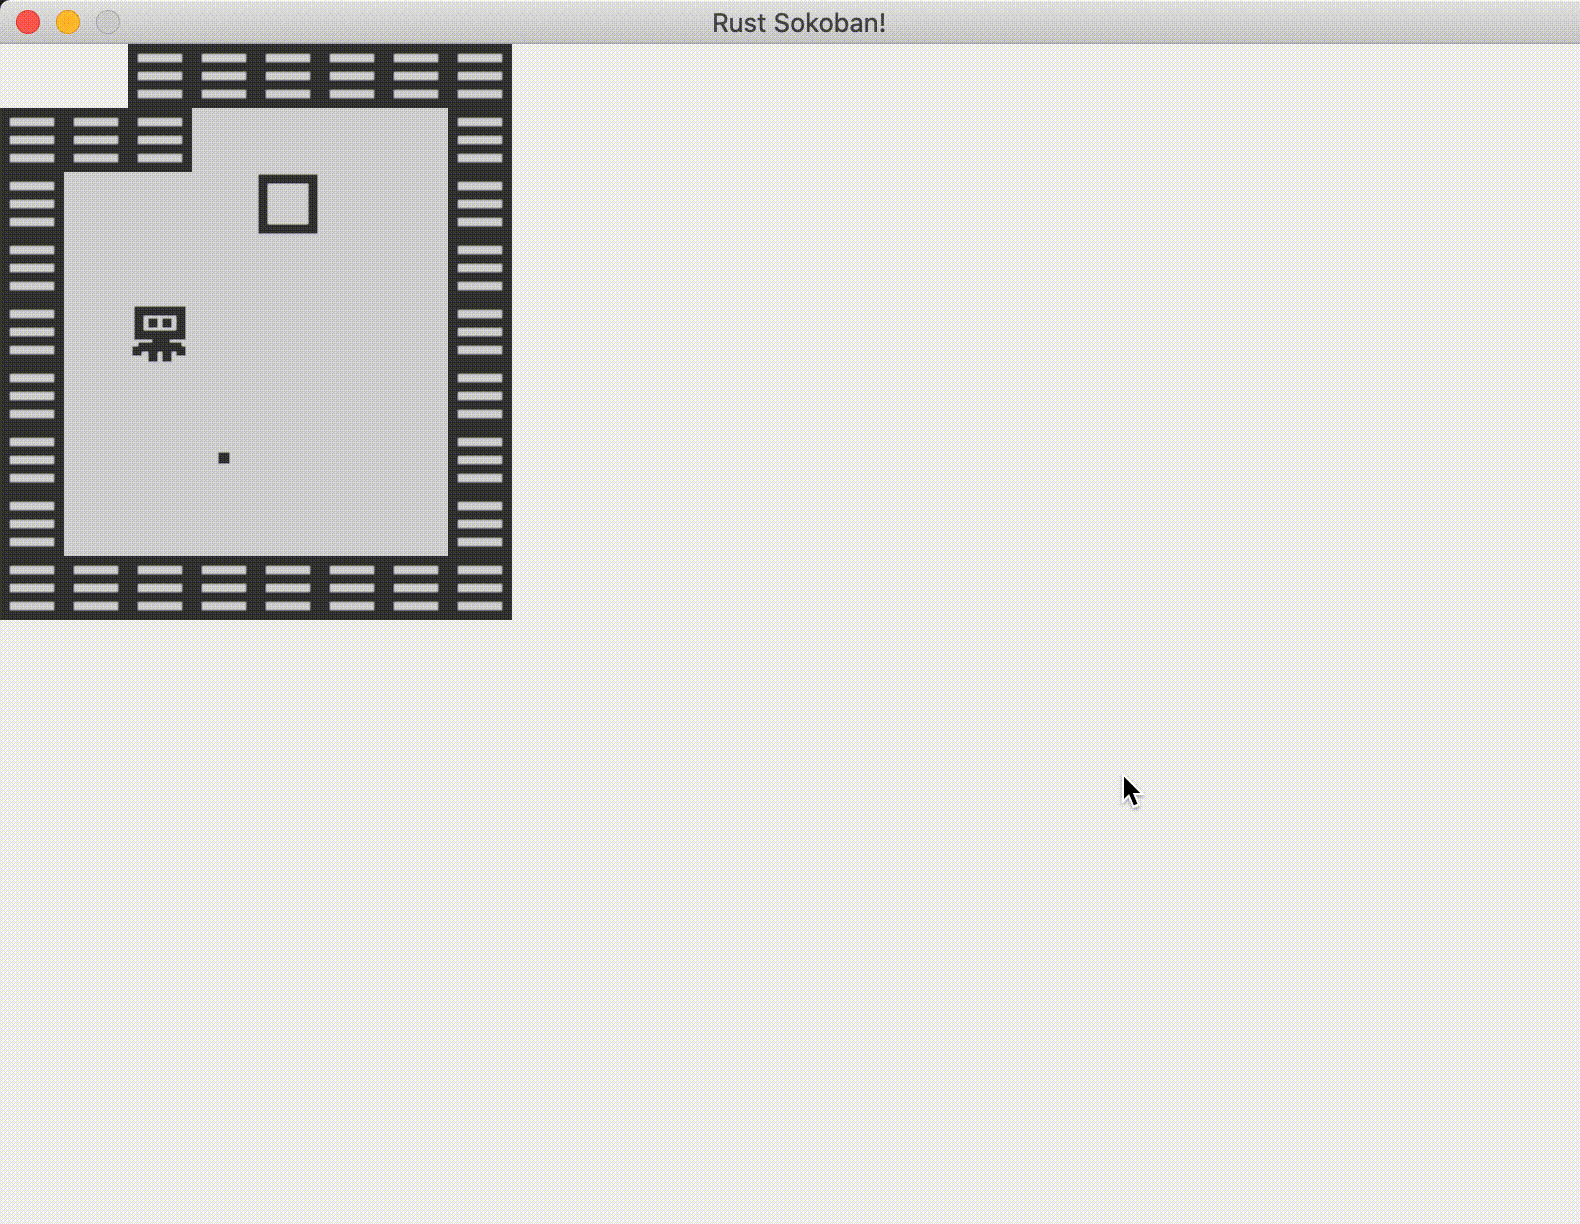
Now let's run the game and see what our map looks like.
Final code below.
/* ANCHOR: all */
// Rust sokoban
// main.rs

use ggez::{
    conf, event,
    graphics::{self, DrawParam, Image},
    Context, GameResult,
};
use glam::Vec2;
use hecs::{Entity, World};

use std::path;

const TILE_WIDTH: f32 = 32.0;

// ANCHOR: components
#[derive(Clone, Copy)]
pub struct Position {
    x: u8,
    y: u8,
    z: u8,
}

pub struct Renderable {
    path: String,
}

pub struct Wall {}

pub struct Player {}

pub struct Box {}

pub struct BoxSpot {}

// ANCHOR_END: components

// ANCHOR: game
// This struct will hold all our game state
// For now there is nothing to be held, but we'll add
// things shortly.
struct Game {
    world: World,
}
// ANCHOR_END: game

// ANCHOR: init
// Initialize the level// Initialize the level
pub fn initialize_level(world: &mut World) {
    // ANCHOR: map
    const MAP: &str = "
    N N W W W W W W
    W W W . . . . W
    W . . . B . . W
    W . . . . . . W
    W . P . . . . W
    W . . . . . . W
    W . . S . . . W
    W . . . . . . W
    W W W W W W W W
    ";
    // ANCHOR_END: map

    load_map(world, MAP.to_string());
}

pub fn load_map(world: &mut World, map_string: String) {
    // read all lines
    let rows: Vec<&str> = map_string.trim().split('\n').map(|x| x.trim()).collect();

    for (y, row) in rows.iter().enumerate() {
        let columns: Vec<&str> = row.split(' ').collect();

        for (x, column) in columns.iter().enumerate() {
            // Create the position at which to create something on the map
            let position = Position {
                x: x as u8,
                y: y as u8,
                z: 0, // we will get the z from the factory functions
            };

            // Figure out what object we should create
            match *column {
                "." => {
                    create_floor(world, position);
                }
                "W" => {
                    create_floor(world, position);
                    create_wall(world, position);
                }
                "P" => {
                    create_floor(world, position);
                    create_player(world, position);
                }
                "B" => {
                    create_floor(world, position);
                    create_box(world, position);
                }
                "S" => {
                    create_floor(world, position);
                    create_box_spot(world, position);
                }
                "N" => (),
                c => panic!("unrecognized map item {}", c),
            }
        }
    }
}
// ANCHOR_END: init

// ANCHOR: handler
impl event::EventHandler<ggez::GameError> for Game {
    fn update(&mut self, _context: &mut Context) -> GameResult {
        Ok(())
    }

    fn draw(&mut self, context: &mut Context) -> GameResult {
        // Render game entities
        {
            run_rendering(&self.world, context);
        }

        Ok(())
    }
}
// ANCHOR_END: handler

// ANCHOR: entities
pub fn create_wall(world: &mut World, position: Position) -> Entity {
    world.spawn((
        Position { z: 10, ..position },
        Renderable {
            path: "/images/wall.png".to_string(),
        },
        Wall {},
    ))
}
pub fn create_floor(world: &mut World, position: Position) -> Entity {
    world.spawn((
        Position { z: 5, ..position },
        Renderable {
            path: "/images/floor.png".to_string(),
        },
    ))
}

pub fn create_box(world: &mut World, position: Position) -> Entity {
    world.spawn((
        Position { z: 10, ..position },
        Renderable {
            path: "/images/box.png".to_string(),
        },
        Box {},
    ))
}

pub fn create_box_spot(world: &mut World, position: Position) -> Entity {
    world.spawn((
        Position { z: 9, ..position },
        Renderable {
            path: "/images/box_spot.png".to_string(),
        },
        BoxSpot {},
    ))
}

pub fn create_player(world: &mut World, position: Position) -> Entity {
    world.spawn((
        Position { z: 10, ..position },
        Renderable {
            path: "/images/player.png".to_string(),
        },
        Player {},
    ))
}
// ANCHOR_END: entities

// ANCHOR: rendering_system
fn run_rendering(world: &World, context: &mut Context) {
    // Clearing the screen (this gives us the background colour)
        let mut canvas =
        graphics::Canvas::from_frame(context, graphics::Color::from([0.95, 0.95, 0.95, 1.0]));

    // Get all the renderables with their positions and sort by the position z
    // This will allow us to have entities layered visually.
    let mut query = world.query::<(&Position, &Renderable)>();
    let mut rendering_data: Vec<(Entity, (&Position, &Renderable))> = query.into_iter().collect();
    rendering_data.sort_by_key(|&k| k.1 .0.z);

    // Iterate through all pairs of positions & renderables, load the image
    // and draw it at the specified position.
    for (_, (position, renderable)) in rendering_data.iter() {
        // Load the image
        let image = Image::from_path(context, renderable.path.clone()).unwrap();
        let x = position.x as f32 * TILE_WIDTH;
        let y = position.y as f32 * TILE_WIDTH;

        // draw
        let draw_params = DrawParam::new().dest(Vec2::new(x, y));
        canvas.draw(&image, draw_params);
    }

    // Finally, present the canvas, this will actually display everything
    // on the screen.
    canvas.finish(context).expect("expected to present");
}
// ANCHOR_END: rendering_system

// ANCHOR: main
pub fn main() -> GameResult {
    let mut world = World::new();
    initialize_level(&mut world);

    // Create a game context and event loop
    let context_builder = ggez::ContextBuilder::new("rust_sokoban", "sokoban")
        .window_setup(conf::WindowSetup::default().title("Rust Sokoban!"))
        .window_mode(conf::WindowMode::default().dimensions(800.0, 600.0))
        .add_resource_path(path::PathBuf::from("./resources"));

    let (context, event_loop) = context_builder.build()?;

    // Create the game state
    let game = Game { world };
    // Run the main event loop
    event::run(context, event_loop, game)
}
// ANCHOR_END: main

/* ANCHOR_END: all */
CODELINK: You can see the full code in this example here.
Moving the player
It wouldn't be a game if we couldn't move the player, would it? In this section we will figure out how to grab input events.
Input events
The first step for making our player move is to start listening to input events. If we take a quick look at the ggez input example we can see we can check if a given key is pressed using is_key_pressed.
Let's start with a very basic implementation of the input system where we simply check if a key is pressed and print to the console.
#![allow(unused)]
fn main() {
#[allow(dead_code)]
fn run_input_print(_world: &World, context: &mut Context) {
    if context.keyboard.is_key_pressed(KeyCode::Up) {
        println!("UP");
    }
    if context.keyboard.is_key_pressed(KeyCode::Down) {
        println!("DOWN");
    }
    if context.keyboard.is_key_pressed(KeyCode::Left) {
        println!("LEFT");
    }
    if context.keyboard.is_key_pressed(KeyCode::Right) {
        println!("RIGHT");
    }
}
}
Then, we'll add this code inside the event::EventHandler implementation block for our Game:
#![allow(unused)]
fn main() {
impl event::EventHandler<ggez::GameError> for Game {
    fn update(&mut self, context: &mut Context) -> GameResult {
        // Run input system
        {
            run_input(&self.world, context);
        }

        Ok(())
    }

    fn draw(&mut self, context: &mut Context) -> GameResult {
        // Render game entities
        {
            run_rendering(&self.world, context);
        }

        Ok(())
    }
}
}
If we run this we should see the print lines in the console.
LEFT
LEFT
RIGHT
UP
DOWN
LEFT
Input system
Let's start by implementing the final input system now.
We already have a way to check if a key was pressed, now we need to implement the logic that will move the player. The logic we are aiming to implement:
- if UP is pressed, we move the player one position up on the y axis
- if DOWN is pressed, we move the player one position down on the y axis
- if LEFT is pressed, we move the player one position left on the x axis
- if RIGHT is pressed, we move the player one position right on the x axis
#![allow(unused)]
fn main() {
#[allow(dead_code)]
fn input_system_duplicate(world: &World, context: &mut Context) {
    for (_, (position, _player)) in world.query::<(&mut Position, &Player)>().iter() {
        if context.keyboard.is_key_pressed(KeyCode::Up) {
            position.y -= 1;
        }
        if context.keyboard.is_key_pressed(KeyCode::Down) {
            position.y += 1;
        }
        if context.keyboard.is_key_pressed(KeyCode::Left) {
            position.x -= 1;
        }
        if context.keyboard.is_key_pressed(KeyCode::Right) {
            position.x += 1;
        }
    }
}
}
The input system is pretty simple, it grabs all the players and positions (we should only have one player but this code doesn't need to care about that, it could in theory work if we have multiple players that we want to control with the same input). And then for every player and position combination, it will grab the first key pressed and remove it from the input queue. It will then figure out what is the required transformation - for example if we press up we want to move one tile up and so on, and then applies this position update.
Pretty cool! Here's how it should look like. Notice we can go through walls and boxes. We'll fix that up in the next section when we add the movable component.
But you might have noticed there's a problem, a single key press triggers multiple moves. Let's fix that in the next section.
Handling multiple key presses
The problem is we are calling the input system multiple times during a given second, which means holding a key pressed for one second will trigger multiple moves for the same key. As you might have noticed this is not a great experience as a player because you don't have good control over the movements and you can easily get into a situation where a box gets stuck next to a wall and there's no way to bring it back.
What options do we have to fix this? We could remember if the key was pressed the last frame, and if it was, we skip it. It would require storing state of the previous frame, and comparing against it in the current frame before deciding to move or not, which is very doable. Fortunately, ggez added this functionality to their keyboard api where you can call is_key_just_pressed and it will automatically check against the current state. Let's try this, it looks something like this.
#![allow(unused)]
fn main() {
fn run_input(world: &World, context: &mut Context) {
    for (_, (position, _player)) in world.query::<(&mut Position, &Player)>().iter() {
        if context.keyboard.is_key_just_pressed(KeyCode::Up) {
            position.y -= 1;
        }
        if context.keyboard.is_key_just_pressed(KeyCode::Down) {
            position.y += 1;
        }
        if context.keyboard.is_key_just_pressed(KeyCode::Left) {
            position.x -= 1;
        }
        if context.keyboard.is_key_just_pressed(KeyCode::Right) {
            position.x += 1;
        }
    }
}
}
And now everything works as expected!
CODELINK: You can see the full code in this example here.
Pushing boxes
In the previous chapter we got our player moving, but he is going through walls and boxes, not really interacting with the environment. In this section we'll add some logic for more intelligent player movement.
Movement components
First, we need to make our code slightly more generic. If you remember the previous chapter we were operating on players to figure out where we should move them, but we'll also need to move boxes. Also in the future we might want to introduce another movable kind of object, so let's try to build something with that in mind. What we'll do in true ECS spirit we will use a marker component to tell us which entities are movable and which aren't. For example, players and boxes are movable, while walls are immovable. Box spots are kind of irrelevant here because they do not move, but they also shouldn't affect the movement of players or boxes, so box spots will not have either of these components.
Here are our two new components.
#![allow(unused)]
fn main() {
pub struct Movable;

pub struct Immovable;
}
Next, we'll add:
- with(Movable) to players and boxes
- with(Immovable) to walls
- do nothing with floors and box spots (as mentioned before they should not be part of our movement/collision system since they are inconsequential to the movement)
#![allow(unused)]
fn main() {
pub fn create_wall(world: &mut World, position: Position) -> Entity {
    world.spawn((
        Position { z: 10, ..position },
        Renderable {
            path: "/images/wall.png".to_string(),
        },
        Wall {},
        Immovable {},
    ))
}
pub fn create_floor(world: &mut World, position: Position) -> Entity {
    world.spawn((
        Position { z: 5, ..position },
        Renderable {
            path: "/images/floor.png".to_string(),
        },
    ))
}

pub fn create_box(world: &mut World, position: Position) -> Entity {
    world.spawn((
        Position { z: 10, ..position },
        Renderable {
            path: "/images/box.png".to_string(),
        },
        Box {},
        Movable {},
    ))
}

pub fn create_box_spot(world: &mut World, position: Position) -> Entity {
    world.spawn((
        Position { z: 9, ..position },
        Renderable {
            path: "/images/box_spot.png".to_string(),
        },
        BoxSpot {},
    ))
}

pub fn create_player(world: &mut World, position: Position) -> Entity {
    world.spawn((
        Position { z: 10, ..position },
        Renderable {
            path: "/images/player.png".to_string(),
        },
        Player {},
        Movable {},
    ))
}
}
Movement requirements
Now let's think of a few examples that illustrate our requirements for movement. This will help us understand how we need to change the implementation of the input system to use Movable and Immovable correctly.
Scenarios:
(player, floor)andRIGHTpressed -> player should move to the right(player, wall)andRIGHTpressed -> player should not move to the right(player, box, floor)andRIGHTpressed -> player should move to the right, box should move to the right(player, box, wall)andRIGHTpressed -> nothing should move(player, box, box, floor)andRIGHTpressed -> player, box1 and box2 should all move one to the right(player, box, box, wall)andRIGHTpressed -> nothing should move
A few observations we can make based on this:
- the collision/movement detection should happen all at once for all objects involved - for example, for scenario 6 if we processed one item at a time, we would move the player, we would move the first box, and when we get to the second box we realize we cannot move it, and we'd have to roll back all our movement actions, which will not work. So for every input, we must figure out all the objects involved and holistically decide if the action is possible or not.
- a chain of movables with an empty spot can move (empty spot in this case means something neither movable or immovable)
- a chain of movables with an immovable spot cannot move
- even though all examples were moving to the right, the rules should generalize for any movement and the key pressed should just influence how we find the chain
So given this, let's start implementing this logic. Let's think about the logical pieces we need. Some initial ideas:
- find all the movable and immovable entities - this is so we can figure out if they are affected by the movement
- figure out which way to move based on a key - we've kind of figured this out in the previous section already, basically a bunch of +1/-1 operations based on the key enum
- iterate through all positions between the player and the end of the map on the correct axis based on the direction - for example, if we press right, we need to go from player.x to map_width, if we press up we need to go from 0 to player.y
- for every tile in this sequence we need to:
- if the tile is movable, continue and remember this tile
- if the tile is not movable, stop and don't move anything
- if the tile is neither movable or immovable, move all the tiles we've remembered so far
Here is the new implementation of the input systems, it's a bit long but hopefully it makes sense.
#![allow(unused)]
fn main() {
fn run_input(world: &World, context: &mut Context) {
    let mut to_move: Vec<(Entity, KeyCode)> = Vec::new();

    // get all the movables and immovables
    let mov: HashMap<(u8, u8), Entity> = world
        .query::<(&Position, &Movable)>()
        .iter()
        .map(|t| ((t.1 .0.x, t.1 .0.y), t.0))
        .collect::<HashMap<_, _>>();
    let immov: HashMap<(u8, u8), Entity> = world
        .query::<(&Position, &Immovable)>()
        .iter()
        .map(|t| ((t.1 .0.x, t.1 .0.y), t.0))
        .collect::<HashMap<_, _>>();

    for (_, (position, _player)) in world.query::<(&mut Position, &Player)>().iter() {
        if context.keyboard.is_key_repeated() {
            continue;
        }

        // Now iterate through current position to the end of the map
        // on the correct axis and check what needs to move.
        let key = if context.keyboard.is_key_pressed(KeyCode::Up) {
            KeyCode::Up
        } else if context.keyboard.is_key_pressed(KeyCode::Down) {
            KeyCode::Down
        } else if context.keyboard.is_key_pressed(KeyCode::Left) {
            KeyCode::Left
        } else if context.keyboard.is_key_pressed(KeyCode::Right) {
            KeyCode::Right
        } else {
            continue;
        };

        let (start, end, is_x) = match key {
            KeyCode::Up => (position.y, 0, false),
            KeyCode::Down => (position.y, MAP_HEIGHT - 1, false),
            KeyCode::Left => (position.x, 0, true),
            KeyCode::Right => (position.x, MAP_WIDTH - 1, true),
            _ => continue,
        };

        let range = if start < end {
            (start..=end).collect::<Vec<_>>()
        } else {
            (end..=start).rev().collect::<Vec<_>>()
        };

        for x_or_y in range {
            let pos = if is_x {
                (x_or_y, position.y)
            } else {
                (position.x, x_or_y)
            };

            // find a movable
            // if it exists, we try to move it and continue
            // if it doesn't exist, we continue and try to find an immovable instead
            match mov.get(&pos) {
                Some(entity) => to_move.push((*entity, key)),
                None => {
                    // find an immovable
                    // if it exists, we need to stop and not move anything
                    // if it doesn't exist, we stop because we found a gap
                    match immov.get(&pos) {
                        Some(_id) => to_move.clear(),
                        None => break,
                    }
                }
            }
        }
    }

    // Now actually move what needs to be moved
    for (entity, key) in to_move {
        let mut position = world.get::<&mut Position>(entity).unwrap();

        match key {
            KeyCode::Up => position.y -= 1,
            KeyCode::Down => position.y += 1,
            KeyCode::Left => position.x -= 1,
            KeyCode::Right => position.x += 1,
            _ => (),
        }
    }
}
}
Now if we run the code, we'll see it actually works! We can't go through walls anymore and we can push the box and it stops when it gets to the wall.
Full code below.
/* ANCHOR: all */
// Rust sokoban
// main.rs

use ggez::{
    conf, event,
    graphics::{self, DrawParam, Image},
    input::keyboard::KeyCode,
    Context, GameResult,
};
use glam::Vec2;
use hecs::{Entity, World};

use std::collections::HashMap;
use std::path;

const TILE_WIDTH: f32 = 32.0;
const MAP_WIDTH: u8 = 8;
const MAP_HEIGHT: u8 = 9;

// ANCHOR: components
#[derive(Clone, Copy, Eq, Hash, PartialEq)]
pub struct Position {
    x: u8,
    y: u8,
    z: u8,
}

pub struct Renderable {
    path: String,
}

pub struct Wall {}

pub struct Player {}

pub struct Box {}

pub struct BoxSpot {}

// ANCHOR: components_movement
pub struct Movable;

pub struct Immovable;
// ANCHOR_END: components_movement

// ANCHOR_END: components

// ANCHOR: game
// This struct will hold all our game state
// For now there is nothing to be held, but we'll add
// things shortly.
struct Game {
    world: World,
}
// ANCHOR_END: game

// ANCHOR: init
// Initialize the level// Initialize the level
pub fn initialize_level(world: &mut World) {
    const MAP: &str = "
    N N W W W W W W
    W W W . . . . W
    W . . . B . . W
    W . . . . . . W
    W . P . . . . W
    W . . . . . . W
    W . . S . . . W
    W . . . . . . W
    W W W W W W W W
    ";

    load_map(world, MAP.to_string());
}

pub fn load_map(world: &mut World, map_string: String) {
    // read all lines
    let rows: Vec<&str> = map_string.trim().split('\n').map(|x| x.trim()).collect();

    for (y, row) in rows.iter().enumerate() {
        let columns: Vec<&str> = row.split(' ').collect();

        for (x, column) in columns.iter().enumerate() {
            // Create the position at which to create something on the map
            let position = Position {
                x: x as u8,
                y: y as u8,
                z: 0, // we will get the z from the factory functions
            };

            // Figure out what object we should create
            match *column {
                "." => {
                    create_floor(world, position);
                }
                "W" => {
                    create_floor(world, position);
                    create_wall(world, position);
                }
                "P" => {
                    create_floor(world, position);
                    create_player(world, position);
                }
                "B" => {
                    create_floor(world, position);
                    create_box(world, position);
                }
                "S" => {
                    create_floor(world, position);
                    create_box_spot(world, position);
                }
                "N" => (),
                c => panic!("unrecognized map item {}", c),
            }
        }
    }
}
// ANCHOR_END: init

// ANCHOR: handler
impl event::EventHandler<ggez::GameError> for Game {
    fn update(&mut self, context: &mut Context) -> GameResult {
        // Run input system
        {
            run_input(&self.world, context);
        }

        Ok(())
    }

    fn draw(&mut self, context: &mut Context) -> GameResult {
        // Render game entities
        {
            run_rendering(&self.world, context);
        }

        Ok(())
    }
}
// ANCHOR_END: handler

// ANCHOR: entities
pub fn create_wall(world: &mut World, position: Position) -> Entity {
    world.spawn((
        Position { z: 10, ..position },
        Renderable {
            path: "/images/wall.png".to_string(),
        },
        Wall {},
        Immovable {},
    ))
}
pub fn create_floor(world: &mut World, position: Position) -> Entity {
    world.spawn((
        Position { z: 5, ..position },
        Renderable {
            path: "/images/floor.png".to_string(),
        },
    ))
}

pub fn create_box(world: &mut World, position: Position) -> Entity {
    world.spawn((
        Position { z: 10, ..position },
        Renderable {
            path: "/images/box.png".to_string(),
        },
        Box {},
        Movable {},
    ))
}

pub fn create_box_spot(world: &mut World, position: Position) -> Entity {
    world.spawn((
        Position { z: 9, ..position },
        Renderable {
            path: "/images/box_spot.png".to_string(),
        },
        BoxSpot {},
    ))
}

pub fn create_player(world: &mut World, position: Position) -> Entity {
    world.spawn((
        Position { z: 10, ..position },
        Renderable {
            path: "/images/player.png".to_string(),
        },
        Player {},
        Movable {},
    ))
}
// ANCHOR_END: entities

// ANCHOR: rendering_system
fn run_rendering(world: &World, context: &mut Context) {
    // Clearing the screen (this gives us the background colour)
    let mut canvas =
        graphics::Canvas::from_frame(context, graphics::Color::from([0.95, 0.95, 0.95, 1.0]));

    // Get all the renderables with their positions and sort by the position z
    // This will allow us to have entities layered visually.
    let mut query = world.query::<(&Position, &Renderable)>();
    let mut rendering_data: Vec<(Entity, (&Position, &Renderable))> = query.into_iter().collect();
    rendering_data.sort_by_key(|&k| k.1 .0.z);

    // Iterate through all pairs of positions & renderables, load the image
    // and draw it at the specified position.
    for (_, (position, renderable)) in rendering_data.iter() {
        // Load the image
        let image = Image::from_path(context, renderable.path.clone()).unwrap();
        let x = position.x as f32 * TILE_WIDTH;
        let y = position.y as f32 * TILE_WIDTH;

        // draw
        let draw_params = DrawParam::new().dest(Vec2::new(x, y));
        canvas.draw(&image, draw_params);
    }

    // Finally, present the canvas, this will actually display everything
    // on the screen.
    canvas.finish(context).expect("expected to present");
}
// ANCHOR_END: rendering_system

// ANCHOR: input_system
fn run_input(world: &World, context: &mut Context) {
    let mut to_move: Vec<(Entity, KeyCode)> = Vec::new();

    // get all the movables and immovables
    let mov: HashMap<(u8, u8), Entity> = world
        .query::<(&Position, &Movable)>()
        .iter()
        .map(|t| ((t.1 .0.x, t.1 .0.y), t.0))
        .collect::<HashMap<_, _>>();
    let immov: HashMap<(u8, u8), Entity> = world
        .query::<(&Position, &Immovable)>()
        .iter()
        .map(|t| ((t.1 .0.x, t.1 .0.y), t.0))
        .collect::<HashMap<_, _>>();

    for (_, (position, _player)) in world.query::<(&mut Position, &Player)>().iter() {
        if context.keyboard.is_key_repeated() {
            continue;
        }

        // Now iterate through current position to the end of the map
        // on the correct axis and check what needs to move.
        let key = if context.keyboard.is_key_pressed(KeyCode::Up) {
            KeyCode::Up
        } else if context.keyboard.is_key_pressed(KeyCode::Down) {
            KeyCode::Down
        } else if context.keyboard.is_key_pressed(KeyCode::Left) {
            KeyCode::Left
        } else if context.keyboard.is_key_pressed(KeyCode::Right) {
            KeyCode::Right
        } else {
            continue;
        };

        let (start, end, is_x) = match key {
            KeyCode::Up => (position.y, 0, false),
            KeyCode::Down => (position.y, MAP_HEIGHT - 1, false),
            KeyCode::Left => (position.x, 0, true),
            KeyCode::Right => (position.x, MAP_WIDTH - 1, true),
            _ => continue,
        };

        let range = if start < end {
            (start..=end).collect::<Vec<_>>()
        } else {
            (end..=start).rev().collect::<Vec<_>>()
        };

        for x_or_y in range {
            let pos = if is_x {
                (x_or_y, position.y)
            } else {
                (position.x, x_or_y)
            };

            // find a movable
            // if it exists, we try to move it and continue
            // if it doesn't exist, we continue and try to find an immovable instead
            match mov.get(&pos) {
                Some(entity) => to_move.push((*entity, key)),
                None => {
                    // find an immovable
                    // if it exists, we need to stop and not move anything
                    // if it doesn't exist, we stop because we found a gap
                    match immov.get(&pos) {
                        Some(_id) => to_move.clear(),
                        None => break,
                    }
                }
            }
        }
    }

    // Now actually move what needs to be moved
    for (entity, key) in to_move {
        let mut position = world.get::<&mut Position>(entity).unwrap();

        match key {
            KeyCode::Up => position.y -= 1,
            KeyCode::Down => position.y += 1,
            KeyCode::Left => position.x -= 1,
            KeyCode::Right => position.x += 1,
            _ => (),
        }
    }
}
// ANCHOR_END: input_system

// ANCHOR: main
pub fn main() -> GameResult {
    let mut world = World::new();
    initialize_level(&mut world);

    // Create a game context and event loop
    let context_builder = ggez::ContextBuilder::new("rust_sokoban", "sokoban")
        .window_setup(conf::WindowSetup::default().title("Rust Sokoban!"))
        .window_mode(conf::WindowMode::default().dimensions(800.0, 600.0))
        .add_resource_path(path::PathBuf::from("./resources"));

    let (context, event_loop) = context_builder.build()?;

    // Create the game state
    let game = Game { world };
    // Run the main event loop
    event::run(context, event_loop, game)
}
// ANCHOR_END: main

/* ANCHOR_END: all */
CODELINK: You can see the full code in this example here.
Modules
The main file is getting quite big and as you can imagine, that will not be very sustainable as our project grows. Luckily, Rust has the concept of modules which will alow us to nicely split out functionality based on concerns into separate files.
For now, let's aim for this folder structure. Eventually as we get more components and systems, we'll probably want more than one file, but this should be a pretty good place to start.
├── resources
│   └── images
│       ├── box.png
│       ├── box_spot.png
│       ├── floor.png
│       ├── player.png
│       └── wall.png
├── src
│   ├── systems
│   │   ├── input.rs
│   │   ├── rendering.rs
│   │   └── mod.rs
│   ├── components.rs
│   ├── constants.rs
│   ├── entities.rs
│   ├── main.rs
│   ├── map.rs
│   └── resources.rs
└── Cargo.toml
MORE: Read more about modules and managing growing projects here.
Let's start by moving all the components into a file. There should be no changes apart from making some fields public. The reason why we need to make the fields public is because when everything was in the same file everything had access to everything else, which was convenient to start with, but now that we have split things out we need to pay more attention to visibilities. For now we'll make the fields public to get things working again, but there is a better way which we will discuss in a later section. We've also moved the components registration at the bottom of this file which is quite handy when we add components we only need to change this file.
#![allow(unused)]
fn main() {
// components.rs
#[derive(Clone, Copy, Eq, Hash, PartialEq)]
pub struct Position {
    pub x: u8,
    pub y: u8,
    pub z: u8,
}

pub struct Renderable {
    pub path: String,
}

pub struct Wall {}

pub struct Player {}

pub struct Box {}

pub struct BoxSpot {}

pub struct Movable;

pub struct Immovable;
}
Next up, let's move the constants into their own file. For now we are hardcoding the map dimensions, we need them for the movement to know when we've reached the edge of the map, but as an improvement would could later store the dimensions of the map and make them dynamic based on the map loading.
#![allow(unused)]
fn main() {
// constants.rs
pub const TILE_WIDTH: f32 = 32.0;
pub const MAP_WIDTH: u8 = 8;
pub const MAP_HEIGHT: u8 = 9;
}
Next up, entity creation code is now into an entities file.
#![allow(unused)]
fn main() {
// entities.rs
use crate::components::*;
use hecs::{Entity, World};

pub fn create_wall(world: &mut World, position: Position) -> Entity {
    world.spawn((
        Position { z: 10, ..position },
        Renderable {
            path: "/images/wall.png".to_string(),
        },
        Wall {},
        Immovable {},
    ))
}
pub fn create_floor(world: &mut World, position: Position) -> Entity {
    world.spawn((
        Position { z: 5, ..position },
        Renderable {
            path: "/images/floor.png".to_string(),
        },
    ))
}

pub fn create_box(world: &mut World, position: Position) -> Entity {
    world.spawn((
        Position { z: 10, ..position },
        Renderable {
            path: "/images/box.png".to_string(),
        },
        Box {},
        Movable {},
    ))
}

pub fn create_box_spot(world: &mut World, position: Position) -> Entity {
    world.spawn((
        Position { z: 9, ..position },
        Renderable {
            path: "/images/box_spot.png".to_string(),
        },
        BoxSpot {},
    ))
}

pub fn create_player(world: &mut World, position: Position) -> Entity {
    world.spawn((
        Position { z: 10, ..position },
        Renderable {
            path: "/images/player.png".to_string(),
        },
        Player {},
        Movable {},
    ))
}
}
Now for the map loading.
#![allow(unused)]
fn main() {
// map.rs
use crate::components::Position;
use crate::entities::*;
use hecs::World;

pub fn initialize_level(world: &mut World) {
    const MAP: &str = "
    N N W W W W W W
    W W W . . . . W
    W . . . B . . W
    W . . . . . . W
    W . P . . . . W
    W . . . . . . W
    W . . S . . . W
    W . . . . . . W
    W W W W W W W W
    ";

    load_map(world, MAP.to_string());
}

pub fn load_map(world: &mut World, map_string: String) {
    // read all lines
    let rows: Vec<&str> = map_string.trim().split('\n').map(|x| x.trim()).collect();

    for (y, row) in rows.iter().enumerate() {
        let columns: Vec<&str> = row.split(' ').collect();

        for (x, column) in columns.iter().enumerate() {
            // Create the position at which to create something on the map
            let position = Position {
                x: x as u8,
                y: y as u8,
                z: 0, // we will get the z from the factory functions
            };

            // Figure out what object we should create
            match *column {
                "." => {
                    create_floor(world, position);
                }
                "W" => {
                    create_floor(world, position);
                    create_wall(world, position);
                }
                "P" => {
                    create_floor(world, position);
                    create_player(world, position);
                }
                "B" => {
                    create_floor(world, position);
                    create_box(world, position);
                }
                "S" => {
                    create_floor(world, position);
                    create_box_spot(world, position);
                }
                "N" => (),
                c => panic!("unrecognized map item {}", c),
            }
        }
    }
}
}
Finally, we'll move the systems code into their own files (RenderingSystem to rendering.rs and InputSystem to input.rs). It should just be a copy paste from main with some import removals, so go ahead and do that.
We have to update the mod.rs to tell Rust we want to export all the systems to the outside world (in this case the main module).
#![allow(unused)]
fn main() {
// systems/mod.rs
pub mod input;
pub mod rendering;
}
Awesome, now that we've done that here is how our simplified main file looks like. Notice the mod and use declarations after the imports, those are again telling Rust that we want to use those modules.
// main.rs
/* ANCHOR: all */
// Rust sokoban
// main.rs

use ggez::{conf, event, Context, GameResult};
use hecs::World;

use std::path;

mod components;
mod constants;
mod entities;
mod map;
mod systems;

// ANCHOR: game
// This struct will hold all our game state
// For now there is nothing to be held, but we'll add
// things shortly.
struct Game {
    world: World,
}
// ANCHOR_END: game

// ANCHOR: handler
impl event::EventHandler<ggez::GameError> for Game {
    fn update(&mut self, context: &mut Context) -> GameResult {
        // Run input system
        {
            systems::input::run_input(&self.world, context);
        }

        Ok(())
    }

    fn draw(&mut self, context: &mut Context) -> GameResult {
        // Render game entities
        {
            systems::rendering::run_rendering(&self.world, context);
        }

        Ok(())
    }
}
// ANCHOR_END: handler

// ANCHOR: main
pub fn main() -> GameResult {
    let mut world = World::new();
    map::initialize_level(&mut world);

    // Create a game context and event loop
    let context_builder = ggez::ContextBuilder::new("rust_sokoban", "sokoban")
        .window_setup(conf::WindowSetup::default().title("Rust Sokoban!"))
        .window_mode(conf::WindowMode::default().dimensions(800.0, 600.0))
        .add_resource_path(path::PathBuf::from("./resources"));

    let (context, event_loop) = context_builder.build()?;

    // Create the game state
    let game = Game { world };
    // Run the main event loop
    event::run(context, event_loop, game)
}
// ANCHOR_END: main

/* ANCHOR_END: all */
Feel free to run at this point, everything should work just the same, the only difference is now our code is much nicer and ready for more amazing Sokoban features.
CODELINK: You can see the full code in this example here.
Gameplay
The player character is able to move and push boxes on the field. Many (but not all!) games have some kind of objective for the player to achieve. The objective for Sokoban-style games is typically to push boxes onto a goal spot. There's nothing stopping the player from doing this now, but the game also isn't checking for success. The player might achieve the objective without realizing it! Let's update the game to check for the success state.
Let's think about what we'll need to add to this game to check for the success condition and to notify the user when they've beaten the level:
- A
resourcefor tracking the game state- Is the game in progress or completed?
- How many move has the player made?
- A
systemfor checking if the user has completed their objective - A
systemfor updating the number of moves made - UI for reporting game state
Gameplay Resource
We're choosing to use a resource to track game state because the game state is
not associated with a specific entity. Let's start by defining a Gameplay resource.
#![allow(unused)]
fn main() {
// resources.rs
#[derive(Default)]
pub enum GameplayState {
    #[default]
    Playing,
    Won,
}

#[derive(Default)]
pub struct Gameplay {
    pub state: GameplayState,
    pub moves_count: u32,
}
}
Gameplay has two fields: state and moves_count. These are used to track the
current state of the game (is the game still in play, or has the player won?) and
the number of moves made. state is described by an enum.
The eagle-eyed reader will note that we used a macro to derive the Default trait
for Gameplay, and a #[default] annotation for the GameplayState enum. All this annotation does is tell the compiler that if we ever call GameplayState::default() we should get back GameplayState::Playing, which makes sense.
Now, when the game is started, the Gameplay resource will look like this:
#![allow(unused)]
fn main() {
Gameplay {
    state: GameplayState::Playing,
    moves_count: 0
}
}
Step Counter System
We can increment Gameplay's moves_count field to track the number of turns taken.
We already have a system dealing with user input in the input system, so let's adapt that for this purpose.
#![allow(unused)]
fn main() {
// systems/input.rs
pub fn run_input(world: &World, context: &mut Context) {
    let mut to_move: Vec<(Entity, KeyCode)> = Vec::new();

    // Movement code omitted for clarity
    // .....
    // .....

    // Update gameplay moves
    if !to_move.is_empty() {
        let mut query = world.query::<&mut Gameplay>();
        let gameplay = query.iter().next().unwrap().1;
        gameplay.moves_count += 1;
    }

    // Now actually move what needs to be moved
    for (entity, key) in to_move {
        let mut position = world.get::<&mut Position>(entity).unwrap();

        match key {
            KeyCode::Up => position.y -= 1,
            KeyCode::Down => position.y += 1,
            KeyCode::Left => position.x -= 1,
            KeyCode::Right => position.x += 1,
            _ => (),
        }
    }
}
}
Since we've already done the work to check if a player character will move in response to a keypress, we can use that to determine when to increment the step counter.
Gameplay System
Next, let's integrate this resource with a new gameplay state system. This system will continuously check to see if all the boxes have the same position as all the box spots. Once all the boxes are on all the box spots, the game has been won!
Aside from Gameplay, this system only needs read-only access to the
Position, Box, and BoxSpot components.
If all box spots have a corresponding box at the same position, the game is over and the player has won. Otherwise, the game is still in play.
#![allow(unused)]
fn main() {
// systems/gameplay.rs
use crate::components::*;
use hecs::World;

use std::collections::HashMap;

pub fn run_gameplay_state(world: &World) {
    // get all boxes indexed by position
    let mut query = world.query::<(&Position, &Box)>();
    let boxes_by_position: HashMap<(u8, u8), &Box> = query
        .iter()
        .map(|(_, t)| ((t.0.x, t.0.y), t.1))
        .collect::<HashMap<_, _>>();

    // loop through all box spots and check if there is a corresponding
    // box at that position
    let boxes_out_of_position: usize = world
        .query::<(&Position, &BoxSpot)>()
        .iter()
        .map(|(_, (position, _))| {
            if boxes_by_position.contains_key(&(position.x, position.y)) {
                0
            } else {
                1
            }
        })
        .collect::<Vec<usize>>()
        .into_iter()
        .sum();

    // If we made it this far, then all box spots have boxes on them, and the
    // game has been won
    if boxes_out_of_position == 0 {
        let mut query = world.query::<&mut Gameplay>();
        let gameplay = query.iter().next().unwrap().1;
        gameplay.state = GameplayState::Won;
    }
}
}
Finally, let's run the gameplay system in our main update loop.
// main.rs
/* ANCHOR: all */
// Rust sokoban
// main.rs

use ggez::{conf, event, Context, GameResult};
use hecs::World;

use std::path;

mod components;
mod constants;
mod entities;
mod map;
mod systems;

// ANCHOR: game
// This struct will hold all our game state
// For now there is nothing to be held, but we'll add
// things shortly.
struct Game {
    world: World,
}
// ANCHOR_END: game

// ANCHOR: handler
impl event::EventHandler<ggez::GameError> for Game {
    fn update(&mut self, context: &mut Context) -> GameResult {
        // Run input system
        {
            systems::input::run_input(&self.world, context);
        }

        // Run gameplay state
        {
            systems::gameplay::run_gameplay_state(&self.world);
        }

        Ok(())
    }

    fn draw(&mut self, context: &mut Context) -> GameResult {
        // Render game entities
        {
            systems::rendering::run_rendering(&self.world, context);
        }

        Ok(())
    }
}
// ANCHOR_END: handler

// ANCHOR: main
pub fn main() -> GameResult {
    let mut world = World::new();
    map::initialize_level(&mut world);
    entities::create_gameplay(&mut world);

    // Create a game context and event loop
    let context_builder = ggez::ContextBuilder::new("rust_sokoban", "sokoban")
        .window_setup(conf::WindowSetup::default().title("Rust Sokoban!"))
        .window_mode(conf::WindowMode::default().dimensions(800.0, 600.0))
        .add_resource_path(path::PathBuf::from("./resources"));

    let (context, event_loop) = context_builder.build()?;

    // Create the game state
    let game = Game { world };
    // Run the main event loop
    event::run(context, event_loop, game)
}
// ANCHOR_END: main

/* ANCHOR_END: all */
Gameplay UI
The last step is to provide feedback to the user letting them know what the
state of the game is. This requires a resource to track the state and a
system to update the state. We can adapt the GameplayState resource and
rendering system for this.
First, we'll implement Display for GameplayState so we can render the
state of the game as text. We'll use a match expression to allow GameplayState
to render "Playing" or "Won".
#![allow(unused)]
fn main() {
// resources.rs
impl Display for GameplayState {
    fn fmt(&self, fmt: &mut fmt::Formatter) -> fmt::Result {
        fmt.write_str(match self {
            GameplayState::Playing => "Playing",
            GameplayState::Won => "Won",
        })?;
        Ok(())
    }
}
}
Next, we'll add a draw_text method to rendering system, so it can print
GameplayState to the screen...
#![allow(unused)]
fn main() {
// rendering_systems.rs
pub fn draw_text(canvas: &mut Canvas, text_string: &str, x: f32, y: f32) {
    let text = Text::new(TextFragment {
        text: text_string.to_string(),
        color: Some(Color::new(0.0, 0.0, 0.0, 1.0)),
        scale: Some(PxScale::from(20.0)),
        ..Default::default()
    });

    canvas.draw(&text, Vec2::new(x, y));
}
}
...and then we'll add the Gameplay resource to RenderingSystem so we can
call draw_text, and use it all to render the state and number of moves.
#![allow(unused)]
fn main() {
// rendering.rs
    // Render any text
    let mut query = world.query::<&Gameplay>();
    let gameplay = query.iter().next().unwrap().1;
    draw_text(&mut canvas, &gameplay.state.to_string(), 525.0, 80.0);
    draw_text(&mut canvas, &gameplay.moves_count.to_string(), 525.0, 100.0);
}
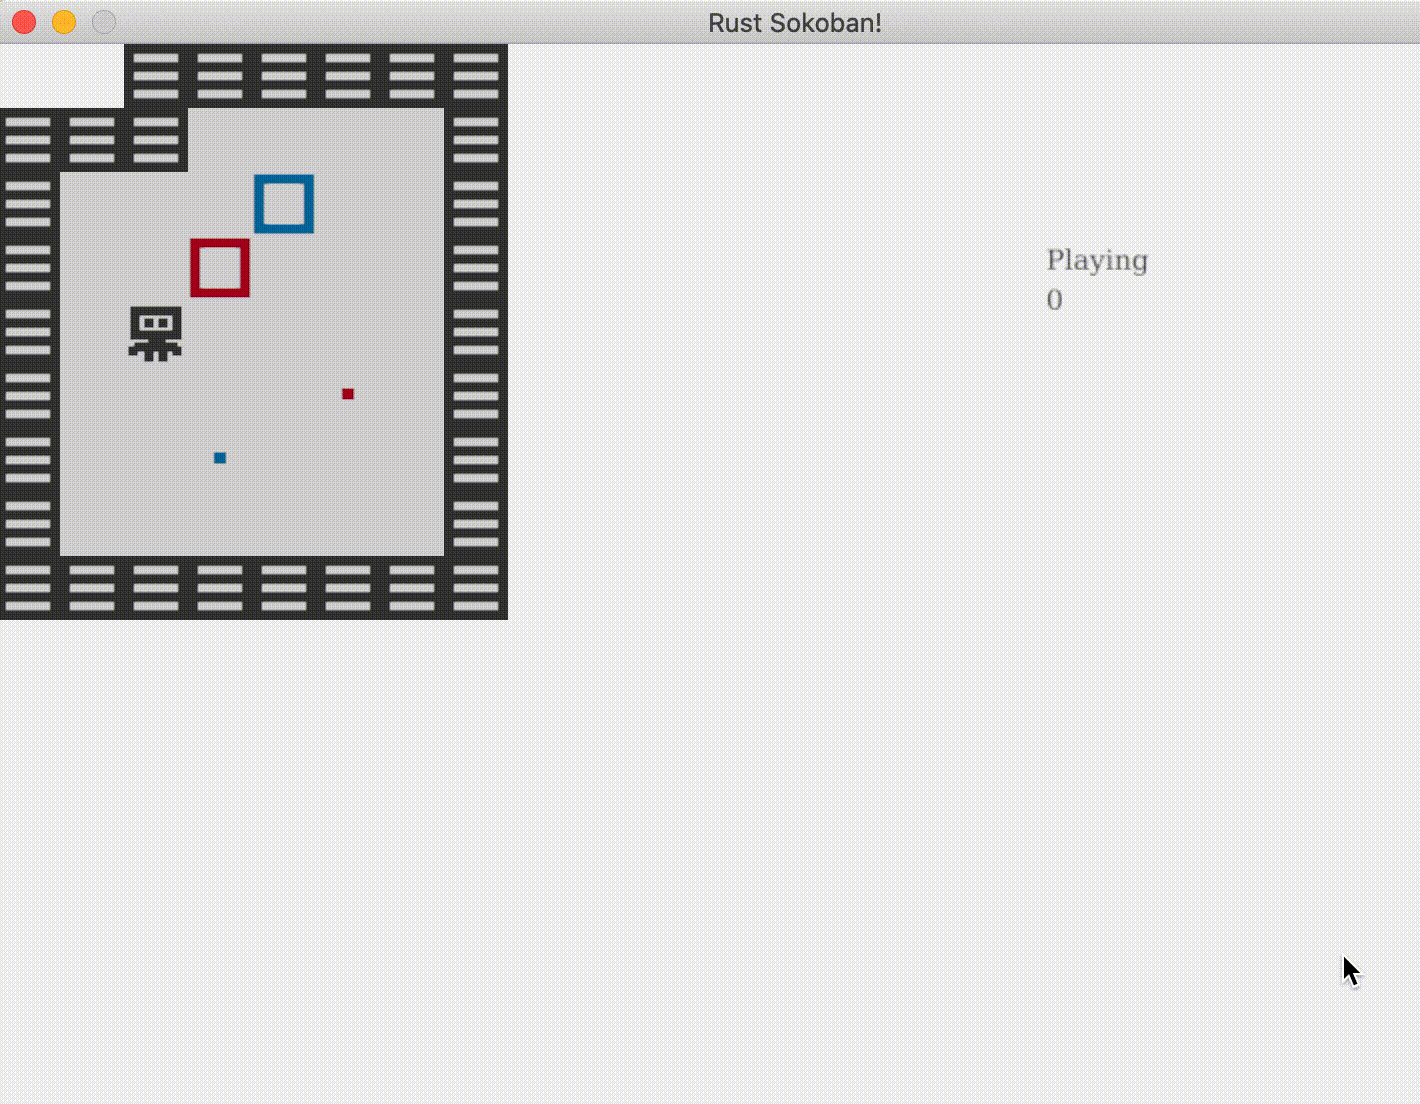
At this point, the game will provide basic feedback to the user:
- Counts the number of steps
- Tells the player when they have won
Here's how it looks.
There are plenty of other enhancements that can be made!
CODELINK: You can see the full code in this example here.
Advanced gameplay
Welcome to Chapter 2 and congratulations of making it so far! In this chapter we are going to work on more advanced gameplay topics!
Coloured boxes
It's time for a little more flair in our game! The gameplay so far is quite simple, put the box on the spot. Let's make it more exciting by adding different coloured boxes. We'll go with red and blue for now but feel free to adapt this to your preference, and create more colours! To win now you'll have to put the box on the same colour spot to win.
Assets
First let's add the new assets, right click and download these as images, or create your own!


The directory structure should look like this (notice we've removed the old default box and default spot).
├── resources
│   └── images
│       ├── box_blue.png
│       ├── box_red.png
│       ├── box_spot_blue.png
│       ├── box_spot_red.png
│       ├── floor.png
│       ├── player.png
│       └── wall.png
├── src
│   ├── systems
│   │   ├── gameplay.rs
│   │   ├── input.rs
│   │   ├── mod.rs
│   │   └── rendering.rs
│   ├── components.rs
│   ├── constants.rs
│   ├── entities.rs
│   ├── main.rs
│   ├── map.rs
│   └── resources.rs
├── Cargo.lock
├── Cargo.toml
Component changes
Now let's add an enum for the colour (if you chose to implement more than two colours you'll have to add them here).
#![allow(unused)]
fn main() {
// components.rs
pub enum BoxColour {
    Red,
    Blue,
}
}
Now let's use this enum both for the box and the spot.
#![allow(unused)]
fn main() {
// components.rs
pub struct Box {
    pub colour: BoxColour,
}

pub struct BoxSpot {
    pub colour: BoxColour,
}
}
Entity creation
Let's also add the colour as a parameter when we created boxes and spots and make sure we pass the correct asset path based on the colour enum.
In order to create the correct string for the asset path we basically want "/images/box_{}.png" where {} is the colour of the box we are trying to create. The challenge we have now is that we are using an enum for the colour, so the Rust compiler will not know how to convert BoxColour::Red into "red". It would be really cool to be able to do colour.to_string() and get the right value. Fortunately, Rust has a nice way for us to do this, we need to implement the Display trait on the BoxColour enum. Here is how that looks like, we simply specify how to map each variant of the enum into a string.
#![allow(unused)]
fn main() {
// components.rs
impl Display for BoxColour {
    fn fmt(&self, fmt: &mut fmt::Formatter) -> fmt::Result {
        fmt.write_str(match self {
            BoxColour::Red => "red",
            BoxColour::Blue => "blue",
        })?;
        Ok(())
    }
}
}
Now let's include the colour in our entity creation code and use the fancy colour.to_string() we just made possible in the previous snippet.
#![allow(unused)]
fn main() {
// entities.rs
pub fn create_box(world: &mut World, position: Position, colour: BoxColour) -> Entity {
    world.spawn((
        Position { z: 10, ..position },
        Renderable {
            path: format!("/images/box_{}.png", colour),
        },
        Box { colour },
        Movable {},
    ))
}

pub fn create_box_spot(world: &mut World, position: Position, colour: BoxColour) -> Entity {
    world.spawn((
        Position { z: 9, ..position },
        Renderable {
            path: format!("/images/box_spot_{}.png", colour),
        },
        BoxSpot { colour },
    ))
}
}
Map
Now let's change our map code to allow new options for coloured boxes and spots:
- "BB" for blue box
- "RB" for red box
- "BS" for blue spot
- "RS" for red spot
#![allow(unused)]
fn main() {
// map.rs
            match *column {
                "." => {
                    create_floor(world, position);
                }
                "W" => {
                    create_floor(world, position);
                    create_wall(world, position);
                }
                "P" => {
                    create_floor(world, position);
                    create_player(world, position);
                }
                "BB" => {
                    create_floor(world, position);
                    create_box(world, position, BoxColour::Blue);
                }
                "RB" => {
                    create_floor(world, position);
                    create_box(world, position, BoxColour::Red);
                }
                "BS" => {
                    create_floor(world, position);
                    create_box_spot(world, position, BoxColour::Blue);
                }
                "RS" => {
                    create_floor(world, position);
                    create_box_spot(world, position, BoxColour::Red);
                }
                "N" => (),
                c => panic!("unrecognized map item {}", c),
            }
}
And let's update our static map when initialising the level.
#![allow(unused)]
fn main() {
// map.rs
pub fn initialize_level(world: &mut World) {
    const MAP: &str = "
    N N W W W W W W
    W W W . . . . W
    W . . . BB . . W
    W . . RB . . . W
    W . P . . . . W
    W . . . . RS . W
    W . . BS . . . W
    W . . . . . . W
    W W W W W W W W
    ";

    load_map(world, MAP.to_string());
}
}
Gameplay
Now we've done the hard work, so we can go ahead and test this code out. You'll notice everything works, but there is a big gameplay bug. You can win by putting the red box on the blue spot and viceversa. Let's fix that.
We've learnt before that data goes in components and behaviour goes in systems - as per ECS methodology. What we are discussing now is behaviour, so it must be in a system. Remember how we added a system for checking whether you've won or not? Well that is the exact place we are after.
Let's modify the run function and check the colour of the spot and the box match.
#![allow(unused)]
fn main() {
// gameplay.rs
use crate::components::*;
use hecs::World;

use std::collections::HashMap;

pub fn run_gameplay_state(world: &World) {
    // get all boxes indexed by position
    let mut query = world.query::<(&Position, &Box)>();
    let boxes_by_position: HashMap<(u8, u8), &Box> = query
        .iter()
        .map(|(_, t)| ((t.0.x, t.0.y), t.1))
        .collect::<HashMap<_, _>>();

    // loop through all box spots and check if there is a corresponding
    // box at that position
    let boxes_out_of_position: usize = world
        .query::<(&Position, &BoxSpot)>()
        .iter()
        .map(|(_, (position, box_spot))| {
            if let Some(the_box) = boxes_by_position.get(&(position.x, position.y)) {
                if box_spot.colour == the_box.colour {
                    0
                } else {
                    1
                }
            } else {
                1
            }
        })
        .collect::<Vec<usize>>()
        .into_iter()
        .sum();

    // If we made it this far, then all box spots have boxes on them, and the
    // game has been won
    if boxes_out_of_position == 0 {
        let mut query = world.query::<&mut Gameplay>();
        let gameplay = query.iter().next().unwrap().1;
        gameplay.state = GameplayState::Won;
    }
}
}
Now if you compile the code at this point it should complain about the fact that we are trying to compare two enums with ==. Rust doesn't know by default how to handle this, so we must tell it. The best way we can do that is add an implementation for the PartialEq trait.
#![allow(unused)]
fn main() {
// components.rs
#[derive(PartialEq)]
pub enum BoxColour {
    Red,
    Blue,
}
}
Now is a good time to discuss these unusual derive annotations. We've used them before, but never got too deep into what they do. Derive attributes can be applied to structs or enums and they allow us to add default trait implementations to our types. For example here we are telling Rust to add the PartialEq default trait implementations to our BoxColour enum.
Here is how the PartialEq default implementation looks like, it just checks if something equals itself. If it does, the comparison succeeds and if it doesn't it fails. Don't worry too much about this if it doesn't make sense.
#![allow(unused)]
fn main() {
pub trait PartialEq {
  fn eq(&self, other: &Self) -> bool;
  fn ne(&self, other: &Self) -> bool { !self.eq(other) };
}
}
So by adding the #[derive(PartialEq)] on top of the enum we are telling Rust that BoxColour now implements the partial eq trait we saw before, which means if we try to do box_colour_1 == box_colour_2 it will use this implementation which will just check if the colour_1 object is the same as the colour_2 object. This is not the most sophisticated partial equality implementation, but it should do just fine for our usecase.
MORE: Read more about PartialEq here and more about derivable traits here.
Now we can compile the code the reap the rewards of our efforts by seeing the game run and telling us we've won only when we put the right box in the right spot!
CODELINK: You can see the full code in this example here.
Animations
In this section we are going to look at adding animations to our game, we'll start with some basic ones but feel free to add more complex ones given the ideas in this tutorial. We'll add two animations: making the player blink and making the boxes jiggle slightly in place.
What is an animation?
An animation is simply a set of frames played at a specific time interval that gives the illusion of movement. Think of it like a video (a video is just a set of images played in sequence), but much lower framerate.
For example, to get our player blinking we'll have three animation frames:
- our current player with the eyes open
- player with eyes a little bit closed
- player with eyes completely closed
If we play these three frames in sequence you'll notice it looks like the player is blinking. You can try this out by opening the images and shifting between them quickly on the image preview.
There are a few gotchas on this:
- the assets need to be done with a specific framerate in mind - for us we will go with 250 milliseconds, meaning we will play a new animation frame every 250ms, so we will have 4 frames per second
- the assets need to be consistent with each other - imagine we had two types of players which had different assets and different looking eyes, we would have to make sure that when we create the three frames mentioned above they would be consistent, otherwise the two players would blink at different rates
- designing assets for a lot of frames is a lot of work, so we'll try to keep our animations quite simple and stick to the key frames
How will it work?
So how is this going to work in our existing Sokoban game? We'll have to:
- Change our renderable component to allow multiple frames - we could also create a new renderable component that handles animated renderables and keep the one we have for static renderables, but it feels a bit cleaner to keep them together for now
- Modify the player entity construction to take multiple frames
- Keep track of time in our rendering loop - we'll discuss this one in more detail so don't worry if it's not obvious why we need to do this
- Change the rendering system taking into account the number of frames, the time and the frame that is supposed to be rendered at a given time
Assets
Let's add the new assets for the player, it should then look like this. Notice we created a convention to name the frames sequentially, this is not strictly necessary, but it will help us keep track of the order easily.


├── resources
│   └── images
│       ├── box_blue.png
│       ├── box_red.png
│       ├── box_spot_blue.png
│       ├── box_spot_red.png
│       ├── floor.png
│       ├── player_1.png
│       ├── player_2.png
│       ├── player_3.png
│       └── wall.png
Renderable
Now let's update our renderable component to receive multiple frames, instead of having a single path, we'll have a list of paths, this should be pretty straightforward.
Let's also add two new functions to construct the two types of renderables, either with a single path or with multiple paths. These two functions are associated functions, because they are associated with the struct Renderable, but they are the equivalent of static functions in other languages since they don't operate on instances (notice they don't receive &self or &mut self as the first argument, which means we can call them in the context of the struct not an instance of the struct). They are also similar to factory functions, since they encapsulate the logic and validation required before actually constructing an object.
MORE: Read more about associated functions here.
#![allow(unused)]
fn main() {
// components.rs
pub struct Renderable {
    paths: Vec<String>,
}

impl Renderable {
    pub fn new_static(path: &str) -> Self {
        Self {
            paths: vec![path.to_string()],
        }
    }

    pub fn new_animated(paths: Vec<&str>) -> Self {
        Self {
            paths: paths.iter().map(|p| p.to_string()).collect(),
        }
    }
}
}
Next, we need a way of telling if a renderable is animated or static, which we will use in the rendering system. We could leave the paths member variable public and allow the rendering system to get the length of the paths and infer based on the length, but there is a more idiomatic way. We can add an enum for the kind of renderable, and add a method on the renderable to get that kind, in this way we encapsulate the logic of the kind within the renderable, and we can keep paths private. You can put the kind declaration anywhere in the components.rs, but ideally next to the renderable declaration.
#![allow(unused)]
fn main() {
// components.rs
pub enum RenderableKind {
    Static,
    Animated,
}
}
Now let's add a function to tell us the kind of a renderable based on the internal paths.
#![allow(unused)]
fn main() {
// components.rs
    pub fn kind(&self) -> RenderableKind {
        match self.paths.len() {
            0 => panic!("invalid renderable"),
            1 => RenderableKind::Static,
            _ => RenderableKind::Animated,
        }
    }
}
And finally, because we made paths private, we need to allow users of renderable to get a specific path from our list. For static renderables, this will be the 0th path (the only one) and for animated paths we'll let the rendering system decide which path should be rendered based on the time. The only tricky bit here is if we get asked for a frame bigger than what we have, we will wrap that around by modding with the length.
#![allow(unused)]
fn main() {
// components.rs
    pub fn path(&self, path_index: usize) -> String {
        // If we get asked for a path that is larger than the
        // number of paths we actually have, we simply mod the index
        // with the length to get an index that is in range.
        self.paths[path_index % self.paths.len()].clone()
    }
}
Entity creation
Next up, let's update our player entity creation to account for multiple paths. Notice now we are using the new_animated function to construct the renderable.
#![allow(unused)]
fn main() {
// entities.rs
pub fn create_box(world: &mut World, position: Position, colour: BoxColour) -> Entity {
    world.spawn((
        Position { z: 10, ..position },
        Renderable::new_animated(vec![
            &format!("/images/box_{}_1.png", colour),
            &format!("/images/box_{}_2.png", colour),
        ]),
        Box { colour },
        Movable {},
    ))
}

pub fn create_box_spot(world: &mut World, position: Position, colour: BoxColour) -> Entity {
    world.spawn((
        Position { z: 9, ..position },
        Renderable::new_static(&format!("/images/box_spot_{}.png", colour)),
        BoxSpot { colour },
    ))
}
}
And let's update everything else to use the new_static function - here is how we are doing it for the wall entity creation, feel free to go ahead and apply this to the other static entities.
#![allow(unused)]
fn main() {
// entities.rs
use crate::components::*;
use hecs::{Entity, World};

pub fn create_wall(world: &mut World, position: Position) -> Entity {
    world.spawn((
        Position { z: 10, ..position },
        Renderable::new_static("/images/wall.png"),
        Wall {},
        Immovable {},
    ))
}

pub fn create_floor(world: &mut World, position: Position) -> Entity {
    world.spawn((
        Position { z: 5, ..position },
        Renderable::new_static("/images/floor.png"),
    ))
}

// ANCHOR: create_box
pub fn create_box(world: &mut World, position: Position, colour: BoxColour) -> Entity {
    world.spawn((
        Position { z: 10, ..position },
        Renderable::new_animated(vec![
            &format!("/images/box_{}_1.png", colour),
            &format!("/images/box_{}_2.png", colour),
        ]),
        Box { colour },
        Movable {},
    ))
}

pub fn create_box_spot(world: &mut World, position: Position, colour: BoxColour) -> Entity {
    world.spawn((
        Position { z: 9, ..position },
        Renderable::new_static(&format!("/images/box_spot_{}.png", colour)),
        BoxSpot { colour },
    ))
}
// ANCHOR_END: create_box

pub fn create_player(world: &mut World, position: Position) -> Entity {
    world.spawn((
        Position { z: 10, ..position },
        Renderable::new_animated(vec![
            "/images/player_1.png",
            "/images/player_2.png",
            "/images/player_3.png",
        ]),
        Player {},
        Movable {},
    ))
}

pub fn create_gameplay(world: &mut World) -> Entity {
    world.spawn((Gameplay::default(),))
}

// ANCHOR: create_time
pub fn create_time(world: &mut World) -> Entity {
    world.spawn((Time::default(),))
}
// ANCHOR_END: create_time
}
Time
Another component we will need for this is keeping track of time. What does time have to do with this and how does this connect with frame rate? The basic idea is this: ggez controls how often the rendering system gets called, and this depends on the frame rate which in turn depends on how much work we are doing on every iteration of the game loop. Because we don't control this, in the span of a second we could get called 60 times or 57 times or maybe even 30 times. This means we cannot base our animation system on the framerate, and instead we need to keep it based on time.
Because of this we need to keep track of the delta time - or how much time passes between the previous loop and the current loop. And because the delta time is much smaller than our animation frame interval (which we have decided on 250ms), we need to keep the cumulative delta - or how much time has passed since the beginning of the game being launched.
MORE: Read more about delta time, frame rate and game loops here, here or here .
Let's now add a resource for time, this doesn't fit into our component model since time is just some global state that needs to be kept.
#![allow(unused)]
fn main() {
// components.rs
#[derive(Default)]
pub struct Time {
    pub delta: Duration,
}
}
And now let's update this time in our main loop. Luckily ggez provides a function to get the delta, so all we have to do is accumulate it.
#![allow(unused)]
fn main() {
// main.rs
    fn update(&mut self, context: &mut Context) -> GameResult {
        // Run input system
        {
            systems::input::run_input(&self.world, context);
        }

        // Run gameplay state
        {
            systems::gameplay::run_gameplay_state(&self.world);
        }

        // Get and update time resource
        {
            let mut query = self.world.query::<&mut crate::components::Time>();
            let time = query.iter().next().unwrap().1;
            time.delta += context.time.delta();
        }

        Ok(())
    }
}
Rendering system
Now let's update our rendering system. We will get the kind from the renderable, if it's static we simply use the first frame, otherwise we figure out which frame to get based on the delta time.
Let's first add a function to enapsulate this logic of getting the correct image.
#![allow(unused)]
fn main() {
// rendering.rs
pub fn get_image(context: &mut Context, renderable: &Renderable, delta: Duration) -> Image {
    let path_index = match renderable.kind() {
        RenderableKind::Static => {
            // We only have one image, so we just return that
            0
        }
        RenderableKind::Animated => {
            // If we have multiple, we want to select the right one based on the delta time.
            // First we get the delta in milliseconds, we % by 1000 to get the milliseconds
            // only and finally we divide by 250 to get a number between 0 and 4. If it's 4
            // we technically are on the next iteration of the loop (or on 0), but we will let
            // the renderable handle this logic of wrapping frames.
            ((delta.as_millis() % 1000) / 250) as usize
        }
    };

    let image_path = renderable.path(path_index);

    Image::from_path(context, image_path).unwrap()
}
}
And finally, let's use the new get_image function inside the run function (we will also have to add time to the SystemData definition and a couple of imports, but that should be pretty much it).
#![allow(unused)]
fn main() {
// rendering.rs
pub fn run_rendering(world: &World, context: &mut Context) {
    // Clearing the screen (this gives us the background colour)
    let mut canvas =
        graphics::Canvas::from_frame(context, graphics::Color::from([0.95, 0.95, 0.95, 1.0]));

    // Get time
    let mut query = world.query::<&Time>();
    let time = query.iter().next().unwrap().1;

    // Get all the renderables with their positions and sort by the position z
    // This will allow us to have entities layered visually.
    let mut query = world.query::<(&Position, &Renderable)>();
    let mut rendering_data: Vec<(Entity, (&Position, &Renderable))> = query.into_iter().collect();
    rendering_data.sort_by_key(|&k| k.1 .0.z);

    // Iterate through all pairs of positions & renderables, load the image
    // and draw it at the specified position.
    for (_, (position, renderable)) in rendering_data.iter() {
        // Load the image
        let image = get_image(context, renderable, time.delta);
        let x = position.x as f32 * TILE_WIDTH;
        let y = position.y as f32 * TILE_WIDTH;

        // draw
        let draw_params = DrawParam::new().dest(Vec2::new(x, y));
        canvas.draw(&image, draw_params);
    }

    // Render any text
    let mut query = world.query::<&Gameplay>();
    let gameplay = query.iter().next().unwrap().1;
    draw_text(&mut canvas, &gameplay.state.to_string(), 525.0, 80.0);
    draw_text(&mut canvas, &gameplay.moves_count.to_string(), 525.0, 100.0);

    // Finally, present the canvas, this will actually display everything
    // on the screen.
    canvas.finish(context).expect("expected to present");
}
}
Box animations
Now that we've learned how to do this, let's extend this to make the boxes animate as well. All we have to do is add new assets and fix the entity creation and everything should just work. Here are the assets I used, feel free to re-use them or create new ones!


Wrap up
That was a long section, but I hope you enjoyed it! Here is how the game should look now.
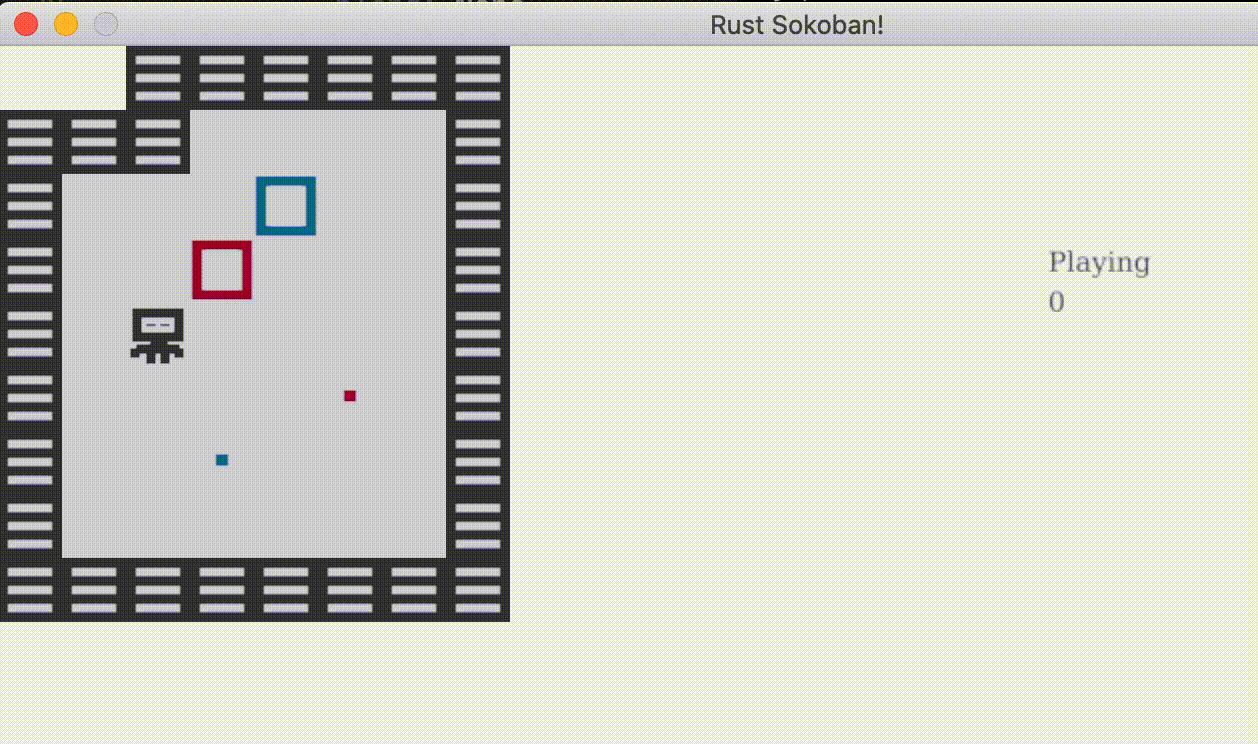
CODELINK: You can see the full code in this example here.
Sounds and events
In this section we will work on adding events which will be later used for adding sound effects. In short, we want to play sounds in these circumstances:
- when the player hits a wall or an obstacle - to let them know they cannot get through
- when the player places a box on the correct spot - as an indication of "you've done it correctly"
- when the player places a box on the incorrect spot - as an indication that the move was wrong
Actually playing audio will not be too difficult as ggez provides this ability, but the biggest issue we have right now is that we need to determine when to play the sounds.
Let's take the box on correct spot example. We could probably use our game state system and loop through the boxes and the spots and determine when we are in this state and play the sound. But that is not going to work because we will be interating many times per second, and we will always be in this state as long as the box doesn't move, so we will attempt to play many times per second, which is not what we want. We could try to keep some state to know what we are currently playing, but that doesn't feel right. The problem is we cannot do this by iteratively checking state, we instead need a reactive model where we can be told something has just happenned, and we need to take an action. What I've described here is an event model, we need to fire an event when a box gets placed on a spot, and then when we receive this event on the other end we need to play the sound. The really good thing about this is that we will be able to re-use this event system for many other purposes.
Events infrastructure: How
Let's start by discussing how we will implement events. We will not use components or entities (although we could), instead we will use a resource very similar to the input queue. The parts of the code that need to enqueue events will need to get access to this resource, and we will then have a system which processes these events and take the appropriate actions.
What events
Let's discuss in more detail what events we will need:
- player hit obstacle - this can be an event in itself which we fire from the input system when we try to move but can't
- box placed on correct/incorrect spot - we can model this as a single event with a property inside it that tells us if the box/spot combination is correct - thinking a bit deeper about how we can achieve this, we can have an entity moved event, and when we receive that event we can check the entity id of that entity that just moved to see if it's a box and if it's on the right/wrong/any spot (this is an example of creating an event chain - an event from an event)
Events types
Now let's go into the implementation of events. We'll use an enum to define various event types. Now, we've used enums before (for the rendering type and the box colours) but this time we will take full advantage of the power of Rust enums. One of the most interesting things about them is that we actually attach properties to each enum variant.
Let's look at the event definitions, it should be something like this.
#![allow(unused)]
fn main() {
// events.rs
use hecs::Entity;

#[derive(Debug)]
pub struct EntityMoved {
    pub entity: Entity,
}

#[allow(dead_code)]
#[derive(Debug)]
pub struct BoxPlacedOnSpot {
    pub is_correct_spot: bool,
}

#[derive(Debug)]
pub enum Event {
    // Fired when the player hits an obstacle like a wall
    PlayerHitObstacle,

    // Fired when an entity is moved
    EntityMoved(EntityMoved),

    // Fired when the box is placed on a spot
    BoxPlacedOnSpot(BoxPlacedOnSpot),
}
}
Event queue resource
Now let's add a resource for the event queue. We will have various systems writing to this queue and one system (the event system) consuming this queue. It's basically a multiple producer single consumer model.
#![allow(unused)]
fn main() {
// components.rs
#[derive(Default)]
pub struct EventQueue {
    pub events: Vec<Event>,
}
}
Sending events
Now that we have a way to enqueue events, let's add the two events we need in the input_system: EntityMoved and PlayerHitObstacle.
#![allow(unused)]
fn main() {
// input.rs
pub fn run_input(world: &World, context: &mut Context) {
    let mut to_move: Vec<(Entity, KeyCode)> = Vec::new();
    let mut events = Vec::new();

    /// Code omitted
    /// ......
    /// ......
            // find a movable
            // if it exists, we try to move it and continue
            // if it doesn't exist, we continue and try to find an immovable instead
            match mov.get(&pos) {
                Some(entity) => to_move.push((*entity, key)),
                None => {
                    // find an immovable
                    // if it exists, we need to stop and not move anything
                    // if it doesn't exist, we stop because we found a gap
                    match immov.get(&pos) {
                        Some(_id) => {
                            to_move.clear();
                            events.push(Event::PlayerHitObstacle {});
                            break;
                        }
                        None => break,
                    }
                }
            }

    /// Code omitted
    /// ......
    /// ......
    ///
    // Now actually move what needs to be moved
    for (entity, key) in to_move {
        let mut position = world.get::<&mut Position>(entity).unwrap();

        match key {
            KeyCode::Up => position.y -= 1,
            KeyCode::Down => position.y += 1,
            KeyCode::Left => position.x -= 1,
            KeyCode::Right => position.x += 1,
            _ => (),
        }

        // Fire an event for the entity that just moved
        events.push(Event::EntityMoved(EntityMoved { entity }));
    }
}
I've omitted some of the code in the original file for readability, but we are really just adding two lines in the right places to create the events and add them to the events vector.
Finally we need to add the events back into the world which we do at the end of the system.
#![allow(unused)]
fn main() {
// input.rs
pub fn run_input(world: &World, context: &mut Context) {
    let mut to_move: Vec<(Entity, KeyCode)> = Vec::new();
    let mut events = Vec::new();

    /// Code omitted
    /// ......
    /// ......

    // Finally add events back into the world
    {
        let mut query = world.query::<&mut EventQueue>();
        let event_queue = query.iter().next().unwrap().1;
        event_queue.events.append(&mut events);
    }
}
}
Consuming events - event system
Now it's time to add a way to consume the events, which will be the events system. This system will contain the logic for what should happen when a specific event is received.
Let discuss how we will handle each event:
- Event::PlayerHitObstacle -> this is where the sound playing will go, but we'll come back to this when we add the audio bits
- Event::EntityMoved(EntityMoved { id }) -> this is where we will add the logic for checking if the entity that just moved is a box and whether it's on a spot or not
- Event::BoxPlacedOnSpot(BoxPlacedOnSpot { is_correct_spot }) -> this is where the sound playing will go, but we'll come back to this when we add the audio bits
#![allow(unused)]
fn main() {
// systems/events.rs
use crate::components::*;
use crate::events::*;
use hecs::World;

use std::collections::HashMap;

pub fn run_process_events(world: &mut World) {
    let events = {
        let mut query = world.query::<&mut crate::components::EventQueue>();
        let events = query
            .iter()
            .next()
            .unwrap()
            .1
            .events
            .drain(..)
            .collect::<Vec<_>>();

        events
    };

    let mut new_events = Vec::new();

    let mut query = world.query::<(&Position, &BoxSpot)>();
    let box_spots_by_position: HashMap<(u8, u8), &BoxSpot> = query
        .iter()
        .map(|(_, t)| ((t.0.x, t.0.y), t.1))
        .collect::<HashMap<_, _>>();

    for event in events {
        println!("New event: {:?}", event);

        match event {
            Event::PlayerHitObstacle => {
                // play sound here
            }
            Event::EntityMoved(EntityMoved { entity }) => {
                // An entity was just moved, check if it was a box and fire
                // more events if it's been moved on a spot.
                if let Ok(the_box) = world.get::<&Box>(entity) {
                    if let Ok(box_position) = world.get::<&Position>(entity) {
                        // Check if there is a spot on this position, and if there
                        // is if it's the correct or incorrect type
                        if let Some(box_spot) =
                            box_spots_by_position.get(&(box_position.x, box_position.y))
                        {
                            new_events.push(Event::BoxPlacedOnSpot(BoxPlacedOnSpot {
                                is_correct_spot: (box_spot.colour == the_box.colour),
                            }));
                        }
                    }
                }
            }
            Event::BoxPlacedOnSpot(BoxPlacedOnSpot { is_correct_spot: _ }) => {
                // play sound here
            }
        }
    }

    // Finally add events back into the world
    {
        let mut query = world.query::<&mut EventQueue>();
        let event_queue = query.iter().next().unwrap().1;
        event_queue.events.append(&mut new_events);
    }
}
}
The end of this system is important, processing an event could lead to another event created. So we must add events back into the world again.
CODELINK: You can see the full code in this example here.
Sound effects
In this section we will work on adding sound effects. In short, we want to play sounds in these circumstances:
- when the player hits a wall or an obstacle - to let them know they cannot get through
- when the player places a box on the correct spot - as an indication of "you've done it correctly"
- when the player places a box on the incorrect spot - as an indication that the move was wrong
Audio store
Now in order to play the sound the wav files need to be loaded. To avoid loading them on the fly every time before we play the sound we'll create an audio store and load them up at the beginning of the game.
We'll use a resource for the audio store.
#![allow(unused)]
fn main() {
#[derive(Default)]
pub struct AudioStore {
    pub sounds: HashMap<String, std::boxed::Box<audio::Source>>,
}
}
And let's add the code for initializing the store, which means pre-loading all the sounds needed for the game.
#![allow(unused)]
fn main() {
pub fn load_sounds(world: &mut World, context: &mut Context) {
    let mut query = world.query::<&mut crate::components::AudioStore>();
    let audio_store = query.iter().next().unwrap().1;

    let sounds = ["correct", "incorrect", "wall"];

    for sound in sounds.iter() {
        let sound_name = sound.to_string();
        let sound_path = format!("/sounds/{}.wav", sound_name);
        let sound_source = Source::new(context, sound_path).expect("expected sound loaded");

        audio_store
            .sounds
            .insert(sound_name, Box::new(sound_source));
    }
}
}
And then call this function when we are initializing the level.
#![allow(unused)]
fn main() {
pub fn initialize_level(world: &mut World, context: &mut Context) {
    const MAP: &str = "
    N N W W W W W W
    W W W . . . . W
    W . . . BB . . W
    W . . RB . . . W
    W . P . . . . W
    W . . . . RS . W
    W . . BS . . . W
    W . . . . . . W
    W W W W W W W W
    ";

    load_map(world, MAP.to_string());
    load_sounds(world, context);
}
}
Playing audio
Finally, let's add the ability to play the sound in the store.
#![allow(unused)]
fn main() {
impl AudioStore {
    pub fn play_sound(&mut self, context: &mut Context, sound: &str) {
        if let Some(source) = self.sounds.get_mut(sound) {
            if source.play_detached(context).is_ok() {
                println!("Playing sound: {}", sound);
            }
        }
    }
}
}
And now let's play in the event system.
#![allow(unused)]
fn main() {
// systems/events.rs
use crate::components::*;
use crate::events::*;
use ggez::Context;
use hecs::World;

use std::collections::HashMap;

pub fn run_process_events(world: &mut World, context: &mut Context) {
    let events = {
        let mut query = world.query::<&mut crate::components::EventQueue>();
        let events = query
            .iter()
            .next()
            .unwrap()
            .1
            .events
            .drain(..)
            .collect::<Vec<_>>();

        events
    };

    let mut new_events = Vec::new();

    let mut query = world.query::<(&Position, &BoxSpot)>();
    let box_spots_by_position: HashMap<(u8, u8), &BoxSpot> = query
        .iter()
        .map(|(_, t)| ((t.0.x, t.0.y), t.1))
        .collect::<HashMap<_, _>>();

    let mut query = world.query::<&mut AudioStore>();
    let audio_store = query.iter().next().unwrap().1;

    for event in events {
        println!("New event: {:?}", event);

        match event {
            Event::PlayerHitObstacle => {
                // play sound here
                audio_store.play_sound(context, "wall");
            }
            Event::EntityMoved(EntityMoved { entity }) => {
                // An entity was just moved, check if it was a box and fire
                // more events if it's been moved on a spot.
                if let Ok(the_box) = world.get::<&Box>(entity) {
                    if let Ok(box_position) = world.get::<&Position>(entity) {
                        // Check if there is a spot on this position, and if there
                        // is if it's the correct or incorrect type
                        if let Some(box_spot) =
                            box_spots_by_position.get(&(box_position.x, box_position.y))
                        {
                            new_events.push(Event::BoxPlacedOnSpot(BoxPlacedOnSpot {
                                is_correct_spot: (box_spot.colour == the_box.colour),
                            }));
                        }
                    }
                }
            }
            Event::BoxPlacedOnSpot(BoxPlacedOnSpot { is_correct_spot }) => {
                // play sound here
                let sound = if is_correct_spot {
                    "correct"
                } else {
                    "incorrect"
                };

                audio_store.play_sound(context, sound);
            }
        }
    }

    // Finally add events back into the world
    {
        let mut query = world.query::<&mut EventQueue>();
        let event_queue = query.iter().next().unwrap().1;
        event_queue.events.append(&mut new_events);
    }
}
}
Now let's run the game and enjoy those sound effects!
CODELINK: You can see the full code in this example here.
Batch rendering
You might have noticed while playing the game that the input feels a bit slow. Let's add an FPS counter to see how fast we are rendering. If you are not familiar with the term FPS, it stands for Frames Per Second, and we are basically aiming for 60FPS.
FPS counter
Let's start by adding an FPS counter, there are two parts to this:
- getting or calculating the FPS value
- rendering the value on the screen
For 1 luckily ggez provides a way to get the fps - see here. For 2 we already have a way to render text in the rendering system, so we just need to get the FPS there. Let's put all this together in the code.
#![allow(unused)]
fn main() {
// rendering.rs
pub fn run_rendering(world: &World, context: &mut Context) {
    // Clearing the screen (this gives us the background colour)
    let mut canvas =
        graphics::Canvas::from_frame(context, graphics::Color::from([0.95, 0.95, 0.95, 1.0]));

    /// Code omitted
    /// .....
    /// .....

    // Render FPS
    let fps = format!("FPS: {:.0}", context.time.fps());
    draw_text(&mut canvas, &fps, 525.0, 120.0);

    /// Code omitted
    /// .....
    /// .....

    // Finally, present the canvas, this will actually display everything
    // on the screen.
    canvas.finish(context).expect("expected to present");
}
}
Run the game and move around with the keys a bit and you will see the FPS drops quite significantly from the expected 60. For me it looks to be in the range of 20-30 but depending on your machine it might be more or less.
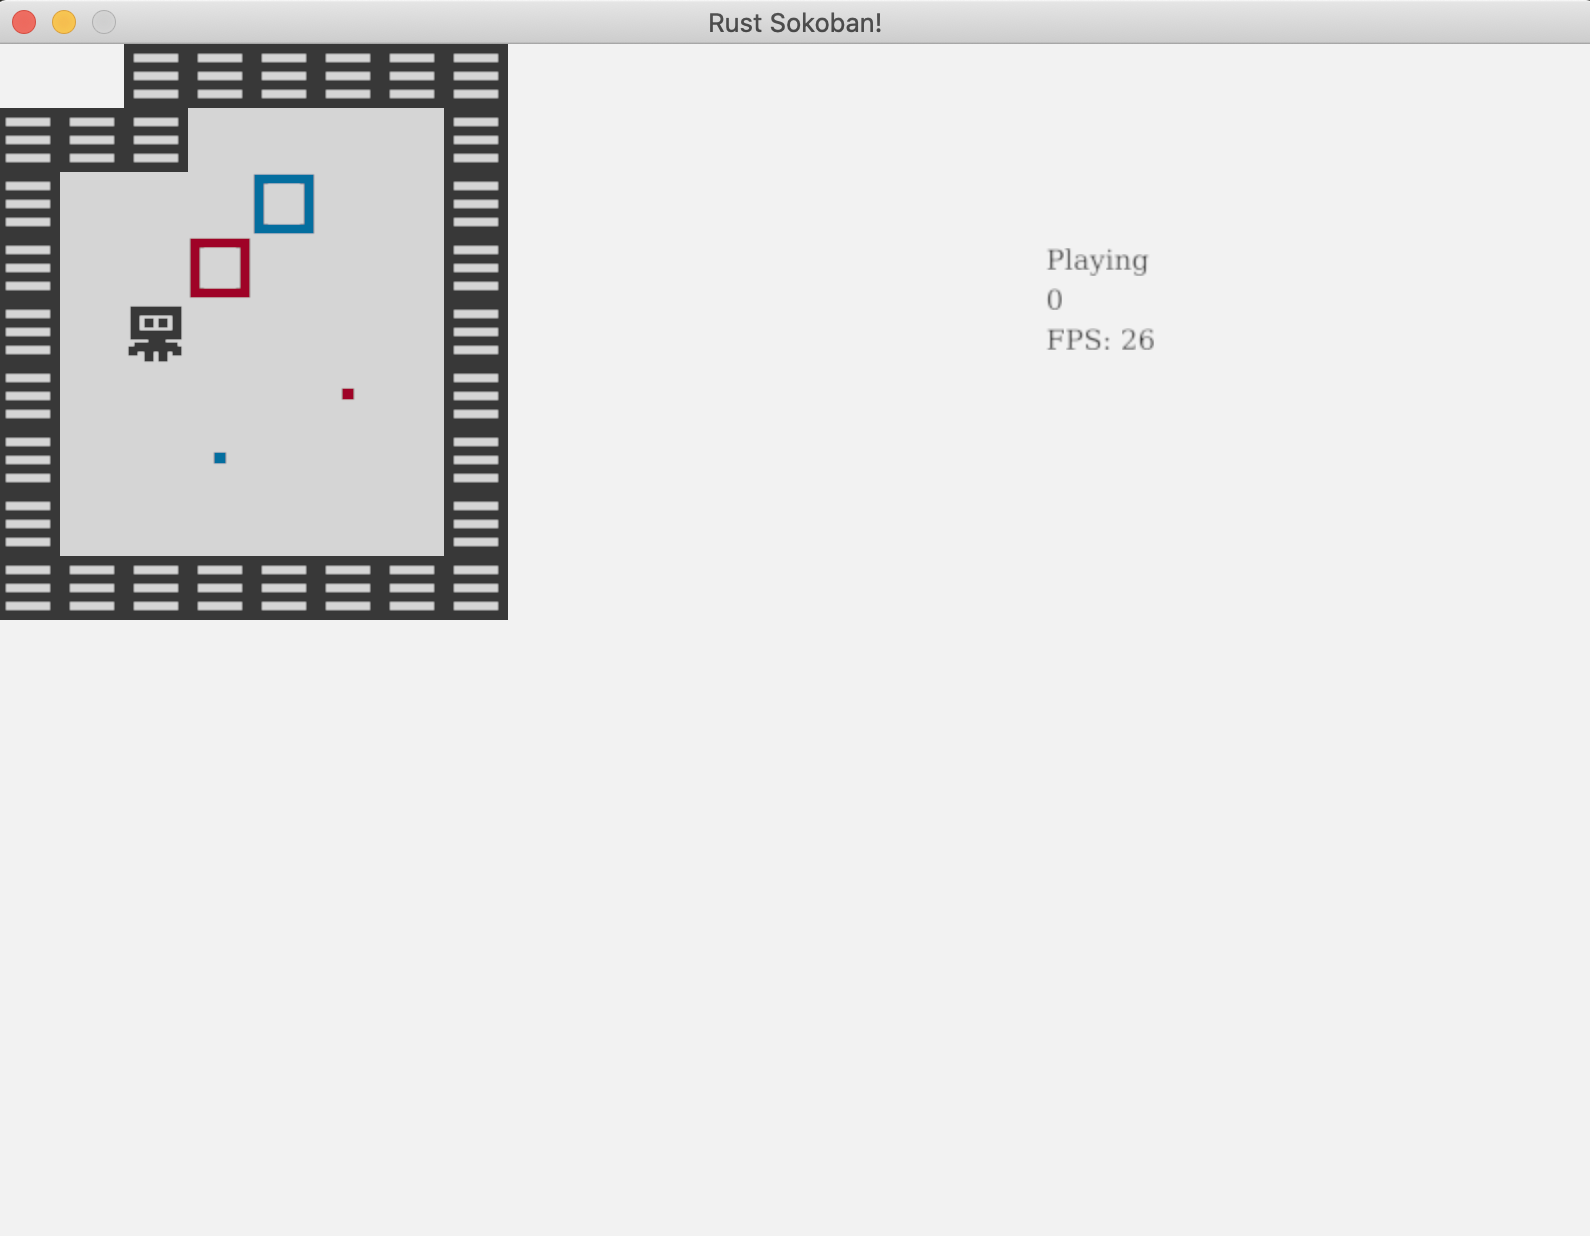
What is causing the FPS drop?
Now you might be asking yourself, what have we done to make this so low? We have a fairly simple game and our logic for input and movement is not actually that complex, we also don't have that many entities or components to warrant such a big FPS drop. Well, to understand this we need to go a bit deeper into how our current rendering system works.
Currently, for every renderable entity, we figure out which image to render and we render it. This means that if we have 20 floor tiles we will load the floor image 20 times and issue 20 separate rendering calls. This is too expensive and it's the cause for our massive FPS drop.
How can we fix this? Well, we can use a technique called batch rendering. With this technique, what we have to do is only load the image once, and tell ggez to render it in all the 20 positions where it needs to be rendered. This way we not only load the image once, but we also only call render once per image, which will speed things up significantly. As a side note, some engines will do this render batching under the hood for you, but ggez doesn't, hence why we need to care.
Batch rendering implementation
Here is what we'll have to do to implement batch rendering:
- for every renderable entity, figure out which image we need to render and at which DrawParams (this is what we currently give ggez as an indication of where to render)
- save all the (image, DrawParams) into a convenient format
- iterate through (image, DrawParams) on a per images basis sorted by z and make a single render call per image
Before we get deep into the rendering code, we will need to do some collection grouping and sorting, and we will use the itertools crate for that. We could implement this grouping ourselves, but there is no point re-inventing the wheel. Let's add itertools as a dependency to our project.
// Cargo.toml
[dependencies]
ggez = "0.9.3"
glam = { version = "0.24", features = ["mint"] }
hecs = "0.10.5"
itertools = "0.13.0"
Let's also import it in the rendering system
#![allow(unused)]
fn main() {
// rendering.rs
use itertools::Itertools;
}
Now, remember that get_image function we wrote in the Animations chapter to figure out which image we need for every frame? We'll be able to re-use that we just need to ensure we don't actually load the image, but instead return the path to the image.
#![allow(unused)]
fn main() {
// rendering.rs
pub fn get_image(renderable: &Renderable, delta: Duration) -> String {
    let path_index = match renderable.kind() {
        RenderableKind::Static => {
            // We only have one image, so we just return that
            0
        }
        RenderableKind::Animated => {
            // If we have multiple, we want to select the right one based on the delta time.
            // First we get the delta in milliseconds, we % by 1000 to get the milliseconds
            // only and finally we divide by 250 to get a number between 0 and 4. If it's 4
            // we technically are on the next iteration of the loop (or on 0), but we will let
            // the renderable handle this logic of wrapping frames.
            ((delta.as_millis() % 1000) / 250) as usize
        }
    };

    renderable.path(path_index)
}
}
Now let's figure out the format we want our batched data to be in. We will use a HashMap<u8, HashMap<String, Vec<DrawParam>>> where:
- the first key (
u8) is the z position - remember we need to respect the z positions and draw from highest to smallest z to ensure the right order (for example floors should be below player, etc) - the value is another
HashMap, where the second key (String) is the path to the image - finally, the last value is a
Vec<DrawParam>which are all the params at which we must render that particular image
Let's now write the code to populate the rendering_batches hash map.
#![allow(unused)]
fn main() {
// rendering.rs
    let mut rendering_batches: HashMap<u8, HashMap<String, Vec<DrawParam>>> = HashMap::new();

    // Iterate each of the renderables, determine which image path should be rendered
    // at which drawparams, and then add that to the rendering_batches.
    for (_, (position, renderable)) in rendering_data.iter() {
        // Load the image
        let image_path = get_image(renderable, time.delta);
        let x = position.x as f32 * TILE_WIDTH;
        let y = position.y as f32 * TILE_WIDTH;
        let z = position.z;

        // draw
        let draw_param = DrawParam::new().dest(Vec2::new(x, y));
        rendering_batches
            .entry(z)
            .or_default()
            .entry(image_path)
            .or_default()
            .push(draw_param);
    }
}
Finally, let's actually render the batches. We will not be able to use the draw(image) function we used before but luckily ggez has a batching API - SpriteBatch. Also note the sorted_by here, that is provided to us to itertools.
#![allow(unused)]
fn main() {
// rendering.rs
    // Iterate spritebatches ordered by z and actually render each of them
    for (_z, group) in rendering_batches
        .iter()
        .sorted_by(|a, b| Ord::cmp(&a.0, &b.0))
    {
        for (image_path, draw_params) in group {
            let image = Image::from_path(context, image_path).unwrap();
            let mut mesh_batch = graphics::InstanceArray::new(context, Some(image));

            for draw_param in draw_params.iter() {
                mesh_batch.push(*draw_param);
            }

            canvas.draw(&mesh_batch, graphics::DrawParam::new());
        }
    }
}
And that's it! Run the game again and you should see a shiny 60FPS and everything should feel much smoother!
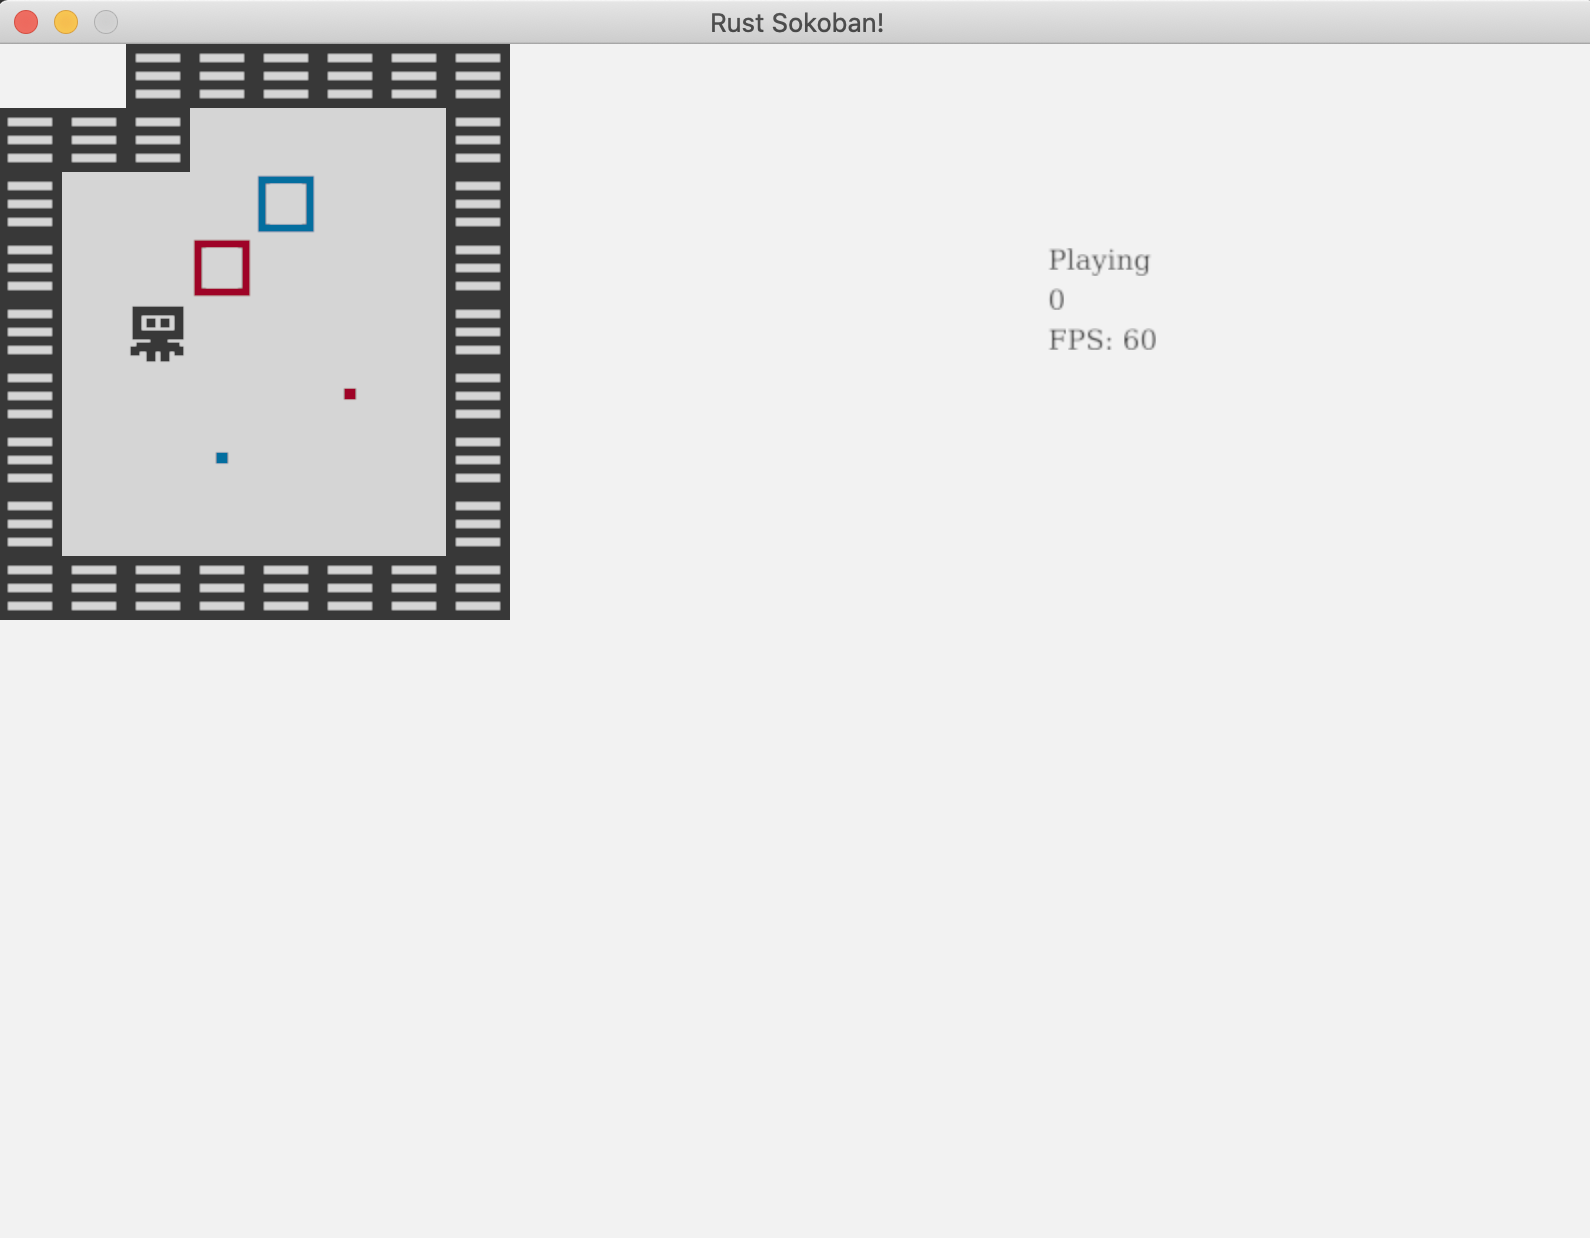
CODELINK: You can see the full code in this example here.