第一章: 开始编写游戏前
欢迎来到 《使用Rust编写推箱子游戏教程》! 在开始动手编写游戏前,我们需要先了解下:
推箱子是个啥样的游戏嘞?
没玩过推箱子游戏?想当年用诺基亚黑白屏手机的时候就有这款游戏了。你可以下载一个玩一下或者点这里看下维基百科的介绍。本教程就是教大家怎么使用Rust和现有的2D游戏引擎、素材,最终编写一个可玩的推箱子游戏。
谁编写了本教程呢?
本教程是由@oliviff 主笔编写,另外还得到了很多优秀贡献者的支持,感谢您们的辛勤付出(排名不分先后):
为什么要使用Rust编写推箱子游戏呢?
我是2019年3月份开始学习Rust的,在编写本教程前我就使用Rust开发过游戏。在学习和使用Rust的过程中我还写了一些博客,感觉从Rust游戏开发中我学到了很多,于是乎我就有个想法:这么好的东西得分享给大家啊,让大家都来体验下啊,独乐乐不如众乐乐!然后就有了本教程。
那是不是得先去学习下Rust呢?
不需要。本教程会手把手教你怎么使用Rust编写游戏,也会对一些Rust的语法进行一些必要的解释。对于一些知识点我们也会提供更详细的介绍链接供您学习参考。当然本教程主要是通过编写一个有趣的游戏顺便对Rust语言进行简单的介绍,所以有些Rust的知识点我们可能不会也没必要过多的深入。
文本样式约定
我们使用下面这种样式的文本链接对Rust或者游戏开发等的知识点的扩展信息。
MORE: 点这里查看更多.
我们使用下面这种样式的文本链接本章内容相关的程序代码。
CODELINK: 点这里查看示例完整代码.
学习资源
如果在学习过程中你需要寻求帮助或者有问题需要找人帮忙解答,可以看下这些地方:
另外Rust背后还有一群很优秀的开发者组成的社区,所以如果有问题也可以寻求社区帮助。
就先介绍到这里吧,接下来让我们开始编写第一个Rust游戏(准确来说,是我的第二个,但希望这是你们的第一个😉)
Made with 🦀 and 🧡 by @oliviff 由FusionZhu、Muzych翻译
项目搭建
建议使用rustup安装管理Rust。安装好Rust后可以在命令行输入以下俩条命令,检查确认是否安装成功:
$ rustc --version
rustc 1.40.0
$ cargo --version
cargo 1.40.0
输出的版本信息未必都是这样的,但建议使用比较新的Rust版本。
创建项目
Cargo是Rust的包管理工具,可以使用它创建我们的游戏项目。首先切换到游戏项目存储路径,然后再输入以下命令:
$ cargo init rust-sokoban
命令执行成功后,会在当前目录下创建一个名称为rust-sokoban的文件夹。文件夹内部是这个样子的:
├── src
│   └── main.rs
└── Cargo.toml
切换到文件夹rust-sokoban并运行命令 cargo run ,你会看到类似下面的输出信息:
$ cargo run
   Compiling rust-sokoban v0.1.0
    Finished dev [unoptimized + debuginfo] target(s) in 1.30s
     Running `../rust-sokoban/target/debug/rust-sokoban`
Hello, world!
添加游戏开发依赖
接下来让我们一起把默认生成的项目修改成一个游戏项目! 我们使用当前最受欢迎的2D游戏引擎之一的ggez
还记得我们刚才在项目目录里看到的Cargo.toml文件吧?这个文件是用来管理项目依赖的,所以需要把我们需要使用到的crate添加到这个文件中。就像这样添加 ggez 依赖:
[dependencies]
ggez = "0.9.3"
MORE: 更多关于Cargo.toml的信息可以看 这里.
接下来再次执行cargo run.这次执行的会长一点,因为需要从crates.io下载我们配置的依赖库并编译链接到我们库中。
cargo run
    Updating crates.io index
    Downloaded ....
    ....
    Compiling ....
    ....
    Finished dev [unoptimized + debuginfo] target(s) in 2m 15s
    Running `.../rust-sokoban/target/debug/rust-sokoban`
    Hello, world!
NOTE: 如果你是使用的Ubuntu操作系统,在执行命令的时候可能会报错,如果报错信息有提到
alsa和libudev可以通过执行下面的命令安装解决:sudo apt-get install libudev-dev libasound2-dev.
接下来我们在main.rs文件中使用ggez创建一个窗口。只是创建一个空的窗口,代码比较简单:
use ggez::{conf, event, Context, GameResult};
use std::path;

// This struct will hold all our game state
// For now there is nothing to be held, but we'll add
// things shortly.
struct Game {}

// This is the main event loop. ggez tells us to implement
// two things:
// - updating
// - rendering
impl event::EventHandler<ggez::GameError> for Game {
    fn update(&mut self, _context: &mut Context) -> GameResult {
        // TODO: update game logic here
        Ok(())
    }

    fn draw(&mut self, _context: &mut Context) -> GameResult {
        // TODO: update draw here
        Ok(())
    }
}

pub fn main() -> GameResult {
    // Create a game context and event loop
    let context_builder = ggez::ContextBuilder::new("rust_sokoban", "sokoban")
        .window_setup(conf::WindowSetup::default().title("Rust Sokoban!"))
        .window_mode(conf::WindowMode::default().dimensions(800.0, 600.0))
        .add_resource_path(path::PathBuf::from("./resources"));

    let (context, event_loop) = context_builder.build()?;
    // Create the game state
    let game = Game {};
    // Run the main event loop
    event::run(context, event_loop, game)
}
可以把代码复制到main.rs文件中,并再次执行cargo run,你会看到:

基本概念和语法
现在我们有了个窗口,我们创建了个窗口耶!接下来我们一起分析下代码并解释下使用到的Rust概念和语法。
引入
您应该在其它编程语言中也接触过这个概念,就是把我们需要用到的依赖包(或crate)里的类型和命名空间引入到当前的代码作用域中。在Rust中,使用use实现引入功能:
结构体声明
MORE: 查看更多结构体相关信息可以点 这里.
实现特征(Trait)
特征类似其它语言中的接口,就是用来表示具备某些行为的特定类型。在这个例子中,我们希望实现EventHandler trait,并将这种行为添加到我们的Game结构体中。
MORE: 想更深入的了解特征可以点 这里.
函数
我们还需要学习下怎么使用Rust编写函数:
你可能会疑惑这里的self是几个意思呢?这里使用self代表函数update是属于结构体的实例化对象而不是静态的。
MORE: 想深入了解函数可以点 这里.
可变语法
你可能更疑惑&mut self这里的&mut是做什么的? 这个主要用来声明一个对象(比如这里的self)是否可以被改变的。再来看个例子:
再回头看update函数,我们使用了&mut 声明self是实例对象的可变引用。有没有点感觉了, 要不我们再看一个例子:
MORE: 想更多的了解
可变性可以看 这里 (虽然是使用的Java作为演示语言讲解的,但对于理解可变性还是很有帮助地), 另外还可以看 这里.
对代码和Rust语法的简单介绍就先到这里,让我们继续前进吧,下一节见!
CODELINK: 要获取本节的完整代码可以点 这里.
实体构建系统
在本章节中我们将更详细的介绍下推箱子游戏并探讨下该怎么构建我们的游戏
推箱子游戏
如果你还没玩过推箱子游戏,可以先看下这张推箱子游戏的动态图片:
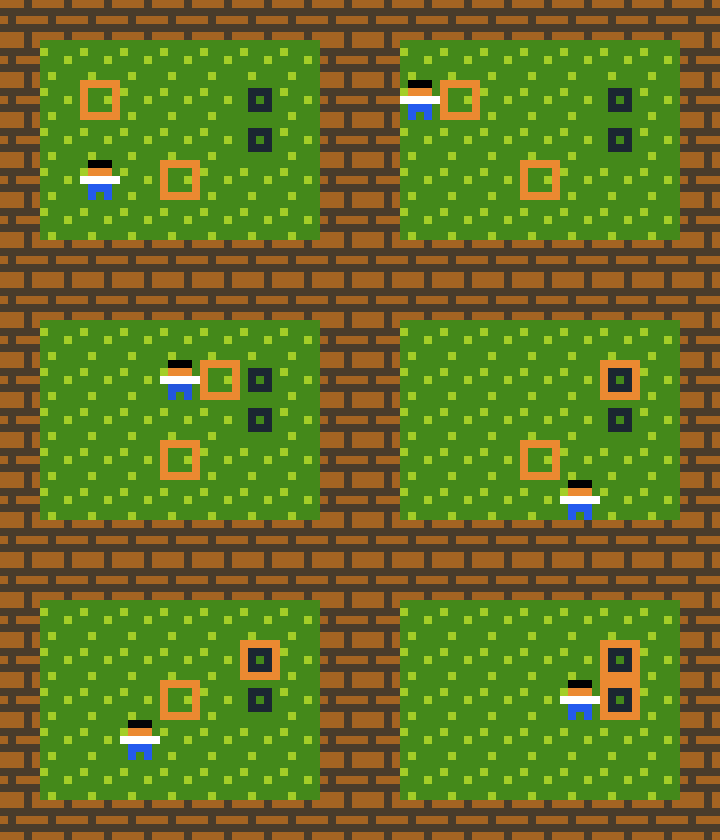
游戏中有墙有箱子,玩家的目标是把箱子推到它们的位置上。
ECS
ECS (实体构建系统)是一种遵循组合优于继承的构建游戏的模式. 像多少Rust游戏一样,我们编写的推箱子游戏也会大量使用ECS,所以我们有必要先花点时间熟悉下ECS:
- 组件(Components) - 组件只包含数据不包含行为,比如:位置组件、可渲染组件和运动组件。
- 实体(Entities) - 实体是由多个组件组成的,比如玩家,可能是由位置组件、可渲染组件、动作组件组合而成的,而地板可能只需要位置组件和可渲染组件,因为它不会动。也可以说实体几乎就是包含一个或多个具有唯一标示信息的组件的容器。
- 系统(Systems) - 系统使用实体和组件并包含基于数据的行为和逻辑。比如渲染系统:它可以一个一个的处理并绘制可渲染实体。就像我们上面提到的组件本身不包含行为,而是通过系统根据数据创建行为。
如果现在觉得还不是很理解ECS,也没有关系,我们下面章节还会介绍一些结合推箱子游戏的实例。
推箱子游戏结构
根据我们对推箱子游戏的了解,要编写一个这样的游戏,起码要有:墙、玩家、地板、箱子还有方块斑点这些实体。
接下来我们需要确认下怎么创建实体,也就是需要什么样的组件。首先,我们需要跟踪地图上所有的东西,所以我们需要一些位置组件。其次,某些实体可以移动,比如:玩家和箱子。所以我们需要一些动作组件。最后,我们还需要绘制实体,所以还需要一些渲染组件。
按照这个思路我们先出一版:
- 玩家实体: 有
位置组件、可渲染组件、运动组件组成 - 墙实体: 有
位置组件和可渲染组件组成 - 地板实体: 有
位置组件和可渲染组件组成 - 箱子实体: 有
位置组件、可渲染组件和运动组件组成 - 方框斑点组件: 有
位置组件和运动组件组成
第一次接触ECS是有点难于理解,如果不理解这些也没关系,可接着往下面看。
Hecs
最后我们需要一个提供ECS的crate,虽然这样的库有一大把,但在本教程中我们使用 hecs ,需要在Cargo.toml文件中配置hecs依赖:
[dependencies]
ggez = "0.9.3"
hecs = "0.10.5"
加油!接下来我们就开始编写组件和实体了!是不是很期待?
CODELINK: 可以点 这里获取本章节完整代码.
组件和实体
在本节中,我们将创建组件,学习如何创建实体,并注册所有内容以确保 hecs 正常工作。
定义组件
我们先从定义组件开始。之前我们讨论了 Position(位置组件)、Renderable(可渲染组件)和 Movement(动作组件),但暂时我们会跳过动作组件。我们还需要一些组件来标识每个实体。例如,我们需要一个 Wall(墙)组件,通过它来标识一个实体是墙。
希望这很直观:位置组件存储 x、y 和 z 坐标,用于告诉我们某物在地图上的位置;可渲染组件会接收一个字符串路径,指向一张可以渲染的图片。所有其他组件都是marker组件。marker组件这个名字听起来可能有些吓人,但它本质上只是一个没有任何其他数据字段的标签。
创建实体
实体只是一个与一组组件相关联的数字标识符。因此,我们创建实体的方法是简单地指定它们包含哪些组件。
现在,创建实体的代码如下所示:
资源
您可能已经注意到,我们在上面的实体创建中引用了要使用的资源。您可以自由创建自己的资源,或者下载我们提供的资源(右键点击图片并选择“另存为”)。


让我们将这些图片添加到项目中。创建一个 resources 文件夹,用于存放所有资源。目前,这些资源仅包括图片,但将来我们可能会添加配置文件或音频文件(继续阅读,您将在 第三章第三节 学习如何播放声音)。在 resources 文件夹下再创建一个 images 文件夹,将我们的 PNG 图片放入其中。您也可以使用不同的文件夹结构,但在本节后续部分使用图片时,请确保路径正确。
项目的目录结构如下所示:
├── resources
│   └── images
│       ├── box.png
│       ├── box_spot.png
│       ├── floor.png
│       ├── player.png
│       └── wall.png
├── src
│   └── main.rs
└── Cargo.toml
创建游戏世界
最后,让我们将所有内容整合在一起。我们需要创建一个 specs::World 对象,将其添加到我们的 Game 结构中,并在主函数中首先初始化它。以下是完整代码,现在运行时仍会显示一个空白窗口,但我们在设置游戏组件和实体方面已经取得了巨大进展!接下来,我们将进入渲染部分,最终在屏幕上看到内容!
pub fn main() -> GameResult {
    let world = World::new();

    // Create a game context and event loop
    let context_builder = ggez::ContextBuilder::new("rust_sokoban", "sokoban")
        .window_setup(conf::WindowSetup::default().title("Rust Sokoban!"))
        .window_mode(conf::WindowMode::default().dimensions(800.0, 600.0))
        .add_resource_path(path::PathBuf::from("./resources"));

    let (context, event_loop) = context_builder.build()?;

    // Create the game state
    let game = Game { world };
    // Run the main event loop
    event::run(context, event_loop, game)
}
注意:运行时,控制台可能会报告一些关于未使用导入或字段的警告,不用担心这些问题,我们将在后续章节中修复它们。
CODELINK: 您可以在 这里 查看本节完整代码。
渲染系统
现在是时候实现我们的第一个系统——渲染系统了。这个系统将负责在屏幕上绘制所有的实体。
渲染系统设置
首先,我们从一个空的实现开始,如下所示:
最后,让我们在绘制循环中运行渲染系统。这意味着每次游戏更新时,我们都会渲染所有实体的最新状态。
现在运行游戏应该可以编译,但可能还不会有任何效果,因为我们尚未填充渲染系统的实现,也没有创建任何实体。
渲染系统实现
注意: 我们将在这里添加 glam 作为依赖项,这是一个简单快速的 3D 库,可以提供一些性能改进。
[dependencies]
ggez = "0.9.3"
glam = { version = "0.24", features = ["mint"] }
以下是渲染系统的实现。它完成以下几个任务:
- 清除屏幕(确保我们不会保留前一帧渲染的状态)
- 获取所有具有可渲染组件的实体并按 z 轴排序(这样我们可以确保正确的叠加顺序,例如玩家应该在地板之上,否则我们看不到玩家)
- 遍历排序后的实体并将它们作为图像渲染
- 最后,呈现到屏幕上
添加一些测试实体
让我们创建一些测试实体以确保工作正常。
最后,让我们将所有内容组合在一起并运行。你应该会看到类似这样的效果!这非常令人兴奋,现在我们有了一个正式的渲染系统,我们终于可以在屏幕上看到一些东西了。接下来,我们将开始处理游戏玩法,使其真正像一个游戏!
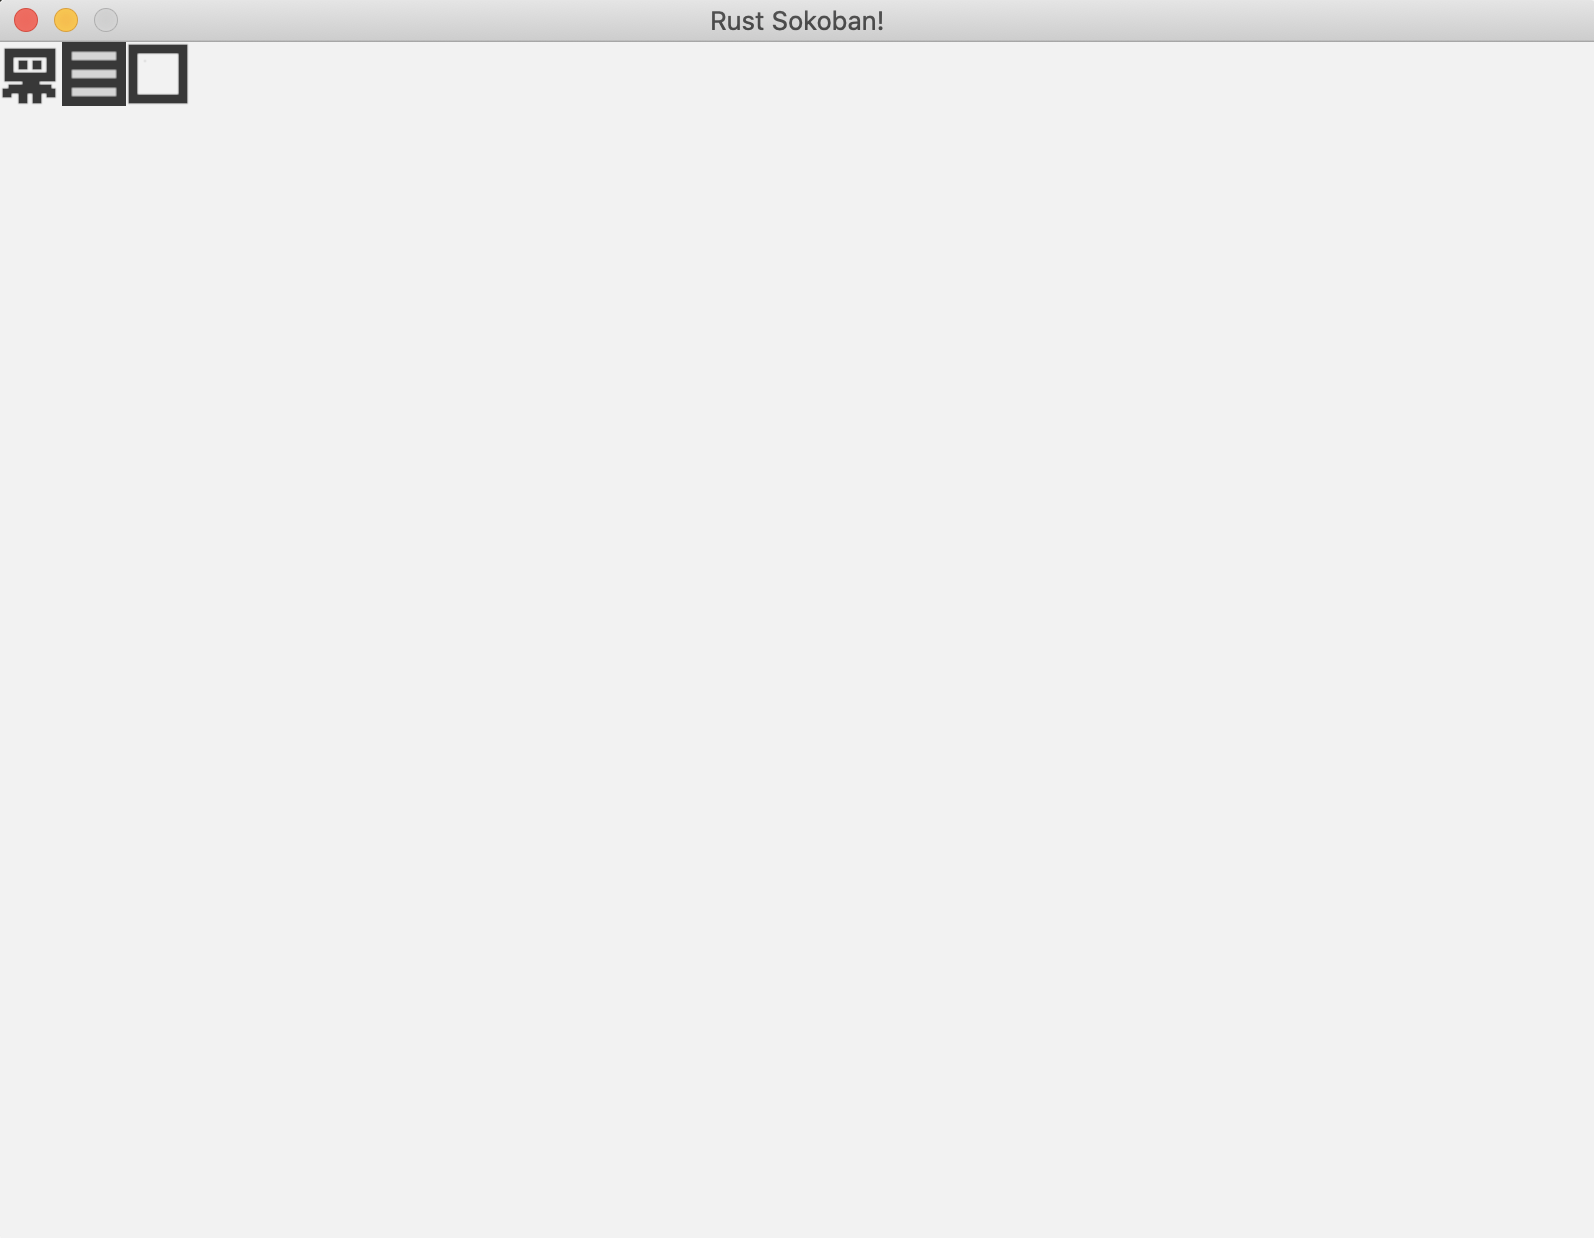
以下是最终代码。
注意: 请注意,这是渲染的一个非常基本的实现,随着实体数量的增加,性能可能不足够好。一个更高级的渲染实现使用批量渲染,可以在第 3 章 - 批量渲染中找到。
/* ANCHOR: all */
// Rust sokoban
// main.rs

use ggez::{
    conf, event,
    graphics::{self, DrawParam, Image},
    Context, GameResult,
};
use glam::Vec2;
use hecs::{Entity, World};

use std::path;

const TILE_WIDTH: f32 = 32.0;

// ANCHOR: components
pub struct Position {
    x: u8,
    y: u8,
    z: u8,
}

pub struct Renderable {
    path: String,
}

pub struct Wall {}

pub struct Player {}

pub struct Box {}

pub struct BoxSpot {}

// ANCHOR_END: components

// ANCHOR: game
// This struct will hold all our game state
// For now there is nothing to be held, but we'll add
// things shortly.
struct Game {
    world: World,
}
// ANCHOR_END: game

// ANCHOR: init
// Initialize the level
pub fn initialize_level(world: &mut World) {
    create_player(
        world,
        Position {
            x: 0,
            y: 0,
            z: 0, // we will get the z from the factory functions
        },
    );
    create_wall(
        world,
        Position {
            x: 1,
            y: 0,
            z: 0, // we will get the z from the factory functions
        },
    );
    create_box(
        world,
        Position {
            x: 2,
            y: 0,
            z: 0, // we will get the z from the factory functions
        },
    );
}
// ANCHOR_END: init

// ANCHOR: handler
impl event::EventHandler<ggez::GameError> for Game {
    fn update(&mut self, _context: &mut Context) -> GameResult {
        Ok(())
    }

    fn draw(&mut self, context: &mut Context) -> GameResult {
        // Render game entities
        {
            run_rendering(&self.world, context);
        }

        Ok(())
    }
}
// ANCHOR_END: handler

// ANCHOR: entities
pub fn create_wall(world: &mut World, position: Position) -> Entity {
    world.spawn((
        Position { z: 10, ..position },
        Renderable {
            path: "/images/wall.png".to_string(),
        },
        Wall {},
    ))
}
pub fn create_floor(world: &mut World, position: Position) -> Entity {
    world.spawn((
        Position { z: 5, ..position },
        Renderable {
            path: "/images/floor.png".to_string(),
        },
    ))
}

pub fn create_box(world: &mut World, position: Position) -> Entity {
    world.spawn((
        Position { z: 10, ..position },
        Renderable {
            path: "/images/box.png".to_string(),
        },
        Box {},
    ))
}

pub fn create_box_spot(world: &mut World, position: Position) -> Entity {
    world.spawn((
        Position { z: 9, ..position },
        Renderable {
            path: "/images/box_spot.png".to_string(),
        },
        BoxSpot {},
    ))
}

pub fn create_player(world: &mut World, position: Position) -> Entity {
    world.spawn((
        Position { z: 10, ..position },
        Renderable {
            path: "/images/player.png".to_string(),
        },
        Player {},
    ))
}
// ANCHOR_END: entities

// ANCHOR: rendering_system
fn run_rendering(world: &World, context: &mut Context) {
    // Clearing the screen (this gives us the background colour)
        let mut canvas =
        graphics::Canvas::from_frame(context, graphics::Color::from([0.95, 0.95, 0.95, 1.0]));

    // Get all the renderables with their positions and sort by the position z
    // This will allow us to have entities layered visually.
    let mut query = world.query::<(&Position, &Renderable)>();
    let mut rendering_data: Vec<(Entity, (&Position, &Renderable))> = query.into_iter().collect();
    rendering_data.sort_by_key(|&k| k.1 .0.z);

    // Iterate through all pairs of positions & renderables, load the image
    // and draw it at the specified position.
    for (_, (position, renderable)) in rendering_data.iter() {
        // Load the image
        let image = Image::from_path(context, renderable.path.clone()).unwrap();
        let x = position.x as f32 * TILE_WIDTH;
        let y = position.y as f32 * TILE_WIDTH;

        // draw
        let draw_params = DrawParam::new().dest(Vec2::new(x, y));
        canvas.draw(&image, draw_params);
    }

    // Finally, present the canvas, this will actually display everything
    // on the screen.
    canvas.finish(context).expect("expected to present");
}
// ANCHOR_END: rendering_system

// ANCHOR: main
pub fn main() -> GameResult {
    let world = World::new();

    // Create a game context and event loop
    let context_builder = ggez::ContextBuilder::new("rust_sokoban", "sokoban")
        .window_setup(conf::WindowSetup::default().title("Rust Sokoban!"))
        .window_mode(conf::WindowMode::default().dimensions(800.0, 600.0))
        .add_resource_path(path::PathBuf::from("./resources"));

    let (context, event_loop) = context_builder.build()?;

    // Create the game state
    let game = Game { world };
    // Run the main event loop
    event::run(context, event_loop, game)
}
// ANCHOR_END: main

/* ANCHOR_END: all */
CODELINK: 你可以在 这里 查看本示例的完整代码。
第二章: 实现基本功能
你好棒棒哦,已经读到第2章啦!在这一章中我们将实现一些游戏的基本功能比如:加载地图,让角色动起来等,总之完成了这一章,我们的程序就有点游戏的意思了.激不激动,让我们继续前进,前进,前进进!
地图加载
上一章我们创建了一些实体来测试我们的渲染系统,但现在是时候渲染一个正式的地图了。在本节中,我们将创建一个基于文本的地图配置并加载它。
地图配置
第一步,让我们尝试基于如下所示的二维地图加载一个关卡。
最终我们可以从文件中加载,但为了简单起见,现在我们先用代码中的常量。
以下是加载地图的实现。
这里最有趣的 Rust 概念可能是 match。我们在这里使用了模式匹配的基本功能,仅仅是匹配地图配置中每个标记的值,但我们可以进行更高级的条件或类型模式匹配。
更多: 阅读更多关于模式匹配的信息 这里。
现在运行游戏,看看我们的地图是什么样子。

以下是最终代码。
/* ANCHOR: all */
// Rust sokoban
// main.rs

use ggez::{
    conf, event,
    graphics::{self, DrawParam, Image},
    Context, GameResult,
};
use glam::Vec2;
use hecs::{Entity, World};

use std::path;

const TILE_WIDTH: f32 = 32.0;

// ANCHOR: components
#[derive(Clone, Copy)]
pub struct Position {
    x: u8,
    y: u8,
    z: u8,
}

pub struct Renderable {
    path: String,
}

pub struct Wall {}

pub struct Player {}

pub struct Box {}

pub struct BoxSpot {}

// ANCHOR_END: components

// ANCHOR: game
// This struct will hold all our game state
// For now there is nothing to be held, but we'll add
// things shortly.
struct Game {
    world: World,
}
// ANCHOR_END: game

// ANCHOR: init
// Initialize the level// Initialize the level
pub fn initialize_level(world: &mut World) {
    // ANCHOR: map
    const MAP: &str = "
    N N W W W W W W
    W W W . . . . W
    W . . . B . . W
    W . . . . . . W
    W . P . . . . W
    W . . . . . . W
    W . . S . . . W
    W . . . . . . W
    W W W W W W W W
    ";
    // ANCHOR_END: map

    load_map(world, MAP.to_string());
}

pub fn load_map(world: &mut World, map_string: String) {
    // read all lines
    let rows: Vec<&str> = map_string.trim().split('\n').map(|x| x.trim()).collect();

    for (y, row) in rows.iter().enumerate() {
        let columns: Vec<&str> = row.split(' ').collect();

        for (x, column) in columns.iter().enumerate() {
            // Create the position at which to create something on the map
            let position = Position {
                x: x as u8,
                y: y as u8,
                z: 0, // we will get the z from the factory functions
            };

            // Figure out what object we should create
            match *column {
                "." => {
                    create_floor(world, position);
                }
                "W" => {
                    create_floor(world, position);
                    create_wall(world, position);
                }
                "P" => {
                    create_floor(world, position);
                    create_player(world, position);
                }
                "B" => {
                    create_floor(world, position);
                    create_box(world, position);
                }
                "S" => {
                    create_floor(world, position);
                    create_box_spot(world, position);
                }
                "N" => (),
                c => panic!("unrecognized map item {}", c),
            }
        }
    }
}
// ANCHOR_END: init

// ANCHOR: handler
impl event::EventHandler<ggez::GameError> for Game {
    fn update(&mut self, _context: &mut Context) -> GameResult {
        Ok(())
    }

    fn draw(&mut self, context: &mut Context) -> GameResult {
        // Render game entities
        {
            run_rendering(&self.world, context);
        }

        Ok(())
    }
}
// ANCHOR_END: handler

// ANCHOR: entities
pub fn create_wall(world: &mut World, position: Position) -> Entity {
    world.spawn((
        Position { z: 10, ..position },
        Renderable {
            path: "/images/wall.png".to_string(),
        },
        Wall {},
    ))
}
pub fn create_floor(world: &mut World, position: Position) -> Entity {
    world.spawn((
        Position { z: 5, ..position },
        Renderable {
            path: "/images/floor.png".to_string(),
        },
    ))
}

pub fn create_box(world: &mut World, position: Position) -> Entity {
    world.spawn((
        Position { z: 10, ..position },
        Renderable {
            path: "/images/box.png".to_string(),
        },
        Box {},
    ))
}

pub fn create_box_spot(world: &mut World, position: Position) -> Entity {
    world.spawn((
        Position { z: 9, ..position },
        Renderable {
            path: "/images/box_spot.png".to_string(),
        },
        BoxSpot {},
    ))
}

pub fn create_player(world: &mut World, position: Position) -> Entity {
    world.spawn((
        Position { z: 10, ..position },
        Renderable {
            path: "/images/player.png".to_string(),
        },
        Player {},
    ))
}
// ANCHOR_END: entities

// ANCHOR: rendering_system
fn run_rendering(world: &World, context: &mut Context) {
    // Clearing the screen (this gives us the background colour)
        let mut canvas =
        graphics::Canvas::from_frame(context, graphics::Color::from([0.95, 0.95, 0.95, 1.0]));

    // Get all the renderables with their positions and sort by the position z
    // This will allow us to have entities layered visually.
    let mut query = world.query::<(&Position, &Renderable)>();
    let mut rendering_data: Vec<(Entity, (&Position, &Renderable))> = query.into_iter().collect();
    rendering_data.sort_by_key(|&k| k.1 .0.z);

    // Iterate through all pairs of positions & renderables, load the image
    // and draw it at the specified position.
    for (_, (position, renderable)) in rendering_data.iter() {
        // Load the image
        let image = Image::from_path(context, renderable.path.clone()).unwrap();
        let x = position.x as f32 * TILE_WIDTH;
        let y = position.y as f32 * TILE_WIDTH;

        // draw
        let draw_params = DrawParam::new().dest(Vec2::new(x, y));
        canvas.draw(&image, draw_params);
    }

    // Finally, present the canvas, this will actually display everything
    // on the screen.
    canvas.finish(context).expect("expected to present");
}
// ANCHOR_END: rendering_system

// ANCHOR: main
pub fn main() -> GameResult {
    let mut world = World::new();
    initialize_level(&mut world);

    // Create a game context and event loop
    let context_builder = ggez::ContextBuilder::new("rust_sokoban", "sokoban")
        .window_setup(conf::WindowSetup::default().title("Rust Sokoban!"))
        .window_mode(conf::WindowMode::default().dimensions(800.0, 600.0))
        .add_resource_path(path::PathBuf::from("./resources"));

    let (context, event_loop) = context_builder.build()?;

    // Create the game state
    let game = Game { world };
    // Run the main event loop
    event::run(context, event_loop, game)
}
// ANCHOR_END: main

/* ANCHOR_END: all */
CODELINK: 你可以在 这里 查看本示例的完整代码。
移动玩家
如果我们不能移动玩家,那就不能算是游戏,对吧?在本节中,我们将学习如何获取输入事件。
输入事件
让玩家移动的第一步是开始监听输入事件。如果我们快速查看 ggez 输入示例,可以看到我们可以使用 is_key_pressed 检查某个键是否被按下。
让我们从一个非常基本的输入系统实现开始,在这里我们只是检查某个键是否被按下并打印到控制台。
然后,我们将这段代码添加到 Game 的 event::EventHandler 实现块中:
如果我们运行它,应该会在控制台中看到打印的行。
LEFT
LEFT
RIGHT
UP
DOWN
LEFT
输入系统
现在让我们实现最终的输入系统。
我们已经有了一种方法来检查某个键是否被按下,现在我们需要实现移动玩家的逻辑。我们希望实现的逻辑是:
- 如果按下 UP 键,我们将玩家在 y 轴上向上移动一个位置
- 如果按下 DOWN 键,我们将玩家在 y 轴上向下移动一个位置
- 如果按下 LEFT 键,我们将玩家在 x 轴上向左移动一个位置
- 如果按下 RIGHT 键,我们将玩家在 x 轴上向右移动一个位置
输入系统非常简单,它获取所有玩家和位置(我们应该只有一个玩家,但这段代码不需要关心这一点,它理论上可以工作于我们希望用相同输入控制多个玩家的情况)。然后,对于每个玩家和位置组合,它将获取第一个按下的键并从输入队列中移除它。接着,它会计算所需的变换——例如,如果按下上键,我们希望向上移动一个格子,依此类推,并应用这个位置更新。
非常酷!这就是它的效果。注意我们可以穿过墙和箱子。在下一节中,当我们添加可移动组件时,我们会修复这个问题。
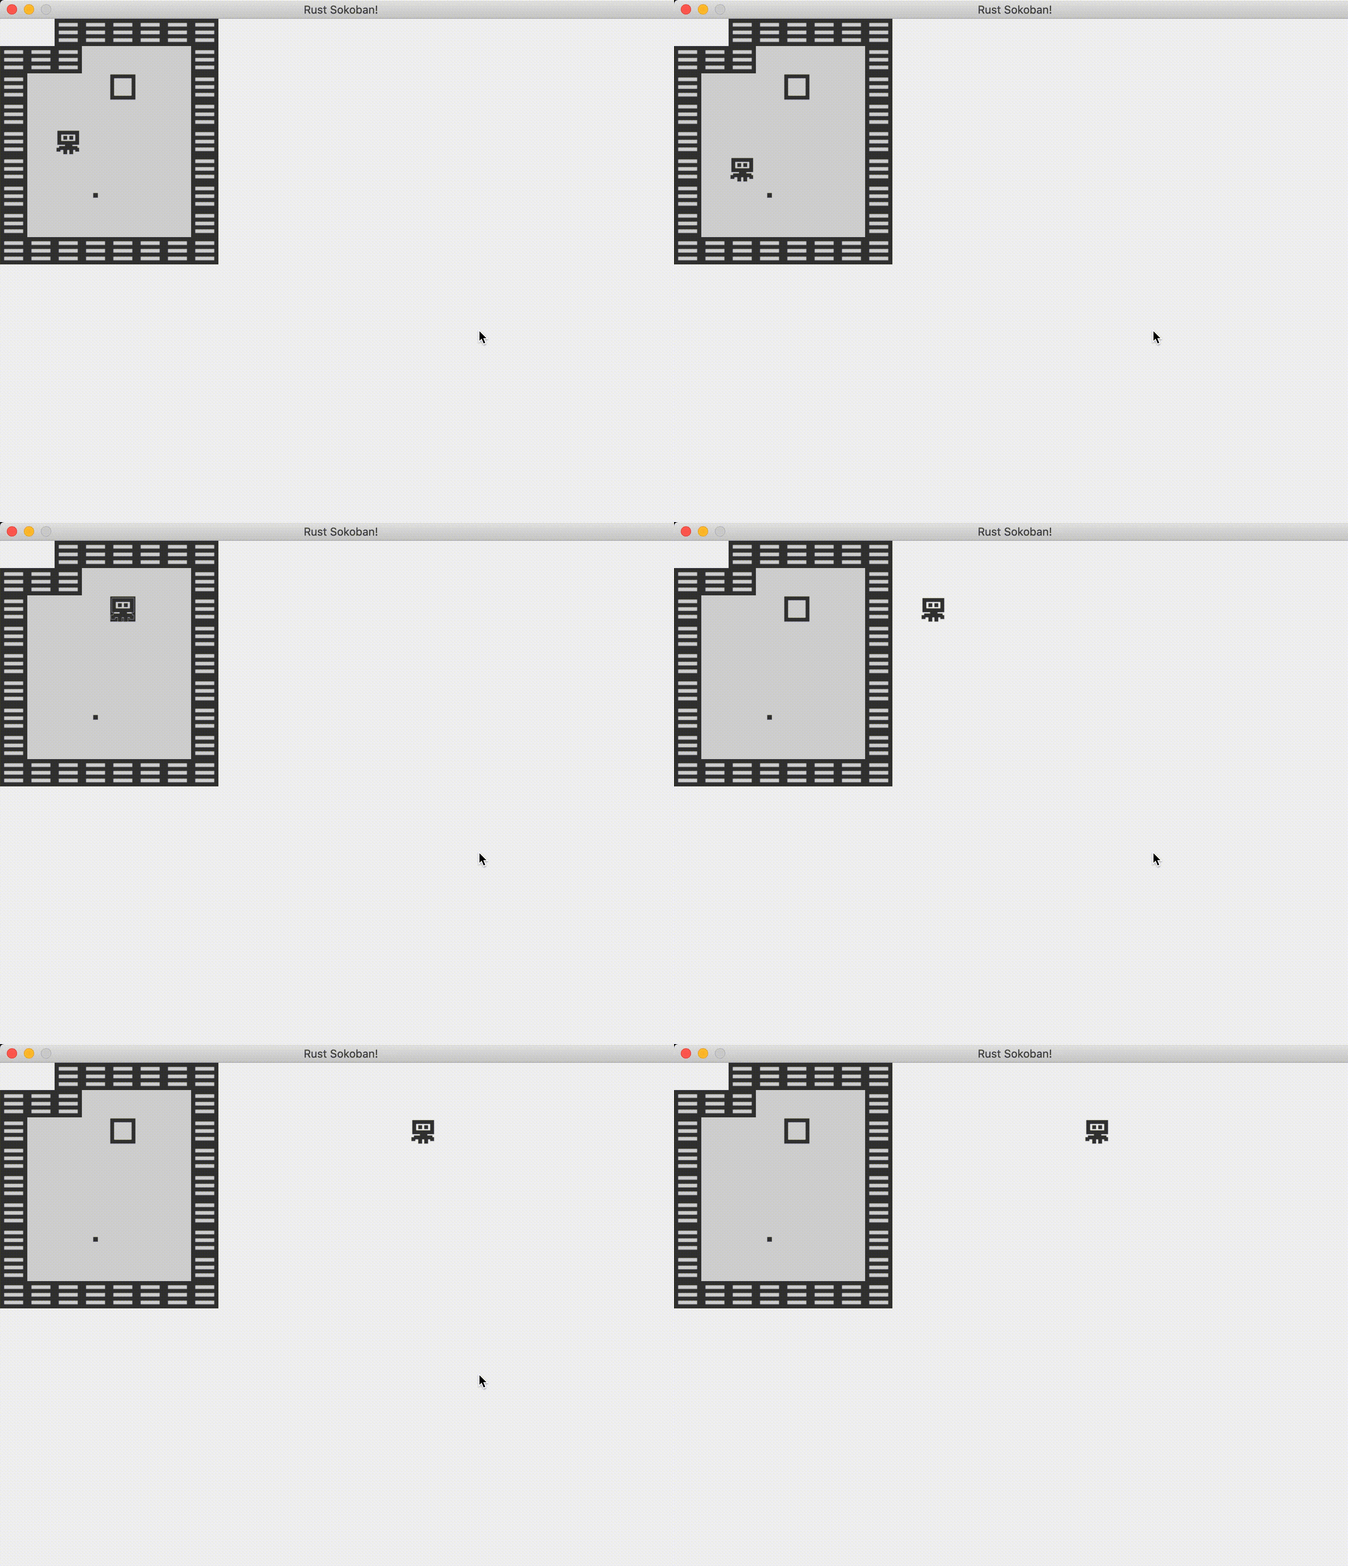
但你可能注意到一个问题,单次按键会触发多次移动。让我们在下一节中修复这个问题。
处理多次按键
问题在于我们在一秒内多次调用输入系统,这意味着按住一个键一秒钟会触发多次移动。作为玩家,这不是一个很好的体验,因为你无法很好地控制移动,很容易陷入一种情况——箱子卡在墙边,无法拉回。
我们有哪些选项来解决这个问题?我们可以记住上一个帧是否按下了键,如果是,我们跳过它。这需要存储上一帧的状态,并在当前帧中与之比较以决定是否移动,这完全可行。幸运的是,ggez 在他们的键盘 API 中添加了这个功能,你可以调用 is_key_just_pressed,它会自动检查当前状态。让我们试试,它看起来像这样:
现在一切都按预期工作了!
CODELINK: 你可以在 这里 查看本示例的完整代码。
推动箱子
在上一章中,我们让玩家可以移动,但他可以穿过墙壁和箱子,并没有真正与环境交互。在本节中,我们将为玩家的移动添加一些更智能的逻辑。
移动组件
首先,我们需要让代码稍微更通用一些。如果你还记得上一章,我们是通过操作玩家来决定如何移动他们的,但我们也需要移动箱子。此外,未来我们可能会引入其他可移动类型的对象,因此我们需要考虑到这一点。按照真正的 ECS(实体-组件-系统) 精神,我们将使用标记组件来区分哪些实体是可移动的,哪些不是。例如,玩家和箱子是可移动的,而墙是不可移动的。箱子放置点在这里无关紧要,因为它们不会移动,但它们也不应该影响玩家或箱子的移动,因此箱子放置点不会具有这些组件中的任何一个。
以下是我们的两个新组件:
接下来,我们将:
- 为玩家和箱子添加
with(Movable) - 为墙添加
with(Immovable) - 对地板和箱子放置点不做任何操作(如前所述,它们不应成为我们的移动/碰撞系统的一部分,因为它们对移动没有影响)
移动需求
现在让我们思考一些示例来说明移动的需求。这将帮助我们理解如何修改输入系统的实现以正确使用 Movable 和 Immovable。
场景:
(player, floor)并按下RIGHT-> 玩家应该向右移动(player, wall)并按下RIGHT-> 玩家不应向右移动(player, box, floor)并按下RIGHT-> 玩家应该向右移动,箱子也应该向右移动(player, box, wall)并按下RIGHT-> 没有任何东西应该移动(player, box, box, floor)并按下RIGHT-> 玩家、箱子1 和箱子2 应该都向右移动一格(player, box, box, wall)并按下RIGHT-> 没有任何东西应该移动
基于这些场景,我们可以做出以下观察:
- 碰撞/移动检测应该一次性处理所有涉及的对象——例如,对于场景 6,如果我们逐个处理,每次处理一个对象,我们会先移动玩家,再移动第一个箱子,当我们处理第二个箱子时发现无法移动,此时需要回滚所有的移动操作,这是不可行的。因此,对于每个输入,我们必须找出所有涉及的对象,并整体判断该动作是否可行。
- 一条包含空位的可移动链可以移动(空位在此表示既非可移动也非不可移动的东西)
- 一条包含不可移动位置的可移动链不能移动
- 尽管所有示例都是向右移动,这些规则应该可以推广到任何方向,按键仅仅影响我们如何找到链条
因此,基于这些规则,让我们开始实现这个逻辑。以下是我们需要的逻辑模块的一些初步想法:
- 找到所有可移动和不可移动的实体 - 这样我们可以判断它们是否受到移动的影响
- 根据按键确定移动方向 - 我们在上一节已经大致解决了这个问题,基本上是一些基于按键枚举的 +1/-1 操作
- 遍历从玩家到地图边缘的所有位置,根据方向确定轴线——例如,如果按下右键,我们需要从
player.x遍历到map_width,如果按下上键,我们需要从0遍历到player.y - 对于序列中的每个格子 我们需要:
- 如果格子是可移动的,继续并记住这个格子
- 如果格子不可移动,停止并不移动任何东西
- 如果格子既不可移动也不可移动,移动我们记住的所有格子
以下是输入系统的新实现,有点长,但希望能理解。
现在运行代码,你会发现它真的有效了!我们不能再穿过墙壁,可以推动箱子,当箱子碰到墙时会停下。
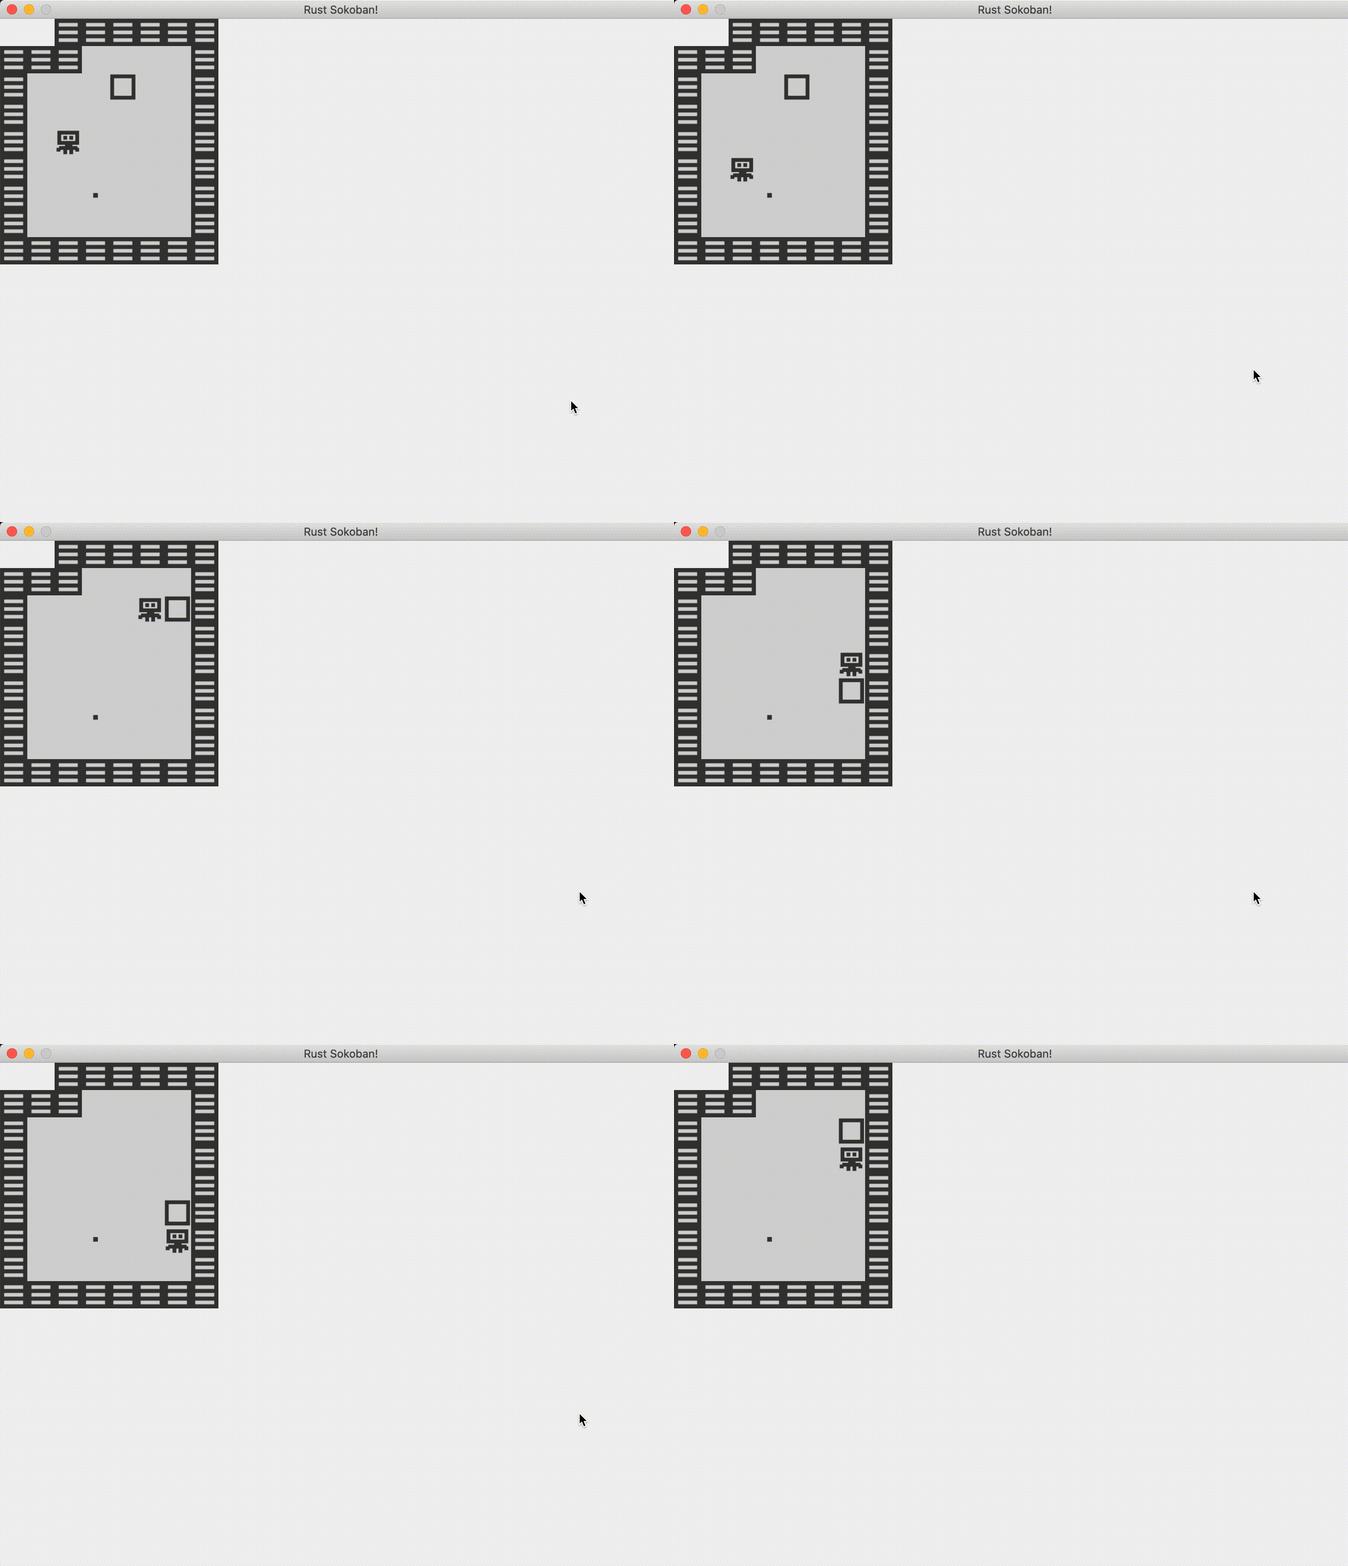
以下是完整代码。
/* ANCHOR: all */
// Rust sokoban
// main.rs

use ggez::{
    conf, event,
    graphics::{self, DrawParam, Image},
    input::keyboard::KeyCode,
    Context, GameResult,
};
use glam::Vec2;
use hecs::{Entity, World};

use std::collections::HashMap;
use std::path;

const TILE_WIDTH: f32 = 32.0;
const MAP_WIDTH: u8 = 8;
const MAP_HEIGHT: u8 = 9;

// ANCHOR: components
#[derive(Clone, Copy, Eq, Hash, PartialEq)]
pub struct Position {
    x: u8,
    y: u8,
    z: u8,
}

pub struct Renderable {
    path: String,
}

pub struct Wall {}

pub struct Player {}

pub struct Box {}

pub struct BoxSpot {}

// ANCHOR: components_movement
pub struct Movable;

pub struct Immovable;
// ANCHOR_END: components_movement

// ANCHOR_END: components

// ANCHOR: game
// This struct will hold all our game state
// For now there is nothing to be held, but we'll add
// things shortly.
struct Game {
    world: World,
}
// ANCHOR_END: game

// ANCHOR: init
// Initialize the level// Initialize the level
pub fn initialize_level(world: &mut World) {
    const MAP: &str = "
    N N W W W W W W
    W W W . . . . W
    W . . . B . . W
    W . . . . . . W
    W . P . . . . W
    W . . . . . . W
    W . . S . . . W
    W . . . . . . W
    W W W W W W W W
    ";

    load_map(world, MAP.to_string());
}

pub fn load_map(world: &mut World, map_string: String) {
    // read all lines
    let rows: Vec<&str> = map_string.trim().split('\n').map(|x| x.trim()).collect();

    for (y, row) in rows.iter().enumerate() {
        let columns: Vec<&str> = row.split(' ').collect();

        for (x, column) in columns.iter().enumerate() {
            // Create the position at which to create something on the map
            let position = Position {
                x: x as u8,
                y: y as u8,
                z: 0, // we will get the z from the factory functions
            };

            // Figure out what object we should create
            match *column {
                "." => {
                    create_floor(world, position);
                }
                "W" => {
                    create_floor(world, position);
                    create_wall(world, position);
                }
                "P" => {
                    create_floor(world, position);
                    create_player(world, position);
                }
                "B" => {
                    create_floor(world, position);
                    create_box(world, position);
                }
                "S" => {
                    create_floor(world, position);
                    create_box_spot(world, position);
                }
                "N" => (),
                c => panic!("unrecognized map item {}", c),
            }
        }
    }
}
// ANCHOR_END: init

// ANCHOR: handler
impl event::EventHandler<ggez::GameError> for Game {
    fn update(&mut self, context: &mut Context) -> GameResult {
        // Run input system
        {
            run_input(&self.world, context);
        }

        Ok(())
    }

    fn draw(&mut self, context: &mut Context) -> GameResult {
        // Render game entities
        {
            run_rendering(&self.world, context);
        }

        Ok(())
    }
}
// ANCHOR_END: handler

// ANCHOR: entities
pub fn create_wall(world: &mut World, position: Position) -> Entity {
    world.spawn((
        Position { z: 10, ..position },
        Renderable {
            path: "/images/wall.png".to_string(),
        },
        Wall {},
        Immovable {},
    ))
}
pub fn create_floor(world: &mut World, position: Position) -> Entity {
    world.spawn((
        Position { z: 5, ..position },
        Renderable {
            path: "/images/floor.png".to_string(),
        },
    ))
}

pub fn create_box(world: &mut World, position: Position) -> Entity {
    world.spawn((
        Position { z: 10, ..position },
        Renderable {
            path: "/images/box.png".to_string(),
        },
        Box {},
        Movable {},
    ))
}

pub fn create_box_spot(world: &mut World, position: Position) -> Entity {
    world.spawn((
        Position { z: 9, ..position },
        Renderable {
            path: "/images/box_spot.png".to_string(),
        },
        BoxSpot {},
    ))
}

pub fn create_player(world: &mut World, position: Position) -> Entity {
    world.spawn((
        Position { z: 10, ..position },
        Renderable {
            path: "/images/player.png".to_string(),
        },
        Player {},
        Movable {},
    ))
}
// ANCHOR_END: entities

// ANCHOR: rendering_system
fn run_rendering(world: &World, context: &mut Context) {
    // Clearing the screen (this gives us the background colour)
    let mut canvas =
        graphics::Canvas::from_frame(context, graphics::Color::from([0.95, 0.95, 0.95, 1.0]));

    // Get all the renderables with their positions and sort by the position z
    // This will allow us to have entities layered visually.
    let mut query = world.query::<(&Position, &Renderable)>();
    let mut rendering_data: Vec<(Entity, (&Position, &Renderable))> = query.into_iter().collect();
    rendering_data.sort_by_key(|&k| k.1 .0.z);

    // Iterate through all pairs of positions & renderables, load the image
    // and draw it at the specified position.
    for (_, (position, renderable)) in rendering_data.iter() {
        // Load the image
        let image = Image::from_path(context, renderable.path.clone()).unwrap();
        let x = position.x as f32 * TILE_WIDTH;
        let y = position.y as f32 * TILE_WIDTH;

        // draw
        let draw_params = DrawParam::new().dest(Vec2::new(x, y));
        canvas.draw(&image, draw_params);
    }

    // Finally, present the canvas, this will actually display everything
    // on the screen.
    canvas.finish(context).expect("expected to present");
}
// ANCHOR_END: rendering_system

// ANCHOR: input_system
fn run_input(world: &World, context: &mut Context) {
    let mut to_move: Vec<(Entity, KeyCode)> = Vec::new();

    // get all the movables and immovables
    let mov: HashMap<(u8, u8), Entity> = world
        .query::<(&Position, &Movable)>()
        .iter()
        .map(|t| ((t.1 .0.x, t.1 .0.y), t.0))
        .collect::<HashMap<_, _>>();
    let immov: HashMap<(u8, u8), Entity> = world
        .query::<(&Position, &Immovable)>()
        .iter()
        .map(|t| ((t.1 .0.x, t.1 .0.y), t.0))
        .collect::<HashMap<_, _>>();

    for (_, (position, _player)) in world.query::<(&mut Position, &Player)>().iter() {
        if context.keyboard.is_key_repeated() {
            continue;
        }

        // Now iterate through current position to the end of the map
        // on the correct axis and check what needs to move.
        let key = if context.keyboard.is_key_pressed(KeyCode::Up) {
            KeyCode::Up
        } else if context.keyboard.is_key_pressed(KeyCode::Down) {
            KeyCode::Down
        } else if context.keyboard.is_key_pressed(KeyCode::Left) {
            KeyCode::Left
        } else if context.keyboard.is_key_pressed(KeyCode::Right) {
            KeyCode::Right
        } else {
            continue;
        };

        let (start, end, is_x) = match key {
            KeyCode::Up => (position.y, 0, false),
            KeyCode::Down => (position.y, MAP_HEIGHT - 1, false),
            KeyCode::Left => (position.x, 0, true),
            KeyCode::Right => (position.x, MAP_WIDTH - 1, true),
            _ => continue,
        };

        let range = if start < end {
            (start..=end).collect::<Vec<_>>()
        } else {
            (end..=start).rev().collect::<Vec<_>>()
        };

        for x_or_y in range {
            let pos = if is_x {
                (x_or_y, position.y)
            } else {
                (position.x, x_or_y)
            };

            // find a movable
            // if it exists, we try to move it and continue
            // if it doesn't exist, we continue and try to find an immovable instead
            match mov.get(&pos) {
                Some(entity) => to_move.push((*entity, key)),
                None => {
                    // find an immovable
                    // if it exists, we need to stop and not move anything
                    // if it doesn't exist, we stop because we found a gap
                    match immov.get(&pos) {
                        Some(_id) => to_move.clear(),
                        None => break,
                    }
                }
            }
        }
    }

    // Now actually move what needs to be moved
    for (entity, key) in to_move {
        let mut position = world.get::<&mut Position>(entity).unwrap();

        match key {
            KeyCode::Up => position.y -= 1,
            KeyCode::Down => position.y += 1,
            KeyCode::Left => position.x -= 1,
            KeyCode::Right => position.x += 1,
            _ => (),
        }
    }
}
// ANCHOR_END: input_system

// ANCHOR: main
pub fn main() -> GameResult {
    let mut world = World::new();
    initialize_level(&mut world);

    // Create a game context and event loop
    let context_builder = ggez::ContextBuilder::new("rust_sokoban", "sokoban")
        .window_setup(conf::WindowSetup::default().title("Rust Sokoban!"))
        .window_mode(conf::WindowMode::default().dimensions(800.0, 600.0))
        .add_resource_path(path::PathBuf::from("./resources"));

    let (context, event_loop) = context_builder.build()?;

    // Create the game state
    let game = Game { world };
    // Run the main event loop
    event::run(context, event_loop, game)
}
// ANCHOR_END: main

/* ANCHOR_END: all */
CODELINK: 你可以在 这里 查看本示例的完整代码。
模块
主文件已经变得相当大了,可以想象,随着我们的项目增长,这种方式将无法维持下去。幸运的是,Rust 提供了模块的概念,可以让我们根据关注点将功能整齐地拆分到单独的文件中。
目前,我们的目标是实现以下文件夹结构。随着我们添加更多的组件和系统,我们可能需要不止一个文件,但这是一个不错的起点。
├── resources
│   └── images
│       ├── box.png
│       ├── box_spot.png
│       ├── floor.png
│       ├── player.png
│       └── wall.png
├── src
│   ├── systems
│   │   ├── input.rs
│   │   ├── rendering.rs
│   │   └── mod.rs
│   ├── components.rs
│   ├── constants.rs
│   ├── entities.rs
│   ├── main.rs
│   ├── map.rs
│   └── resources.rs
└── Cargo.toml
更多: 阅读更多关于模块和管理增长项目的信息 这里。
首先,让我们将所有组件移到一个文件中。除了将某些字段设置为公共的之外,不会有任何更改。需要将字段设置为公共的原因是,当所有内容都在同一个文件中时,所有内容可以相互访问,这在开始时很方便,但现在我们将内容分开,我们需要更加注意可见性。目前我们将字段设置为公共以使其正常工作,但稍后我们会讨论一种更好的方法。我们还将组件注册移动到了该文件的底部,这样当我们添加组件时,只需要更改这个文件就可以了。
接下来,让我们将常量移到它们自己的文件中。目前我们硬编码了地图的尺寸,这在移动时需要知道我们何时到达地图的边缘,但作为改进,我们可以稍后存储地图的尺寸,并根据地图加载动态设置它们。
接下来,实体创建代码现在移到了一个实体文件中。
现在是地图加载。
最后,我们将系统代码移到它们自己的文件中(RenderingSystem 到 rendering.rs,InputSystem 到 input.rs)。这应该只是从主文件中复制粘贴并移除一些导入,因此可以直接进行。
我们需要更新 mod.rs,告诉 Rust 我们想将所有系统导出到外部(在这里是主模块)。
太棒了,现在我们完成了这些操作,以下是简化后的主文件的样子。注意导入后的 mod 和 use 声明,它们再次告诉 Rust 我们想要使用这些模块。
// main.rs
/* ANCHOR: all */
// Rust sokoban
// main.rs

use ggez::{conf, event, Context, GameResult};
use hecs::World;

use std::path;

mod components;
mod constants;
mod entities;
mod map;
mod systems;

// ANCHOR: game
// This struct will hold all our game state
// For now there is nothing to be held, but we'll add
// things shortly.
struct Game {
    world: World,
}
// ANCHOR_END: game

// ANCHOR: handler
impl event::EventHandler<ggez::GameError> for Game {
    fn update(&mut self, context: &mut Context) -> GameResult {
        // Run input system
        {
            systems::input::run_input(&self.world, context);
        }

        Ok(())
    }

    fn draw(&mut self, context: &mut Context) -> GameResult {
        // Render game entities
        {
            systems::rendering::run_rendering(&self.world, context);
        }

        Ok(())
    }
}
// ANCHOR_END: handler

// ANCHOR: main
pub fn main() -> GameResult {
    let mut world = World::new();
    map::initialize_level(&mut world);

    // Create a game context and event loop
    let context_builder = ggez::ContextBuilder::new("rust_sokoban", "sokoban")
        .window_setup(conf::WindowSetup::default().title("Rust Sokoban!"))
        .window_mode(conf::WindowMode::default().dimensions(800.0, 600.0))
        .add_resource_path(path::PathBuf::from("./resources"));

    let (context, event_loop) = context_builder.build()?;

    // Create the game state
    let game = Game { world };
    // Run the main event loop
    event::run(context, event_loop, game)
}
// ANCHOR_END: main

/* ANCHOR_END: all */
此时可以运行,所有功能应该与之前完全相同,不同的是,现在我们的代码更加整洁,为更多令人惊叹的 Sokoban 功能做好了准备。
CODELINK: 你可以在 这里 查看本示例的完整代码。
实现游戏基本功能
现在角色可以推动箱子在区域内移动了.有些(并不是全部)游戏还会设定些目标让玩家去完成.比如有些推箱子类的游戏会让玩家把箱子推到特定的点才算赢.目前我们还没实现类似的功能,还没有检查什么时候玩家赢了并停止游戏,有可能玩家已经把箱子推到目标点了,但我们的游戏并没意识到.接下来就让我们完成这些功能吧!
首先我们需要想一下要检查是否赢了并通知玩家需要添加那些功能. 当玩家闯关时:
- 需要一个用于保存游戏状态的
resource- 游戏是在进行中还是已经完成了?
- 玩家目前一共走了多少步了?
- 需要一个用于检查玩家是否完成任务的
system - 需要一个用于更新移动步数的
system - 需要一个用于展示游戏状态的界面(UI )
游戏状态资源
我们之所以选择使用资源(resource)保存游戏状态,是因为游戏状态信息不跟任何一个实体绑定.接下来我们就开始定义一个Gameplay资源.
Gameplay 有俩个属性: state 和 moves_count. 分别用于保存当前游戏状态(当前游戏正在进行还是已经有了赢家)和玩家操作的步数. state 是枚举(enum)类型, 可以这样定义:
细心的读者会注意到,我们使用了一个宏来为 Gameplay 派生 Default 特性,并为 GameplayState 枚举使用了 #[default] 注解。这个注解的作用是告诉编译器,如果我们调用 GameplayState::default(),我们应该得到 GameplayState::Playing,这是合理的。
现在,当游戏启动时,Gameplay 资源将如下所示:
计步System
我们可以通过增加Gameplay的moves_count属性值来记录玩家操作的步数.
可以在先前定义的处理用户输入的InputSystem中实现计步的功能.因为我们需要在InputSystem中修改Gameplay的属性值,所以需要在InputSystem中定义SystemData类型时使用Write<'a, Gameplay>.
我们先前已经编写过根据玩家按键移动角色的代码,在此基础上再添加增加操作步骤计数的代码就可以了.
Gameplay System
接下来是添加一个GamePlayStateSystem用于检查所有的箱子是否已经推到了目标点,如果已经推到了就赢了.除了 Gameplay, 要完成这个功能还需要对Position, Box, 和 BoxSpot进行只读访问.这里使用 Join 结合Box(箱子) 和 Position(位置)创建一个包含每个箱子位置信息的Vector(集合).我们只需要通过遍历这个集合来判断每个箱子是否在目标点上,如果在就胜利了,如果不在,则游戏继续.
最后还需要在渲染循环中执行我们的代码:
// main.rs
/* ANCHOR: all */
// Rust sokoban
// main.rs

use ggez::{conf, event, Context, GameResult};
use hecs::World;

use std::path;

mod components;
mod constants;
mod entities;
mod map;
mod systems;

// ANCHOR: game
// This struct will hold all our game state
// For now there is nothing to be held, but we'll add
// things shortly.
struct Game {
    world: World,
}
// ANCHOR_END: game

// ANCHOR: handler
impl event::EventHandler<ggez::GameError> for Game {
    fn update(&mut self, context: &mut Context) -> GameResult {
        // Run input system
        {
            systems::input::run_input(&self.world, context);
        }

        // Run gameplay state
        {
            systems::gameplay::run_gameplay_state(&self.world);
        }

        Ok(())
    }

    fn draw(&mut self, context: &mut Context) -> GameResult {
        // Render game entities
        {
            systems::rendering::run_rendering(&self.world, context);
        }

        Ok(())
    }
}
// ANCHOR_END: handler

// ANCHOR: main
pub fn main() -> GameResult {
    let mut world = World::new();
    map::initialize_level(&mut world);
    entities::create_gameplay(&mut world);

    // Create a game context and event loop
    let context_builder = ggez::ContextBuilder::new("rust_sokoban", "sokoban")
        .window_setup(conf::WindowSetup::default().title("Rust Sokoban!"))
        .window_mode(conf::WindowMode::default().dimensions(800.0, 600.0))
        .add_resource_path(path::PathBuf::from("./resources"));

    let (context, event_loop) = context_builder.build()?;

    // Create the game state
    let game = Game { world };
    // Run the main event loop
    event::run(context, event_loop, game)
}
// ANCHOR_END: main

/* ANCHOR_END: all */
游戏信息界面
最后一步是需要提供一个向玩家展示当前游戏状态的界面.我们需要一个用于记录游戏状态的资源和一个更新状态信息的System.可以把这些放到资源GameplayState和RenderingSystem中.
首先需要为GameplayState实现Display特征,这样才能以文本的形式展示游戏状态.这里又用到了模式匹配,根据游戏的状态显示"Playing(进行中)"或"Won(赢了)".
接下来我们需要在RenderingSystem中添加一个方法draw_text,这样它就可以把游戏状态信息GameplayState显示到屏幕上了.
...为了调用draw_text我们还需要把资源 Gameplay 添加 RenderingSystem 中,这样 RenderingSystem 才能获取到资源 Gameplay.
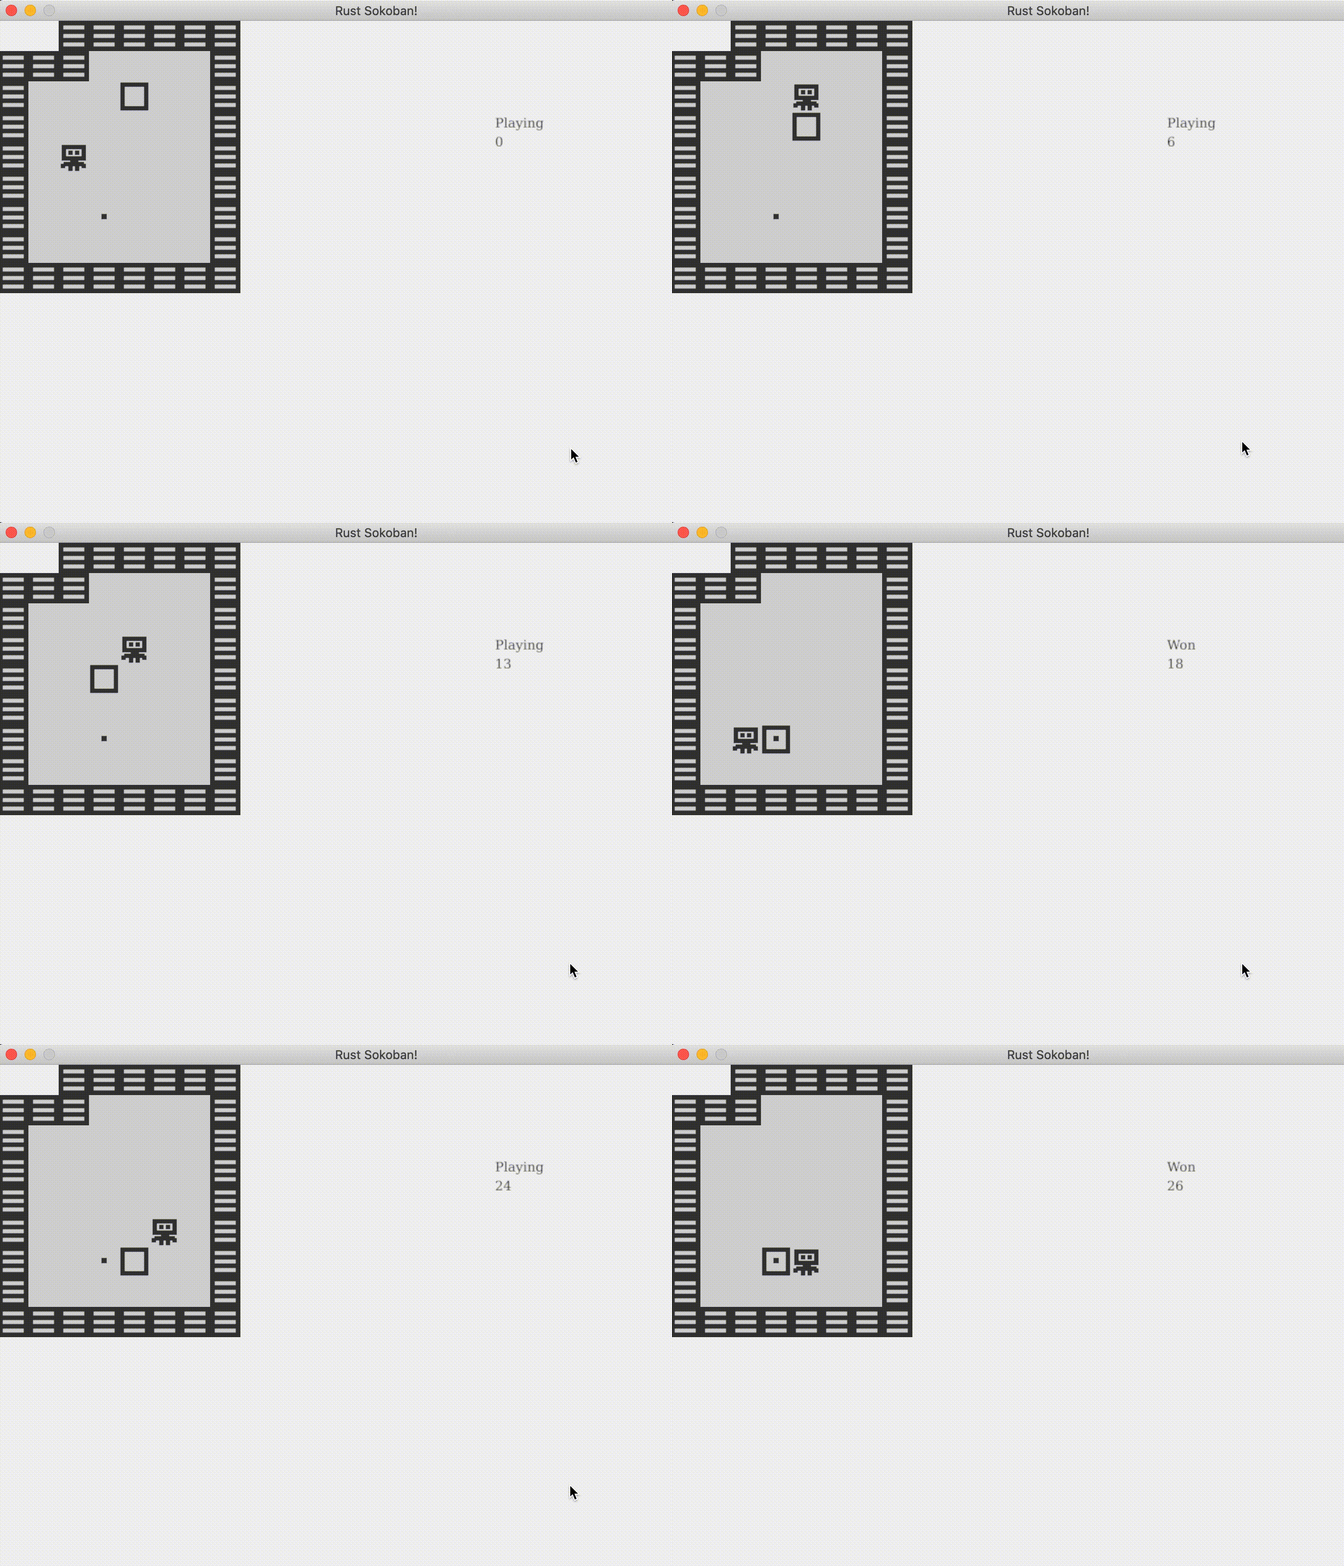
至此我们编写的推箱子游戏已经可以向玩家展示基本的信息了:
- 当前的操作步数
- 当玩家胜利时告诉他们
看起来就像这个样子:
还有很多可以改进增强的!
CODELINK: 点 这里获取目前的完整代码.
开发高级功能
恭喜你已经完成了前两章的学习.接下来我们开始学习点更高级的东东.期待不?那就一起来吧!
彩色方块
是时候为我们的游戏增添一些色彩了!到目前为止,游戏玩法相当简单,就是把方块放到指定位置。让我们通过添加不同颜色的方块来让游戏更有趣!现在我们将使用红色和蓝色方块,但你可以根据自己的喜好进行调整,创建更多颜色!现在要赢得游戏,你必须把方块放在相同颜色的目标点上。
资源
首先让我们添加新的资源,右键下载这些图片,或者创建你自己的图片!


目录结构应该是这样的(注意我们已经移除了默认的方块和目标点):
├── resources
│   └── images
│       ├── box_blue.png
│       ├── box_red.png
│       ├── box_spot_blue.png
│       ├── box_spot_red.png
│       ├── floor.png
│       ├── player.png
│       └── wall.png
├── src
│   ├── systems
│   │   ├── gameplay.rs
│   │   ├── input.rs
│   │   ├── mod.rs
│   │   └── rendering.rs
│   ├── components.rs
│   ├── constants.rs
│   ├── entities.rs
│   ├── main.rs
│   ├── map.rs
│   └── resources.rs
├── Cargo.lock
├── Cargo.toml
组件更改
现在让我们为颜色添加一个枚举(如果你选择实现两种以上的颜色,你需要在这里添加它们)。
现在让我们在方块和目标点中使用这个枚举。
实体创建
让我们在创建方块和目标点时添加颜色参数,并确保根据颜色枚举传递正确的资源路径。
为了根据颜色创建正确的资源路径字符串,我们基本上想要 "/images/box_{}.png",其中 {} 是我们要创建的方块的颜色。现在我们面临的挑战是我们使用的是颜色枚举,所以 Rust 编译器不知道如何将 BoxColour::Red 转换为 "red"。如果能够使用 colour.to_string() 并获得正确的值就太好了。幸运的是,Rust 为我们提供了一个很好的方法,我们需要在 BoxColour 枚举上实现 Display 特征。下面是具体实现,我们只需指定如何将枚举的每个变体映射到字符串。
现在让我们在实体创建代码中包含颜色,并使用我们刚刚实现的 colour.to_string() 功能。
地图
现在让我们修改地图代码以允许新的彩色方块和目标点选项:
- "BB" 表示蓝色方块
- "RB" 表示红色方块
- "BS" 表示蓝色目标点
- "RS" 表示红色目标点
让我们在初始化关卡时更新我们的静态地图。
游戏玩法
现在我们已经完成了艰难的工作,可以继续测试这段代码了。你会注意到一切都能工作,但是存在一个重大的游戏玩法错误。你可以通过把红色方块放在蓝色目标点上或反之来赢得游戏。让我们来修复这个问题。
我们之前学过,根据 ECS 方法论,数据放在组件中,行为放在系统中。我们现在讨论的是行为,所以它必须在系统中。还记得我们如何添加检查是否获胜的系统吗?这正是我们需要修改的地方。
让我们修改运行函数,检查目标点和方块的颜色是否匹配。
如果你现在编译代码,它会抱怨我们试图用 == 比较两个枚举。Rust 默认不知道如何处理这个问题,所以我们必须告诉它。我们能做的最好的方法是为 PartialEq 特征添加一个实现。
现在是讨论这些不寻常的 derive 注解的好时机。我们以前使用过它们,但从未深入探讨它们的作用。派生属性可以应用于结构体或枚举,它们允许我们为我们的类型添加默认的特征实现。例如,这里我们告诉 Rust 为我们的 BoxColour 枚举添加 PartialEq 默认特征实现。
这是 PartialEq 默认实现的样子,它只检查某个东西是否等于它自己。如果相等,比较成功;如果不相等,比较失败。如果这不太容易理解,也不用太担心。
所以通过在枚举上方添加 #[derive(PartialEq)],我们告诉 Rust BoxColour 现在实现了我们之前看到的偏等特征,这意味着如果我们尝试进行 box_colour_1 == box_colour_2,它将使用这个实现,只检查 colour_1 对象是否与 colour_2 对象相同。这不是最复杂的偏等实现,但对我们的用例来说应该足够了。
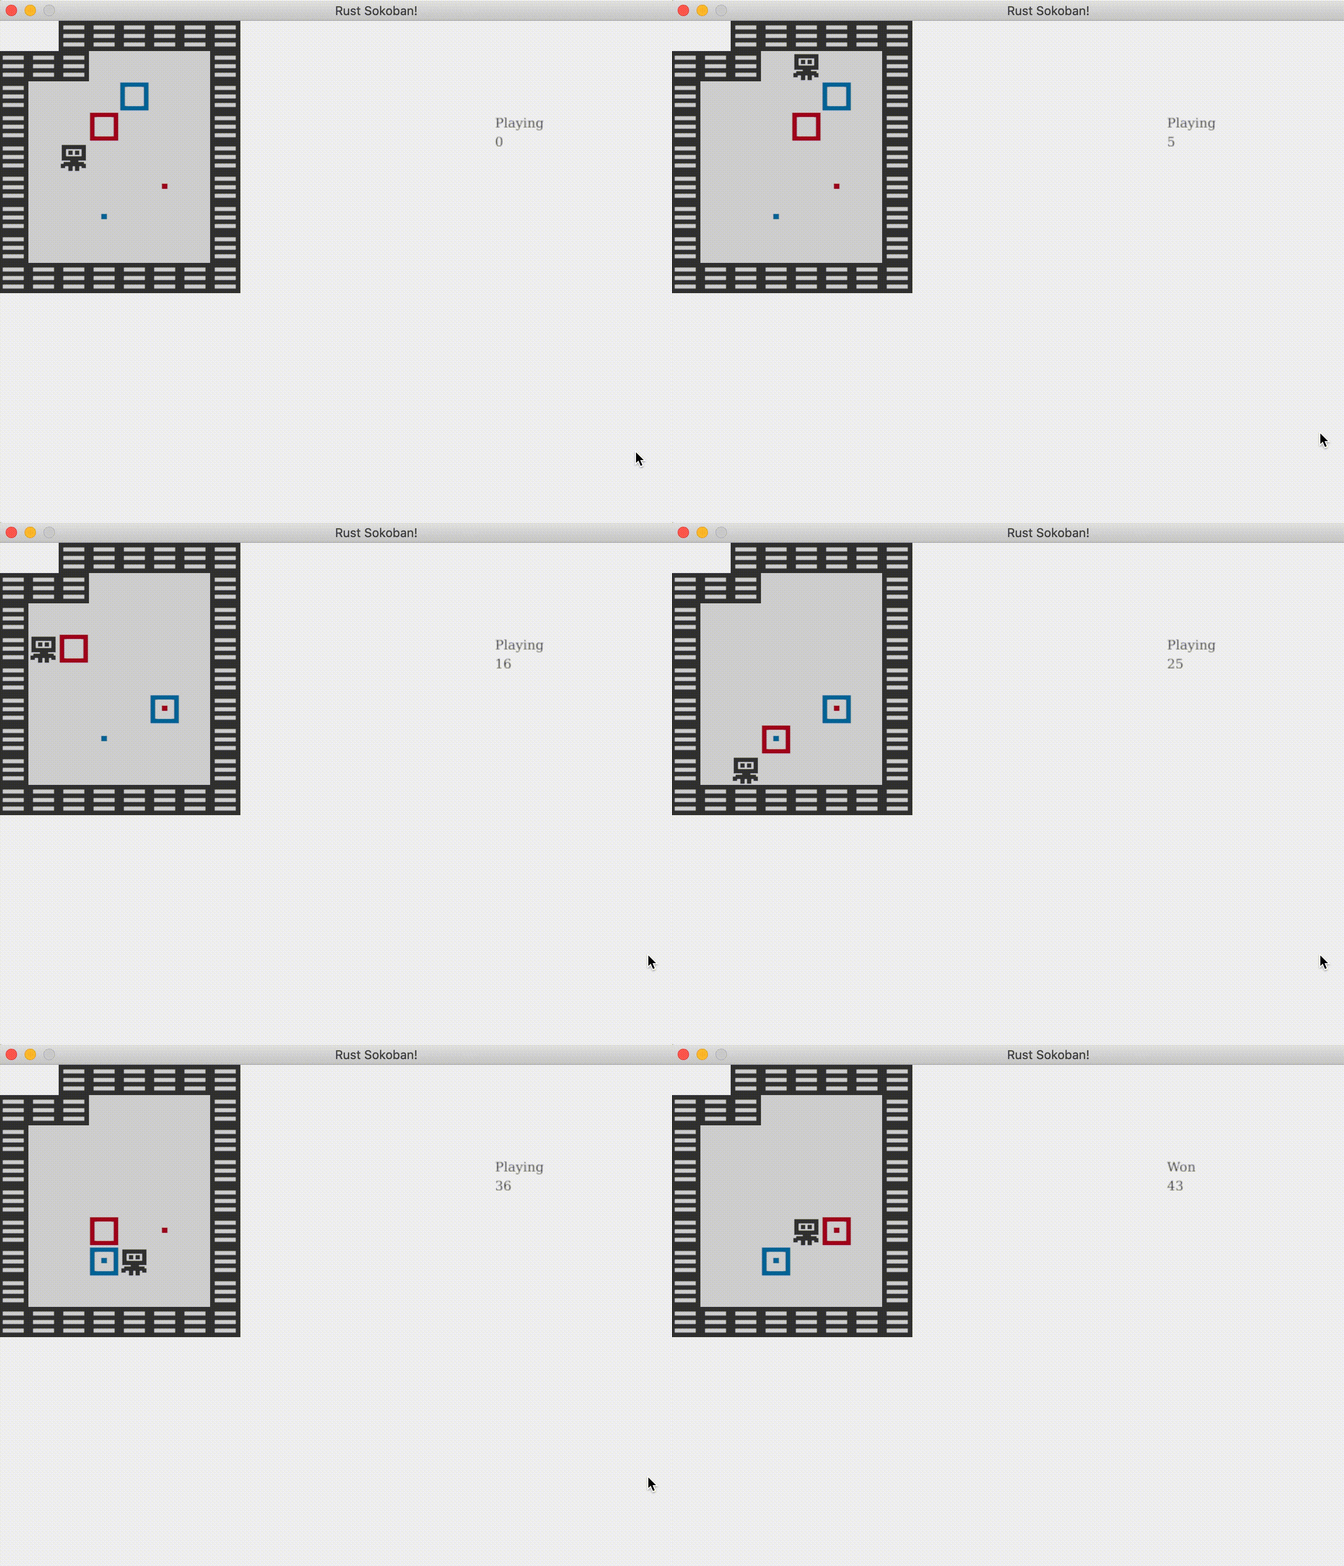
现在我们可以编译代码并通过看到游戏运行来收获我们努力的成果,只有当我们把正确的方块放在正确的位置时,游戏才会告诉我们赢了!
CODELINK: 你可以在这里看到这个示例的完整代码。
动画
在本节中,我们将学习如何为游戏添加动画,我们将从一些基本的动画开始,但你可以根据本教程中的想法添加更复杂的动画。我们将添加两种动画:让玩家眨眼和让方块在原地轻微晃动。
什么是动画?
动画实际上就是在特定时间间隔播放的一组帧,给人以运动的错觉。可以把它想象成一个视频(视频就是按顺序播放的一系列图像),但帧率要低得多。
例如,要让我们的玩家眨眼,我们需要三个动画帧:
- 我们当前的玩家,眼睛睁开
- 玩家眼睛稍微闭合
- 玩家眼睛完全闭合
如果我们按顺序播放这三帧,你会注意到看起来就像玩家在眨眼。你可以通过打开图像并在图像预览中快速切换它们来试试这个效果。
这里有一些需要注意的事项:
- 资源需要针对特定的帧率设计 - 对我们来说,我们将使用 250 毫秒,这意味着我们每 250 毫秒播放一个新的动画帧,所以我们每秒有 4 帧
- 资源之间需要保持一致性 - 想象一下如果我们有两种不同的玩家,它们有不同的资源和不同外观的眼睛,我们需要确保当我们创建上述三帧时它们是一致的,否则两个玩家会以不同的速率眨眼
- 为大量帧设计资源是一项繁重的工作,所以我们会尽量保持动画简单,只关注关键帧
它将如何工作?
那么这在我们现有的推箱子游戏中将如何工作呢?我们需要:
- 修改我们的可渲染组件以允许多个帧 - 我们也可以创建一个新的可渲染组件来处理动画可渲染对象,并保留现有的组件用于静态可渲染对象,但现在把它们放在一起感觉更整洁
- 修改玩家实体构造以接受多个帧
- 在我们的渲染循环中跟踪时间 - 我们稍后会详细讨论这个问题,所以如果现在不太清楚为什么需要这样做也不用担心
- 修改渲染系统,考虑帧数、时间和在给定时间应该渲染的帧
资源
让我们为玩家添加新的资源,它应该是这样的。注意我们创建了一个按顺序命名帧的约定,这不是严格必要的,但它将帮助我们轻松跟踪顺序。


├── resources
│   └── images
│       ├── box_blue.png
│       ├── box_red.png
│       ├── box_spot_blue.png
│       ├── box_spot_red.png
│       ├── floor.png
│       ├── player_1.png
│       ├── player_2.png
│       ├── player_3.png
│       └── wall.png
可渲染特性
现在,让我们更新可渲染组件,把他们变成一个路径列表以接收多个帧
我们还要添加两个新函数,用于构建两种类型的可渲染对象:一种是单一路径,另一种是多个路径。这两个函数是关联函数,因为它们与结构体 Renderable 相关联,但它们相当于其他语言中的静态函数,因为它们不操作实例(注意它们没有接收 &self 或 &mut self 作为第一个参数,这意味着我们可以在结构体的上下文中调用它们,而不是在结构体实例中调用)。它们也类似于工厂函数,因为它们封装了实际构建对象之前所需的逻辑和验证。
更多: 了解更多关于关联函数的信息。这里.
接下来,我们需要一种方法来判断可渲染对象是动画还是静态的,这将在渲染系统中使用。我们可以将 paths 成员变量设为公共,让渲染系统获取 paths 的长度并根据长度推断,但有一种更符合语言习惯的方式。我们可以为可渲染对象的类型添加一个枚举,并在可渲染对象上添加一个方法来获取该类型。这样,我们将类型的逻辑封装在可渲染对象内部,同时可以保持 paths 私有。你可以将类型的声明放在 components.rs 的任何位置,但最好放在 Renderable 声明的旁边。
现在让我们添加一个函数,根据内部的 paths 告诉我们可渲染对象的类型。
最后,由于我们将 paths 设为私有,因此需要让可渲染对象的使用者能够从列表中获取特定路径。对于静态可渲染对象,这将是第 0 个路径(唯一的一个),而对于动画路径,我们将让渲染系统根据时间决定应该渲染哪个路径。唯一需要注意的地方是,如果请求的帧数超出了我们拥有的范围,我们将通过对长度取模来循环处理。
实体创建
接下来,我们将更新玩家实体的创建,以考虑多个路径。请注意,现在我们使用 new_animated 函数来构建可渲染对象
并且让我们更新所有其他部分以使用 new_static 函数——以下是我们如何在墙壁实体创建中实现这一点的示例,请随意将其应用到其他静态实体中。
时间
我们还需要另一个组件来记录时间。时间与此有什么关系?它又是如何与帧率联系起来的呢?基本思路是这样的:ggez 控制渲染系统的调用频率,这取决于帧率,而帧率又取决于我们在游戏循环的每次迭代中做了多少工作。由于我们无法控制这一点,在一秒钟内,渲染系统可能会被调用 60 次、57 次,甚至可能只有 30 次。这意味着我们的动画系统不能基于帧率,而需要基于时间。
正因如此,我们需要记录增量时间(delta time),也就是上一次循环和当前循环之间经过的时间。由于增量时间比我们设定的动画帧间隔(我们决定为 250 毫秒)要小得多,因此我们需要累积增量时间,也就是从游戏启动开始到现在经过的总时间。
现在,我们为时间添加一个资源。这并不适合放入组件模型中,因为时间只是一些需要维护的全局状态。
现在,让我们在主循环中更新时间。幸运的是,ggez 提供了一个函数来获取增量时间,所以我们只需要累积它即可。
渲染系统
现在,我们来更新渲染系统。我们将从可渲染对象中获取类型,如果是静态的,我们直接使用第一帧;否则,我们根据增量时间来确定要使用哪一帧。
首先,我们添加一个函数来封装获取正确图像的逻辑。
最后,我们在 run 函数中使用新的 get_image 函数(我们还需要将时间添加到 SystemData 定义中,并添加一些导入,但基本上就是这样了)。
箱体动画
现在我们已经学会了如何实现这一点,接下来我们将其扩展到让箱子也实现动画效果。我们只需要添加新的资源并调整实体创建部分,其他部分应该就能正常工作了。以下是我使用的资源,你可以随意复用或创建新的资源!


总结一下
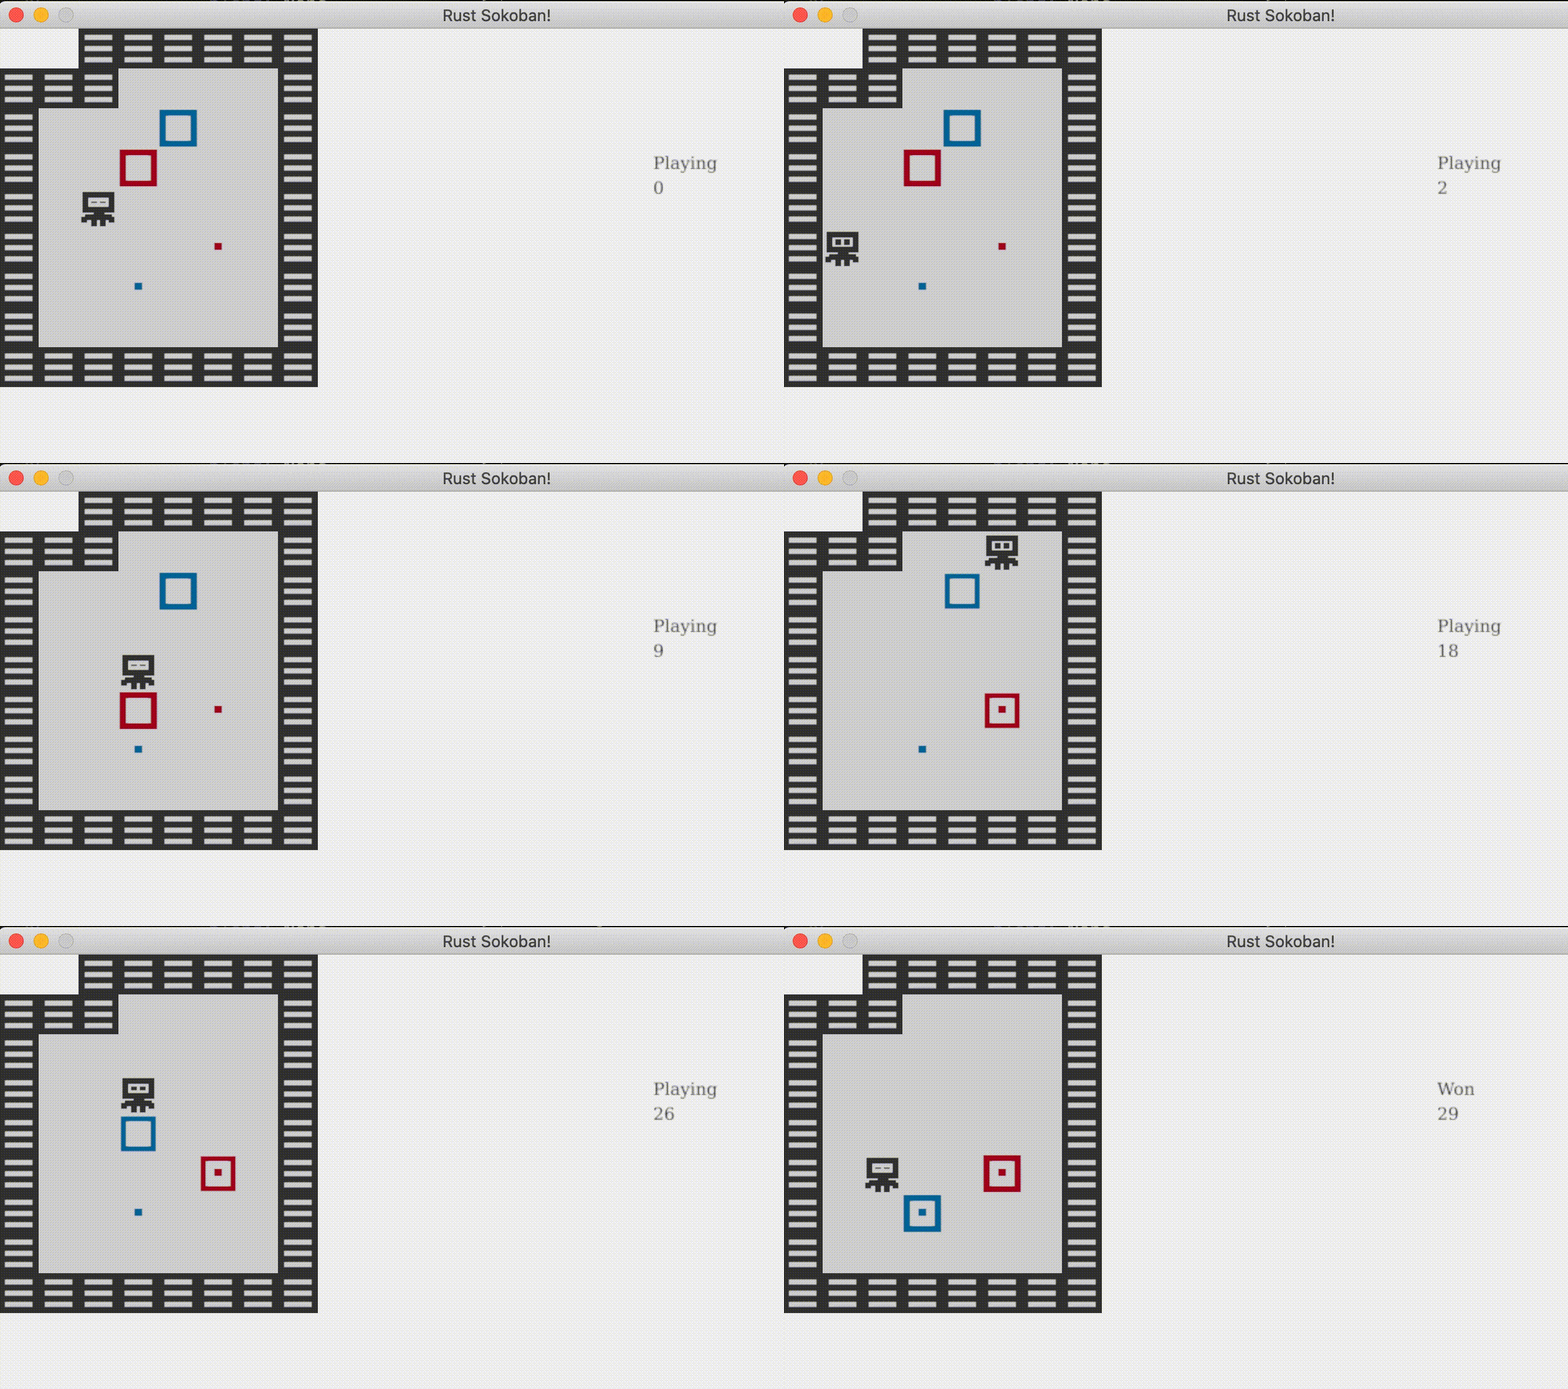
这一部分内容比较长,但希望你喜欢!以下是游戏现在应该呈现的效果。
代码链接: 在这个例子中你可以看到完整的代码 here.
声音和事件
在这个 section 中,我们将工作于添加事件,这些事件将在后续阶段用来添加声音效果。在短语中,我们想在以下情况下播放声音:
- 当玩家击打墙或障碍时 - 为了让他们知道不能通过
- 当玩家把箱放在正确的位置 - 以表明 "你做得对"
- 当玩家把箱放在错误的位置 - 以表示move的错误
实际上播放声音并不是太难,ggez提供了这个功能,但我们目前面临的问题是需要确定何时播放声音。
让我们从box on correct spot来看。我们可能会使用游戏状态系统,并且会循环遍历boxes和spots来检查是否处于这种情况,然后播放声音。但是,这并不是一种好主意,因为我们将每次循环都尝试多次,造成不必要的重复和播放太快。
我们可以尝试在此过程中保持一些状态,但这并不感兴趣。我们的主要问题是,我们无法通过仅检查状态来做到这一点,而必须使用一种有反应性的模型,当发生某件事情时就能让系统作出反应。
我们会使用事件模型。这意味着当一个框架发生变化(如玩家击打墙或移动箱子)时,将引发一个事件。然后,我们可以在另一端接收这个事件,并根据其类型执行相应的操作。这个系统可以复用。
事件实现
让我们从讨论如何实现事件开始。我们不会使用组件或实体(尽管可以),而是使用一种与输入队列非常相似的资源。需要将事件加入队列的代码部分需要访问这个资源,然后我们将有一个系统来处理这些事件并采取相应的操作。
实现什么事件
让我们更详细地讨论一下需要哪些事件:
- 玩家击打障碍 - 这可以是事件本身,通过输入系统当玩家试图移动但无法移动时会引发
- 箱放在正确或错误的位置 - 我们可以将其表示为一个单独的事件,其中包含是否 correct_spot 的属性(我稍后再解释这个属性)
变化类型
我们需要用enum 来定义各种事件类型。我们曾使用过enum(例如Rendering类型和box颜色),但是这次我们要把它的潜力全推到使用,特别是我们可以在其中添加属性。
查看事件定义,它可能是这样的。
事件队列资源
现在,我们需要一个resource来接收事件。这将是一个多生产者单消费者模型。我们会有多个系统添加事件,而一个system(events system)会只消费该事件。
发送事件
现在,我们需要将两个事件在input_system中添加:EntityMoved和PlayerHitObstacle。
为了便于阅读,我省略了原始文件中的部分代码,但实际上我们只是在正确的位置添加了两行代码来创建事件并将它们添加到 events 向量中。
最后,我们需要将事件添加回世界中,这一步在系统的末尾完成。
消费事件 - events系统
现在它是时候添加一个events system来处理事件。
我们将会对每个事件做出以下决策:
-
Event::PlayerHitObstacle -> 这是播放音效的地方,但我们会在添加音频部分时再回到这里。
-
Event::EntityMoved(EntityMoved { id }) -> 这是添加逻辑的地方,用于检查刚刚移动的实体是否是一个箱子,以及它是否在正确的位置上。
-
Event::BoxPlacedOnSpot(BoxPlacedOnSpot { is_correct_spot }) -> 这是播放音效的地方,但我们会在添加音频部分时再回到这里。
事件处理系统的结尾很重要,因为处理一个事件可能会导致另一个事件被创建。因此,我们必须将事件添加回世界。
代码链接:您可以在这个示例中看到完整代码 这里.
音效
本节我们将添加音效。简而言之,我们希望在以下情况下播放声音:
- 当玩家撞击墙或障碍物时 — 提示他们无法通过
- 当玩家将箱子放在正确位置时 - 提示 “做对了”
- 当玩家将箱子放在错误位置时 - 提示 “操作错误”
音频存储
为了播放声音,需要加载wav文件。为了避免每次播放前临时加载,我们将创建一个音频存储,并在游戏开始时预先加载它们。
我们可以使用一个资源来定义音频存储。
接下来添加初始化存储的代码,也就是预加载游戏所需的所有音效。
然后在初始化关卡时调用这个函数。
播放声音
最后, 我们需要在 audio store 中添加声音播放的代码。
现在在事件系统中播放音效:
现在运行游戏,享受这些音效吧!
代码链接: 你可以在这里查看所有代码.
批量渲染
你可能已经注意到在玩游戏时输入感觉有点慢。让我们添加一个 FPS 计数器来看看我们的渲染速度如何。如果你不熟悉 FPS 这个术语,它代表每秒帧数(Frames Per Second),我们的目标是达到 60FPS。
FPS 计数器
让我们从添加 FPS 计数器开始,这包含两个部分:
- 获取或计算 FPS 值
- 在屏幕上渲染这个值
现在,
- 幸运的是,ggez提供了获取FPS的方法 - 参见这里。
- 我们已经在渲染系统中实现了文本渲染功能,只需将FPS显示出来即可。
让我们把这些整合到代码中。
运行游戏并用按键移动一下,你会发现FPS从预期的60明显下降。在我的机器上,FPS大约在20-30之间,但根据你的设备,可能会有所不同。
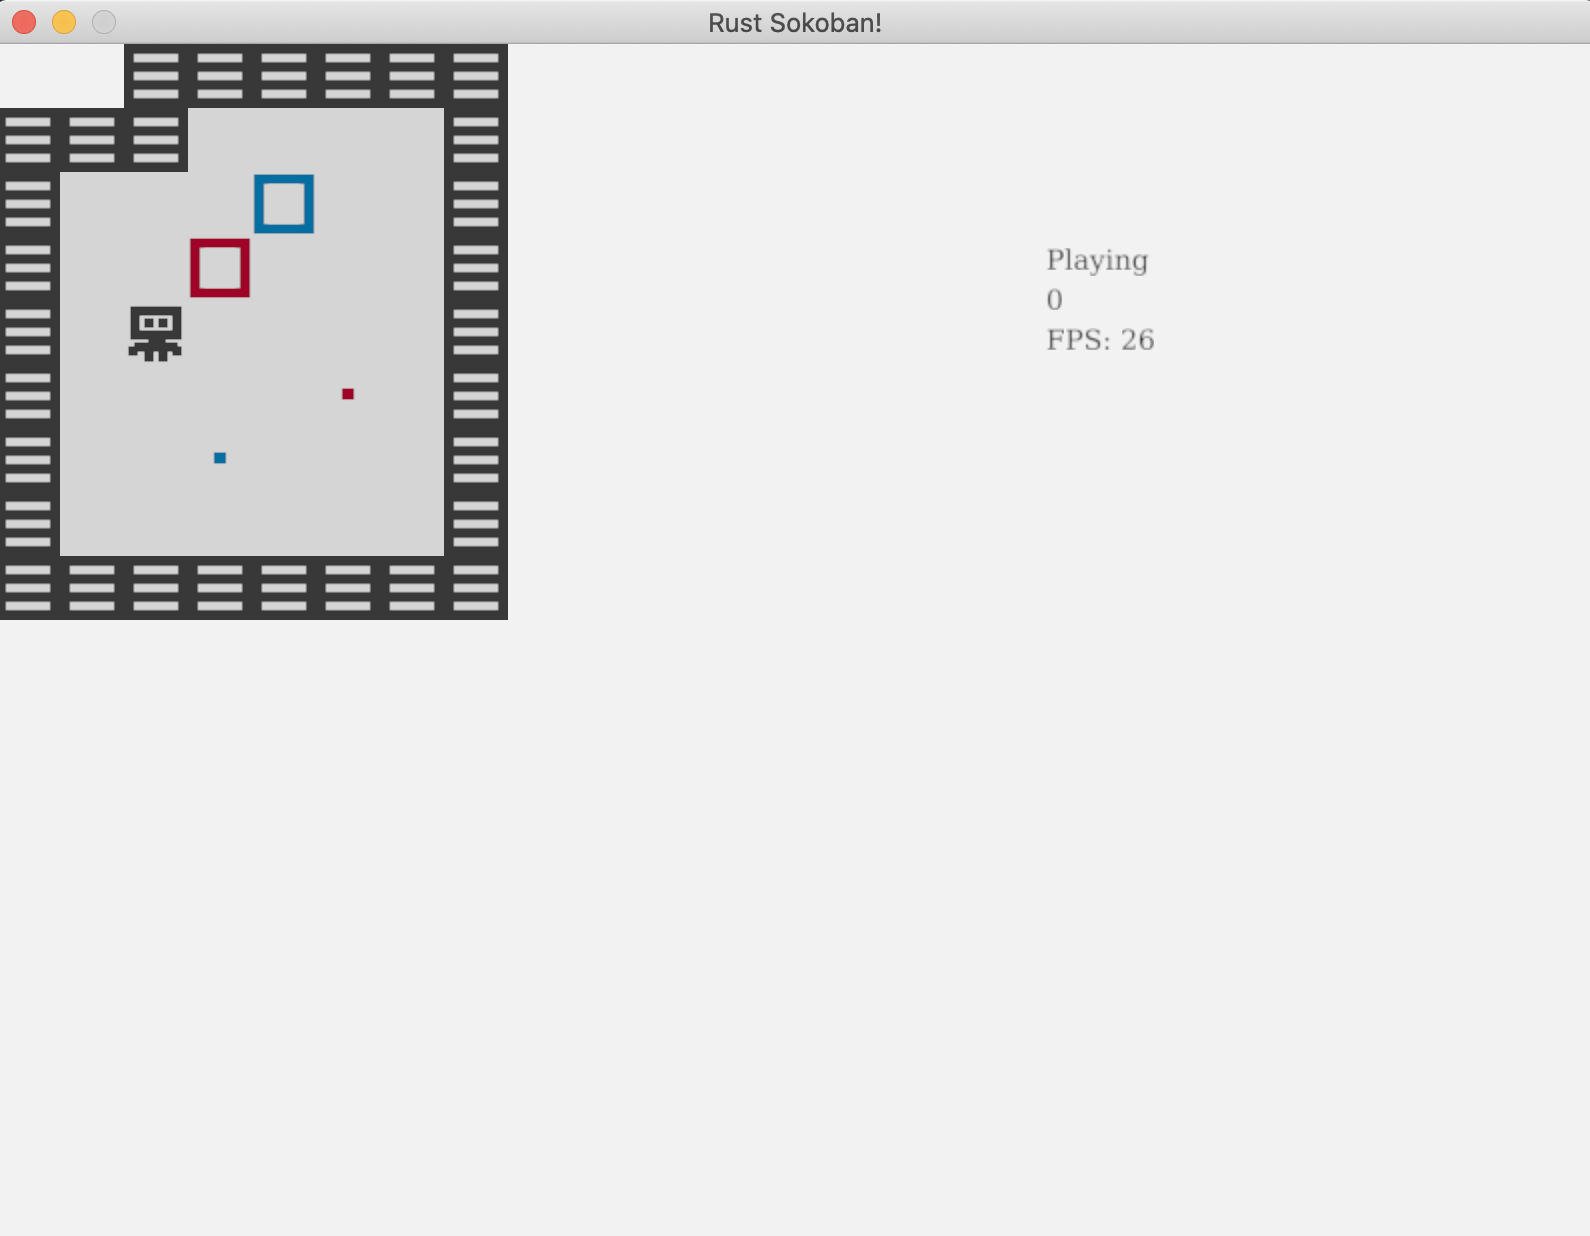
是什么导致了 FPS 下降?
你可能会问,是什么导致FPS这么低?我们的游戏逻辑并不复杂,输入和移动处理也不难,实体和组件数量也不多,不至于造成如此大的FPS下降。要理解这个问题,我们需要深入分析当前渲染系统的工作原理。
目前,对于每个可渲染的实体,我们都会确定要渲染的图像并渲染它。这意味着如果有20个地板图块,我们会加载地板图像20次,并发出20次单独的渲染调用。这种做法开销太大,正是导致FPS大幅下降的原因。
如何解决这个问题?我们可以使用一种称为批量渲染的技术。通过这种技术,我们只需加载图像一次,并告诉ggez在所有需要渲染的20个位置渲染它。这样不仅图像只加载一次,而且每种图像只需调用一次渲染,这将显著提升性能。顺便提一下,有些引擎会自动处理这种批量渲染,但ggez不会,所以我们需要手动优化。
批量渲染实现
以下是我们实现批量渲染需要做的事情:
- 对于每个可渲染实体,确定我们需要渲染的图像和 DrawParams(这是我们目前给 ggez 的渲染位置指示)
- 将所有(图像,DrawParams)保存为一个方便的格式
- 按照 z 轴排序遍历(图像,DrawParams),每个图像只进行一次渲染调用
在深入渲染代码之前,我们需要进行一些集合的分组和排序操作,为此我们将使用itertools库。虽然我们可以自己实现分组功能,但没有必要重复造轮子。让我们将itertools添加为项目的依赖。
// Cargo.toml
[dependencies]
ggez = "0.9.3"
glam = { version = "0.24", features = ["mint"] }
hecs = "0.10.5"
itertools = "0.13.0"
我们也在渲染系统中导入它
还记得我们在动画章节中编写的get_image函数吗?它用于确定每一帧所需的图像。我们可以复用这个函数,只需确保它不实际加载图像,而是返回图像的路径。
现在让我们确定批量数据的格式。我们将使用HashMap<u8, HashMap<String, Vec<DrawParam>>>,其中:
- 第一个键(
u8)是z值 - 记住我们需要按z值从高到低渲染,以确保正确的顺序(例如地板应该在玩家下方等)。 - 另一个值是
HashMap,其中第二个键(String)是图像的路径。 - 最后,值是
Vec<DrawParam>,表示需要渲染该图像的所有位置参数。
现在我们来编写代码,填充rendering_batches哈希表。
最后,我们来实现批量渲染。之前使用的draw(image)函数不再适用,但幸运的是ggez提供了批量渲染API - SpriteBatch。另外注意这里的sorted_by,这是itertools提供的功能。
搞定!再次运行游戏,你应该会看到稳定的60FPS,操作也会更加流畅!
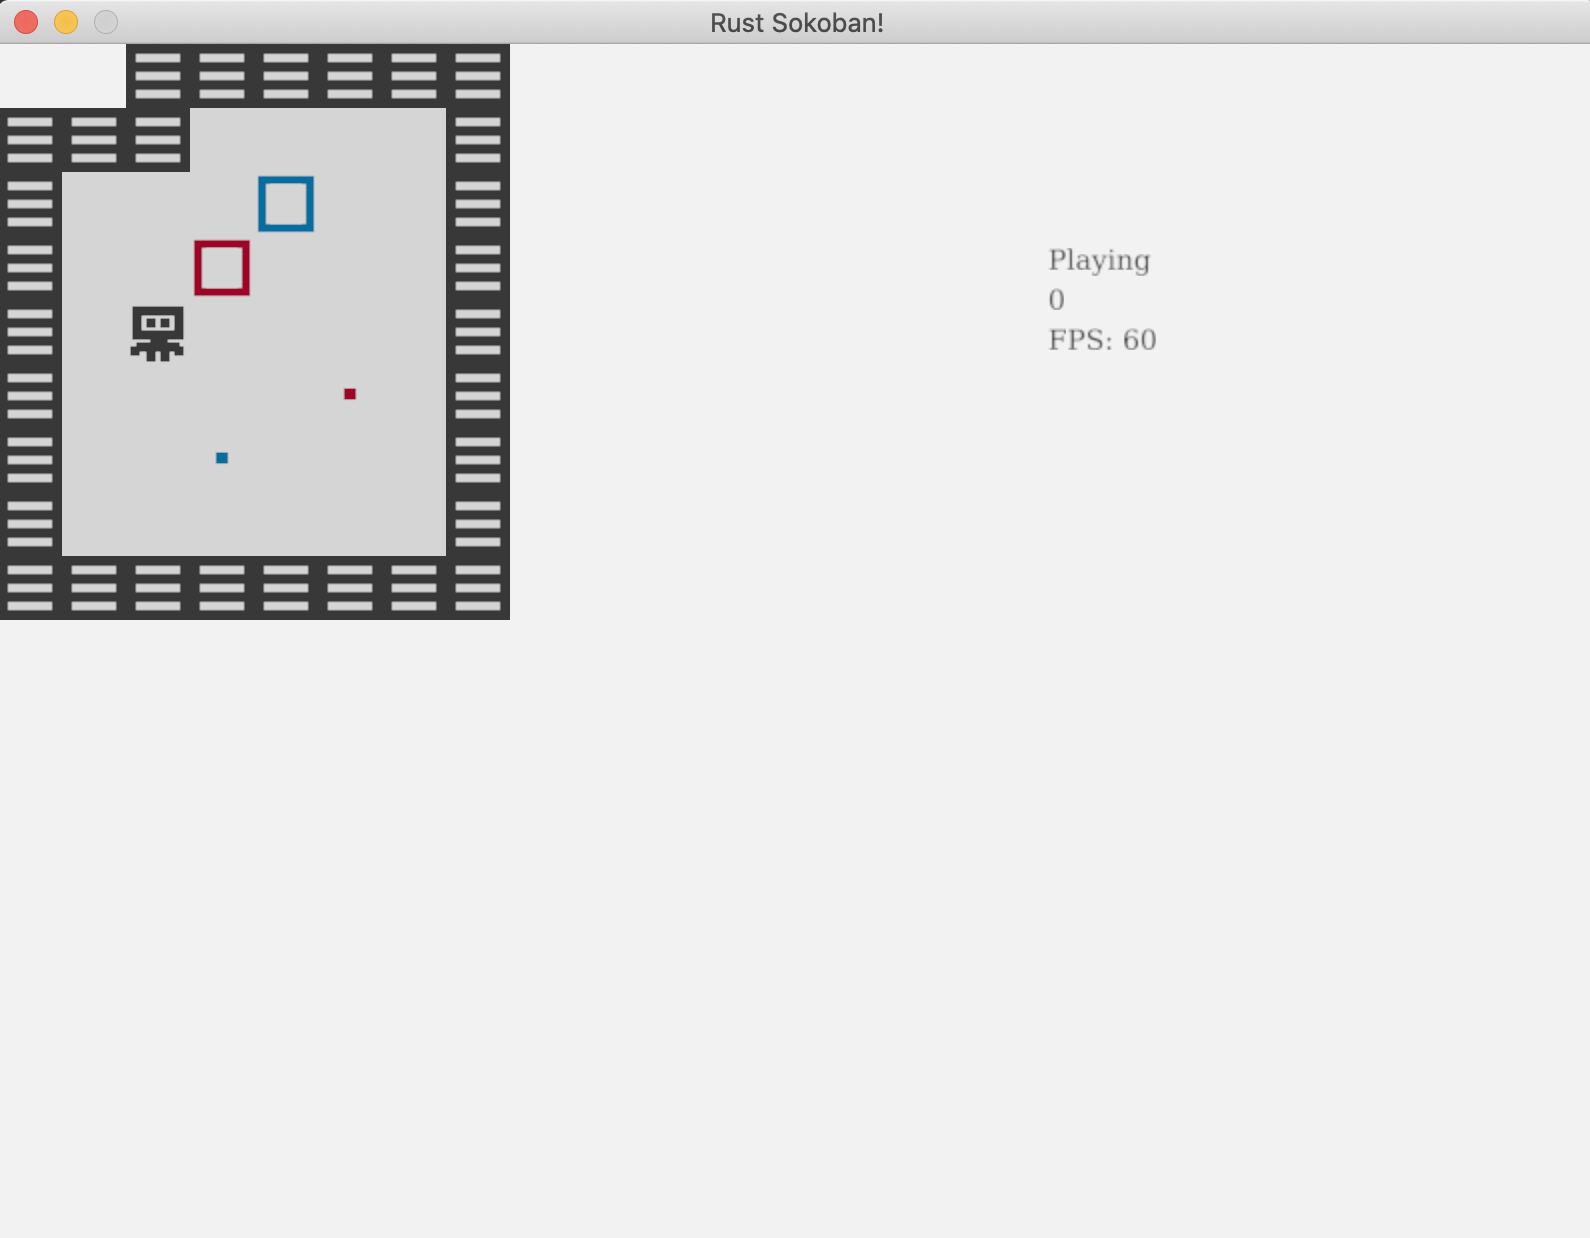
代码链接: 你可以在这里看到这个示例的完整代码。